Videon iOS
A video streaming iOS app with admin pane
by: W3 Engineers Ltd.
Email: info@w3engineers.com
At first thank you for purchasing this template. If you have any question or any
problem
regarding
this template, feel free to Contact
us via
info@w3engineers.com.
1 - Introduction
Videon iOS is built with native SwiftUI in XCode. It’s an iOS video application.
It has an admin panel by which admin can publish video to the app. Admin can publish
video by uploading
video or youtube link. Admin can also provide live streaming video of youtube.
It offers more than 22 screens and all are fully designed.
Videon iOS offers all required features, which can fulfil any modern application. It’s
easy to customize.
You can customize any screen as per your needs. It follows all the standards to fulfil
user’s requirements.
2 - Folder Structure
2.1Unzip the file.
2.2You see the following folders:
Videon (contain the iOS project files)
videon-admin (admin panel files)
videon.sql (sql file)
Server_Configuration_setup_process.mp4 (Video
Tutorial)
3 - Requirements
XCode 15.3
iOS version 17.0 or later
PHP 7+
mysql database
We have made important steps yellow for up and running the
project.
4 - Installation of the Admin panel
4.1PHP version 7+ required(So update your Xampp control
panel or install new one).
4.2Database Setup
In order to setting up database ,
first you create a database “videon_db”.
Then you can easily import the
videon_db.sql file in your server.
Link the
database to admin panel
For linking up, first you will find
the file from this directory:
Insert the dbname
(if it is empty),
username, password.
4.3Installation on Locally
Make sure that you have already
installed Xampp control panel.
Copy the
videon-admin folder and paste it in your
Xampp's htdocs folder.
Now run your Xampp
Control Panel.
Create a database.
Database name will be
"videon_db" or any other name
Import the
videon.sql file in your created database.(videon.sql file is
located in the Main_files.)
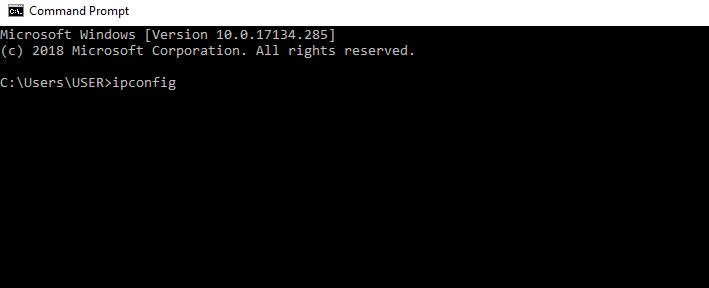
Find your pc ip
address.
Open Command Promt and type =>
ipconfig
Then find the IPv4 address
(example: 192.168.2.88),copy the address
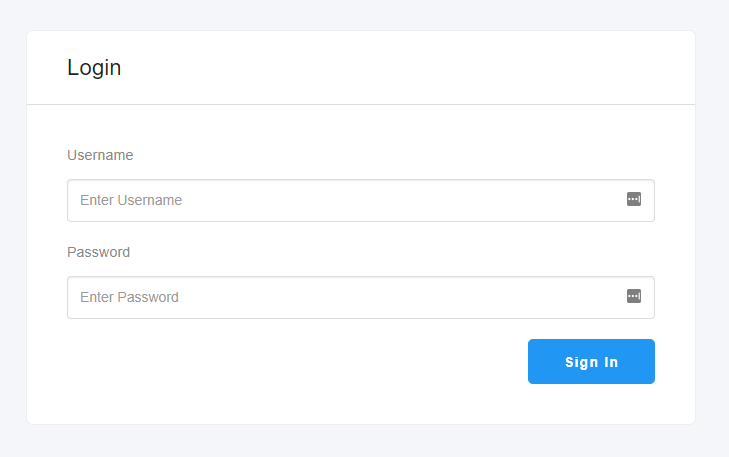
Open your browser.In your browser
url type:
http://your_ip_address/videon-admin
For example, my pc ip address is: 192.168.2.88
So the url will be: http://192.168.2.88/videon-admin
If you see the admin login page,
then admin-panel work successfully.
Username: admin
Password: 123456
4.4Installation on Server
To install it on the live server,
First import the databse to the server.
Then copy the project folder and
paste
it to your live server folder.
Please give
the writeable 777 permission
to the following folders and the subfolders inside them:
public\uploads
public\uploads\thumb
Login as Admin:
UserName: admin
Password: 123456
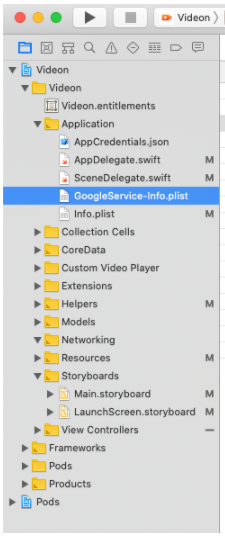
5 - Installation of IOS
Open the Videon project on XCode and
Follow the reference for create Firebase project
Reference:
https://firebase.google.com/docs/ios/setup
and download GoogleService-Info.plist file and add it to the Xcode Project
6 - Customizing the App
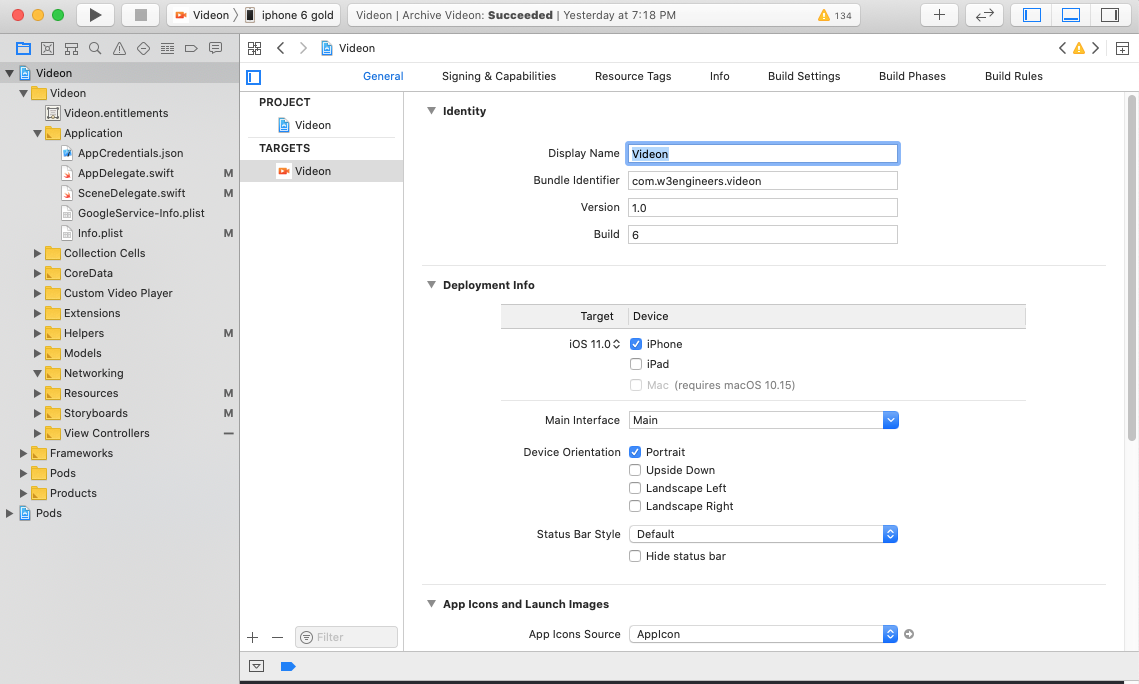
6.1Change app name and bundle identifier
Click the project file from the
left and
then choose the General tab. It will open settings for this project
Update Display Name for App
Name and Bundle Identifier
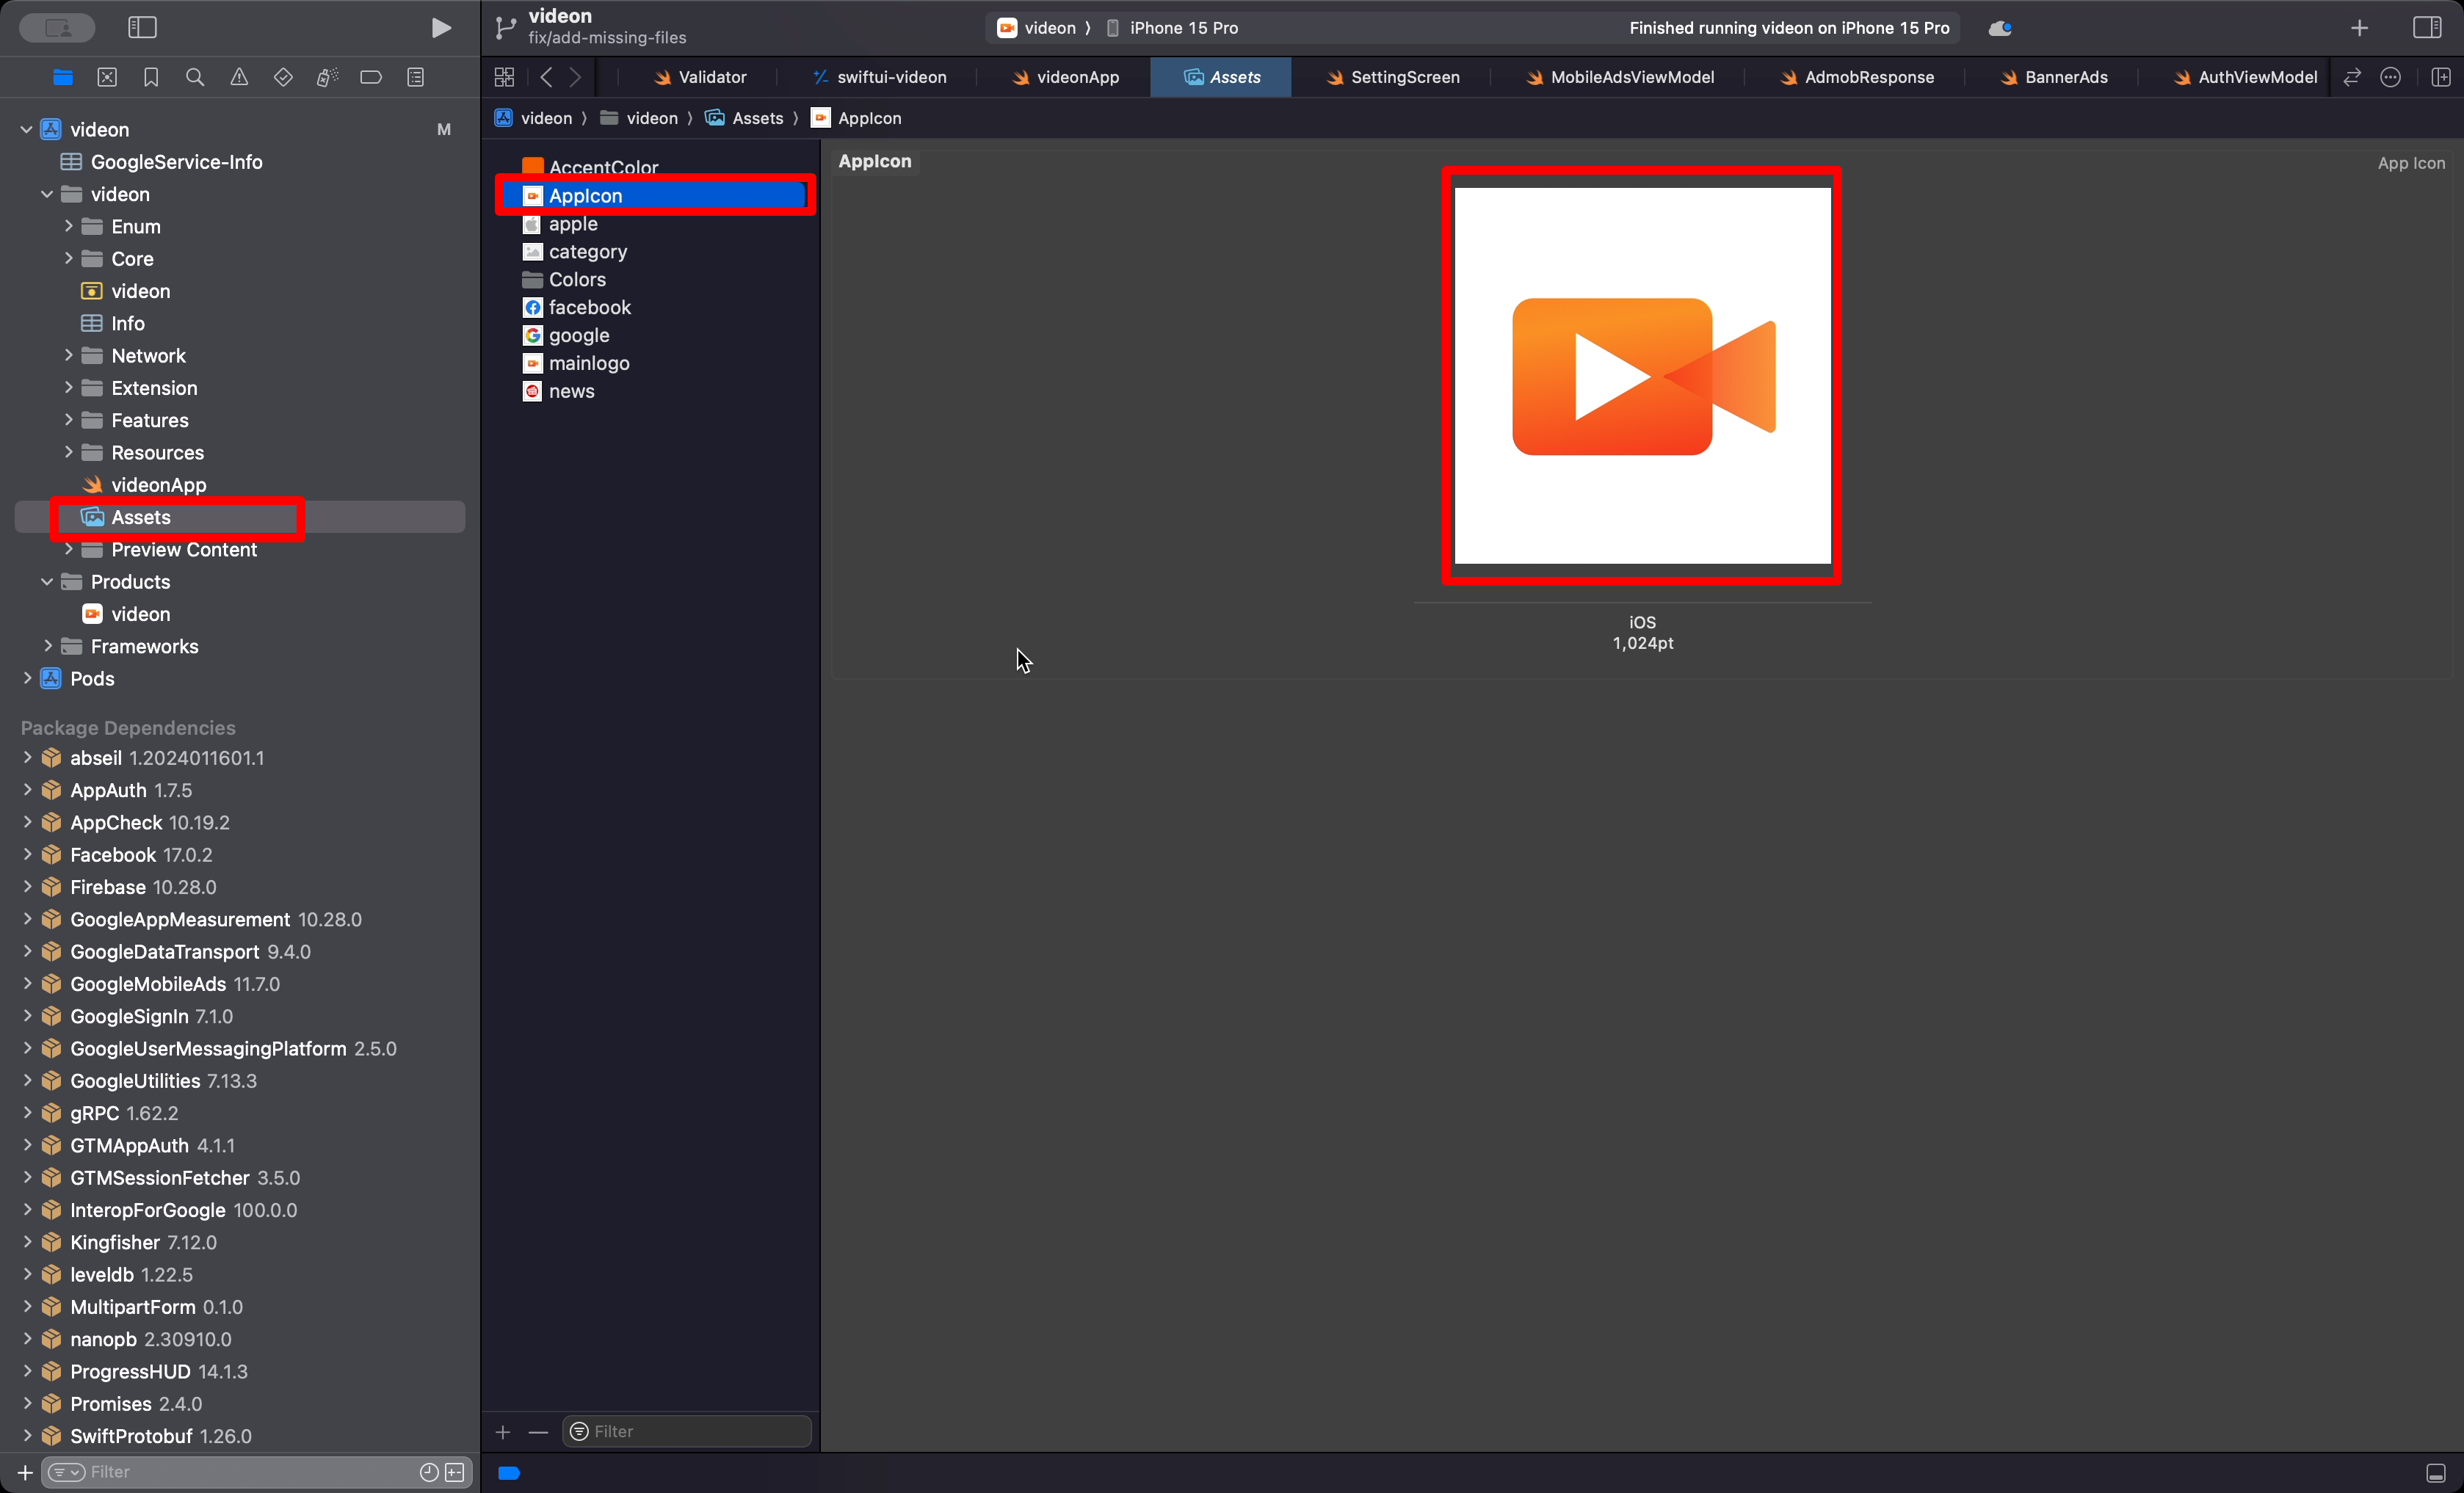
6.2Change App Logo
Open
Assets file and choose AppIcon on top, and Provide your app logo.
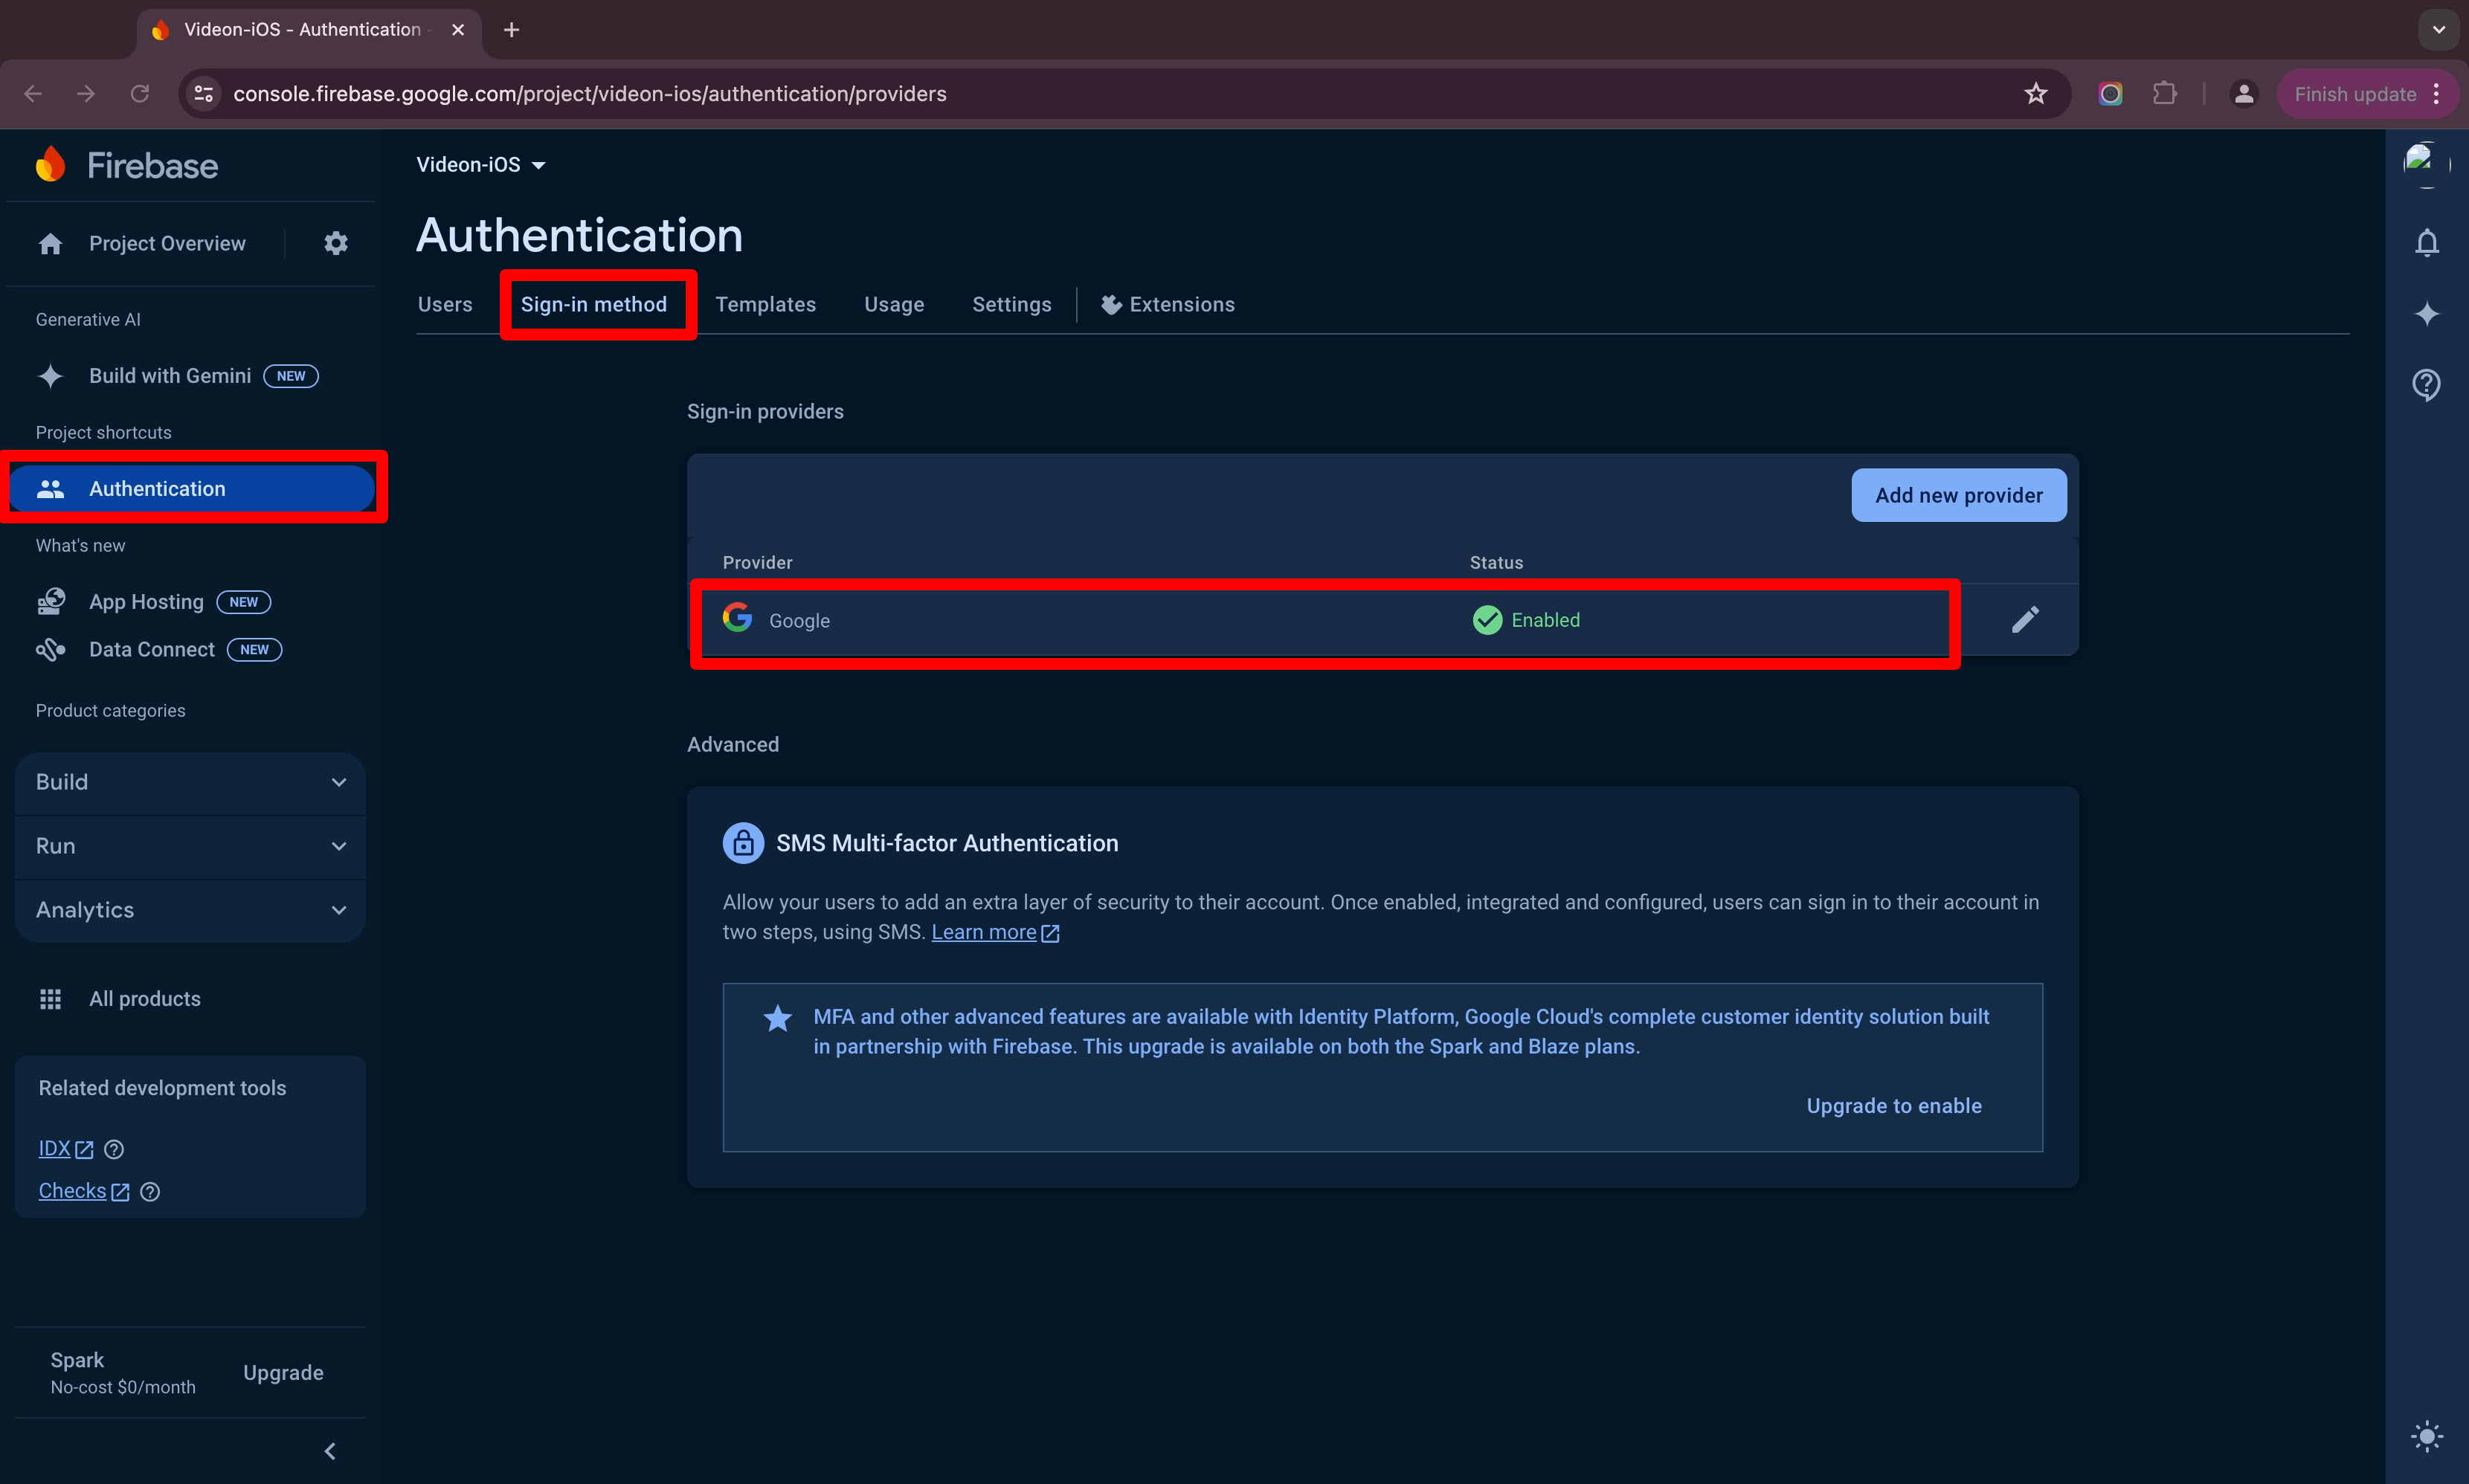
7 - Configure Google Sign-In
Go to the Firebase console ->
Authentication and Click on the Sign-in method tab then enable Google
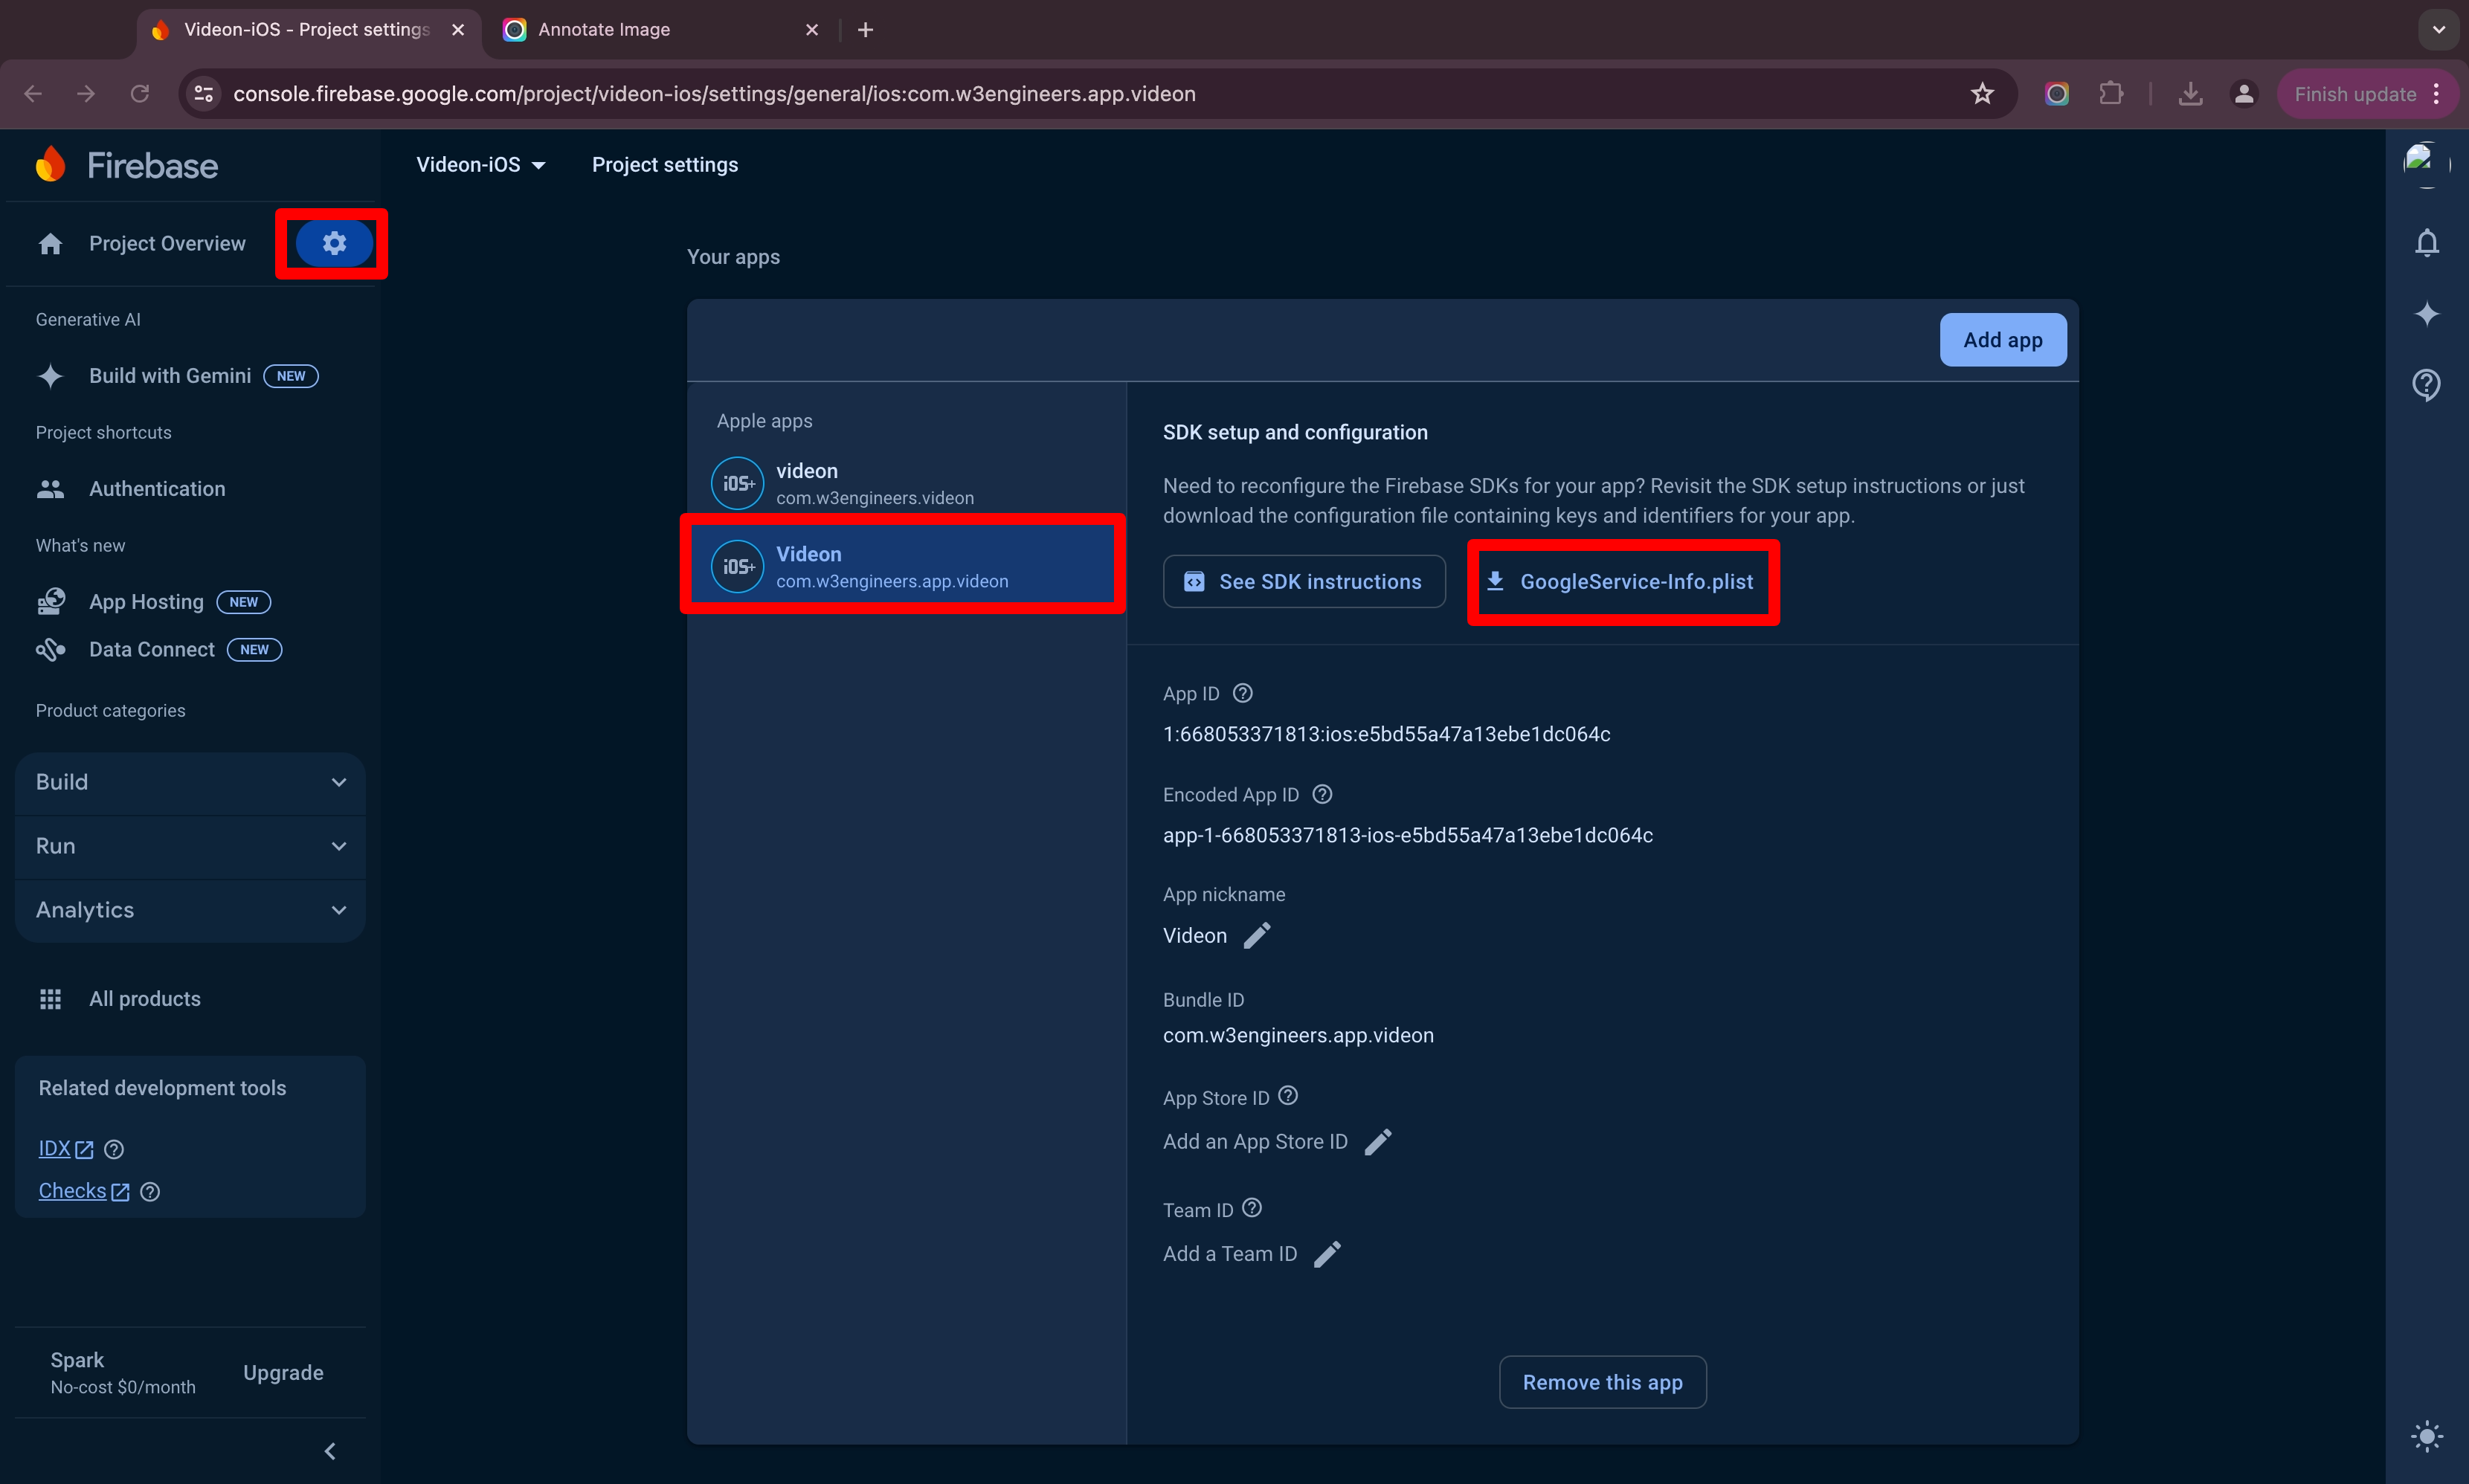
Now download the
GoogleService-Info.plist file again and replace the existing one by this.
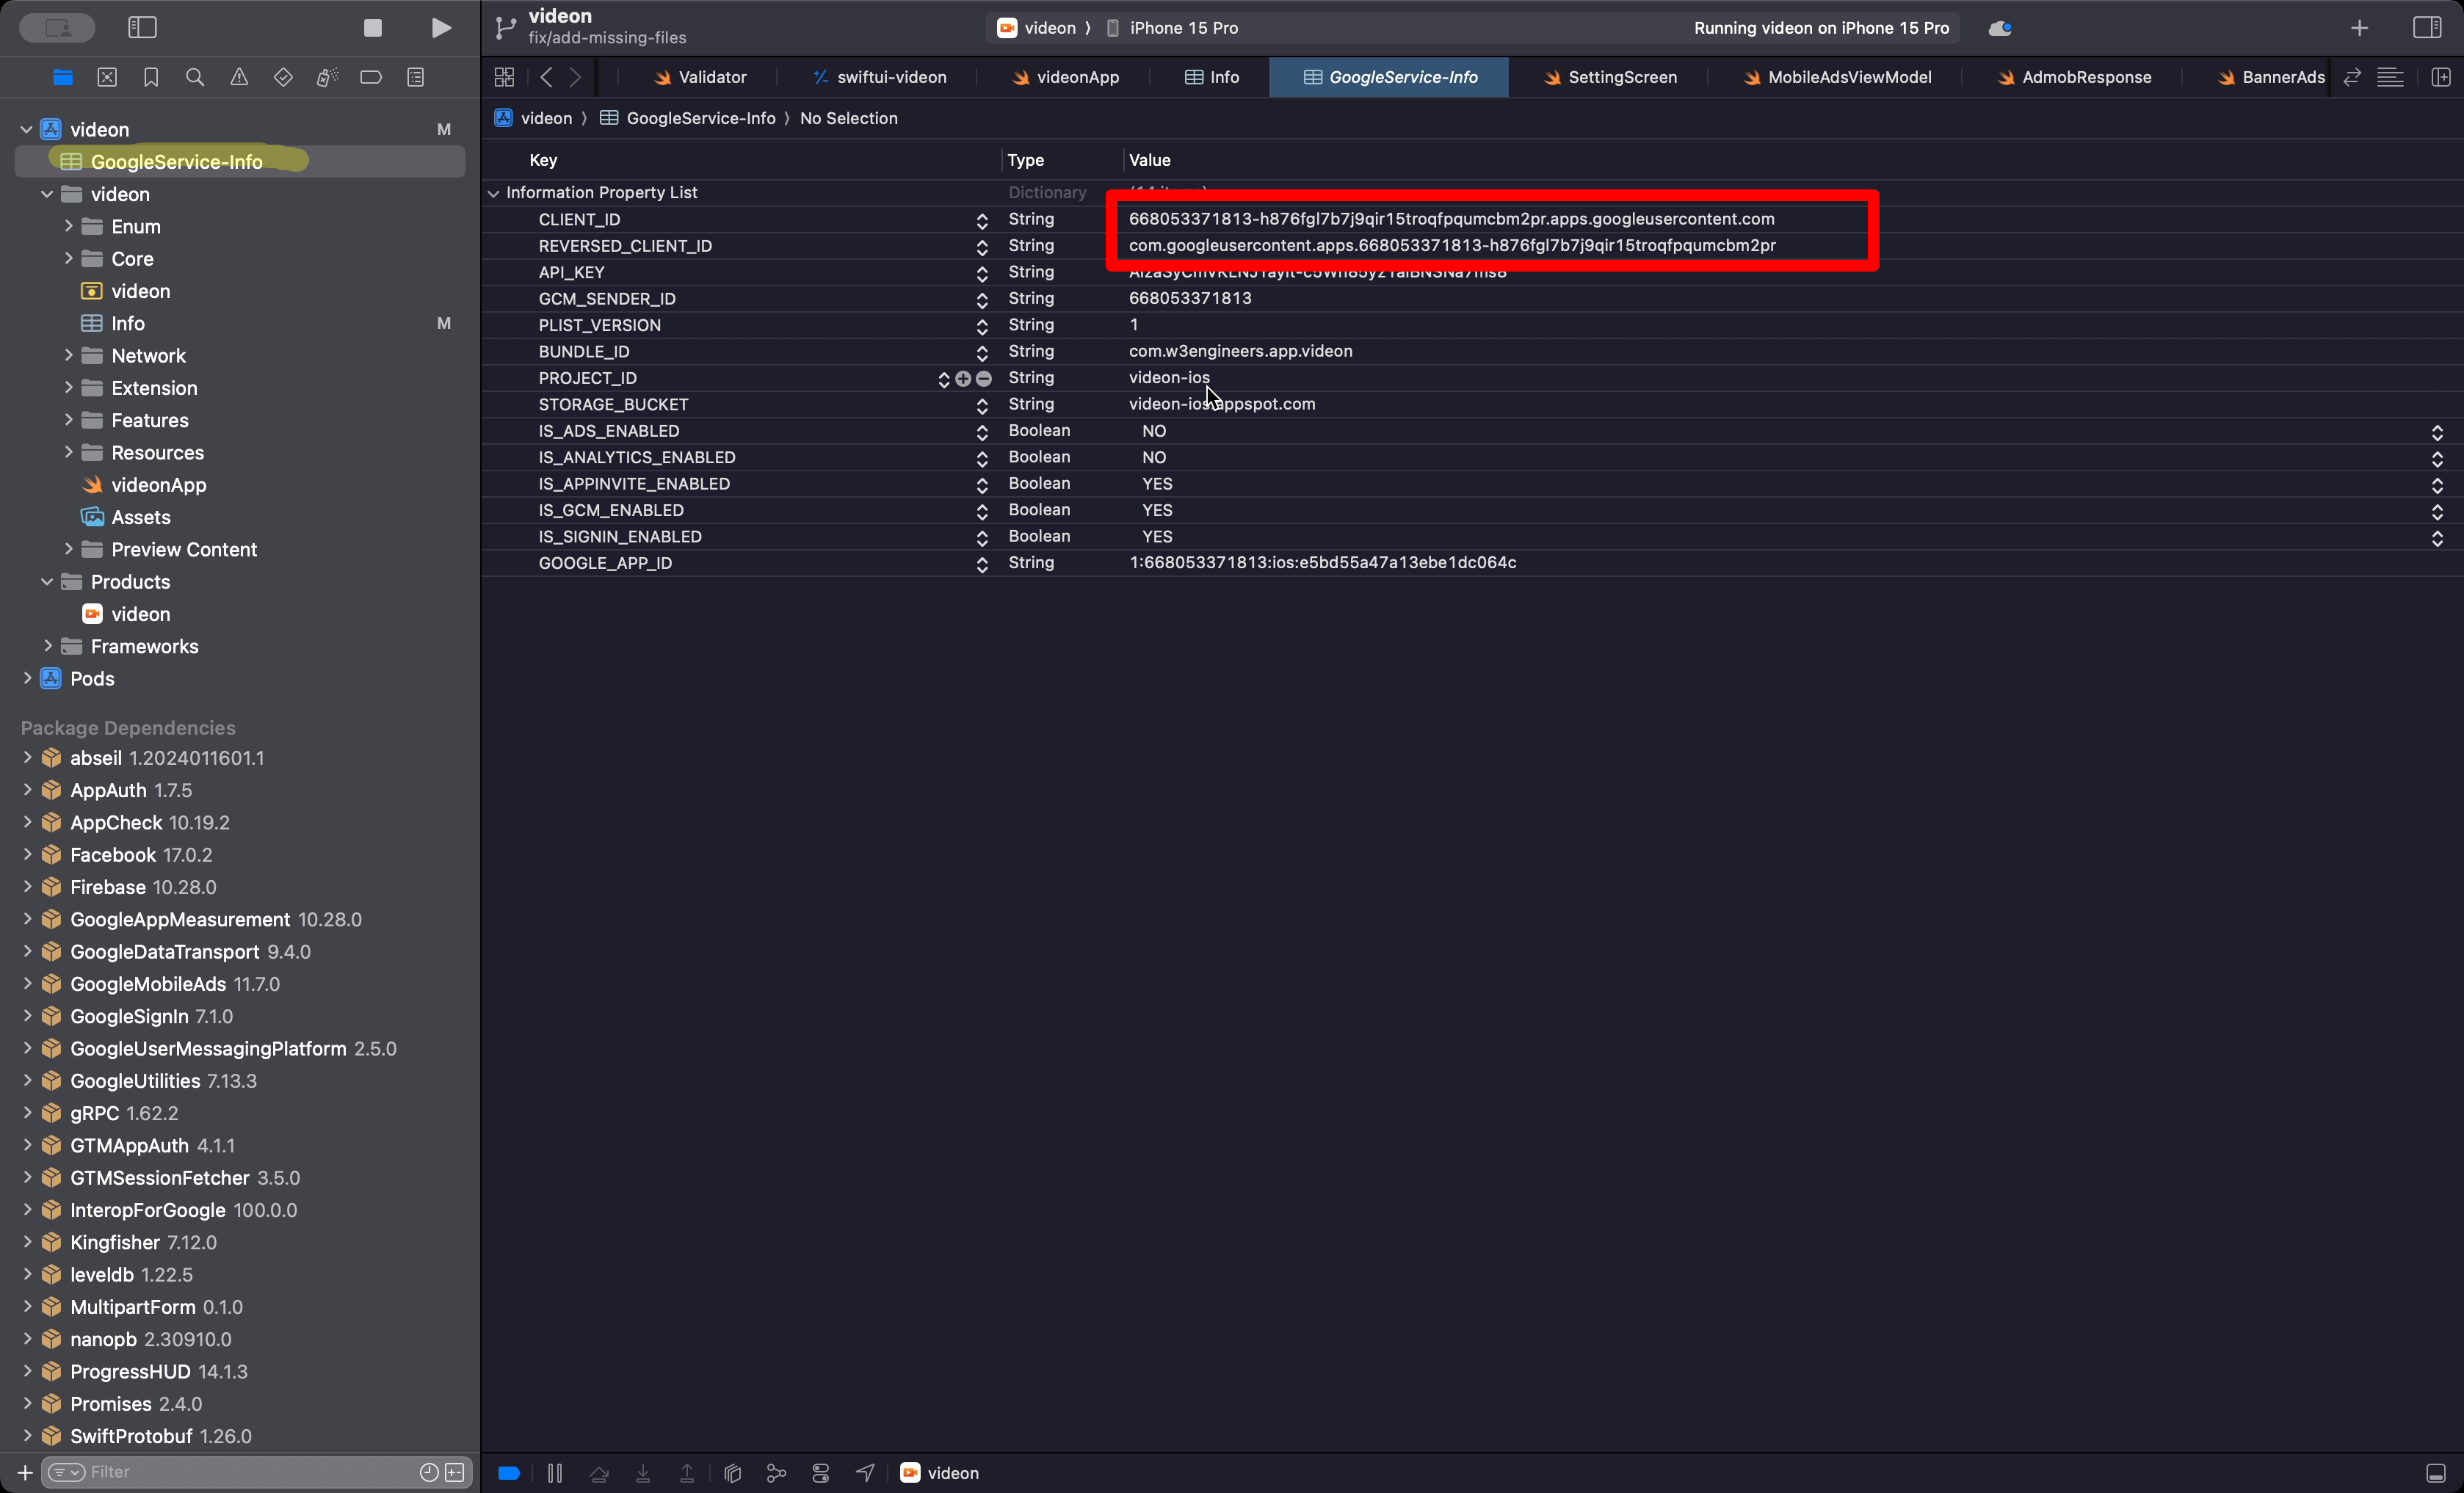
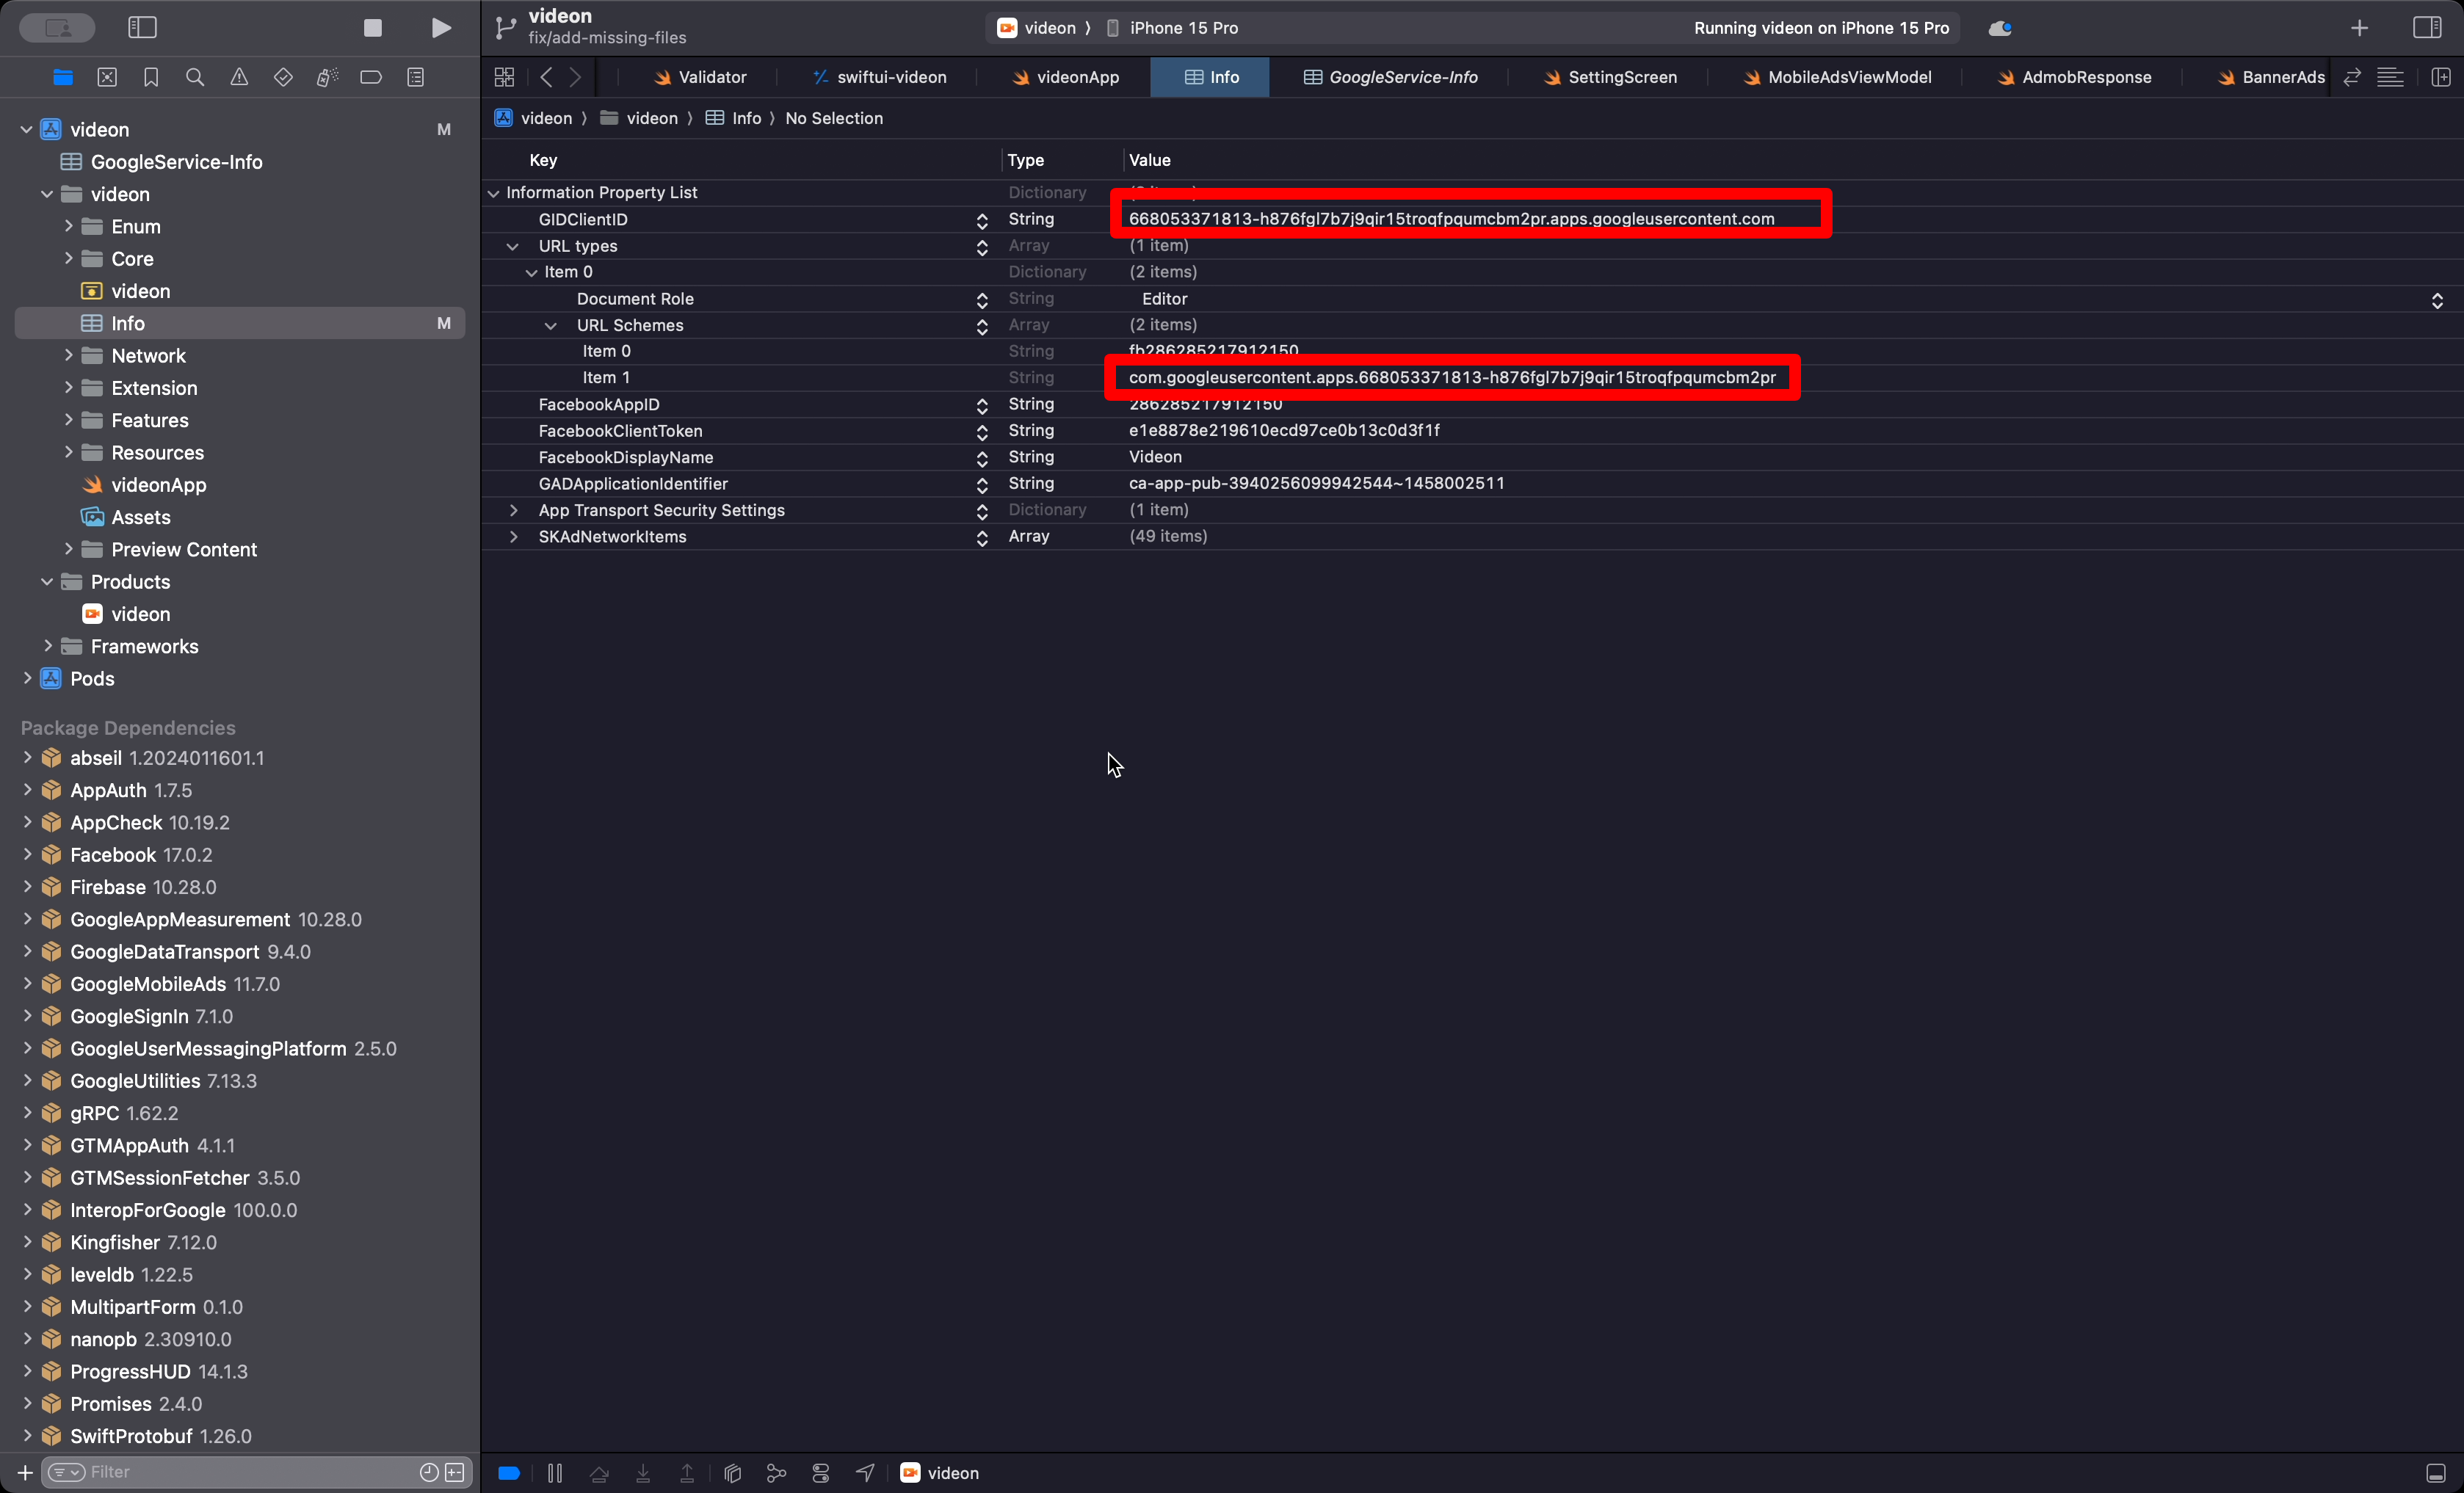
Open the GoogleService-Info.plist
file
and copy the CLIENT_ID & REVERSED_CLIENT_ID
Open the Info.plist file and change
the GID_CLIENT_ID by
CLIENT_ID & item 1 by REVERSED_CLIENT_ID
8 - Configure Facebook Sign-In
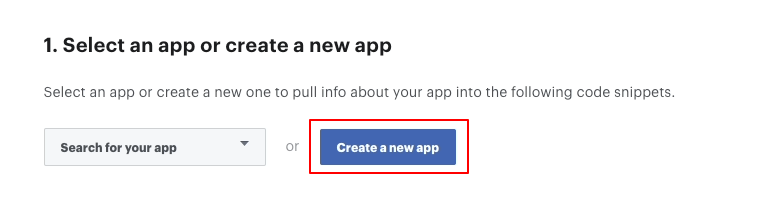
Go to:
Facebook Login for IOS - Quickstart and Click Create a New App
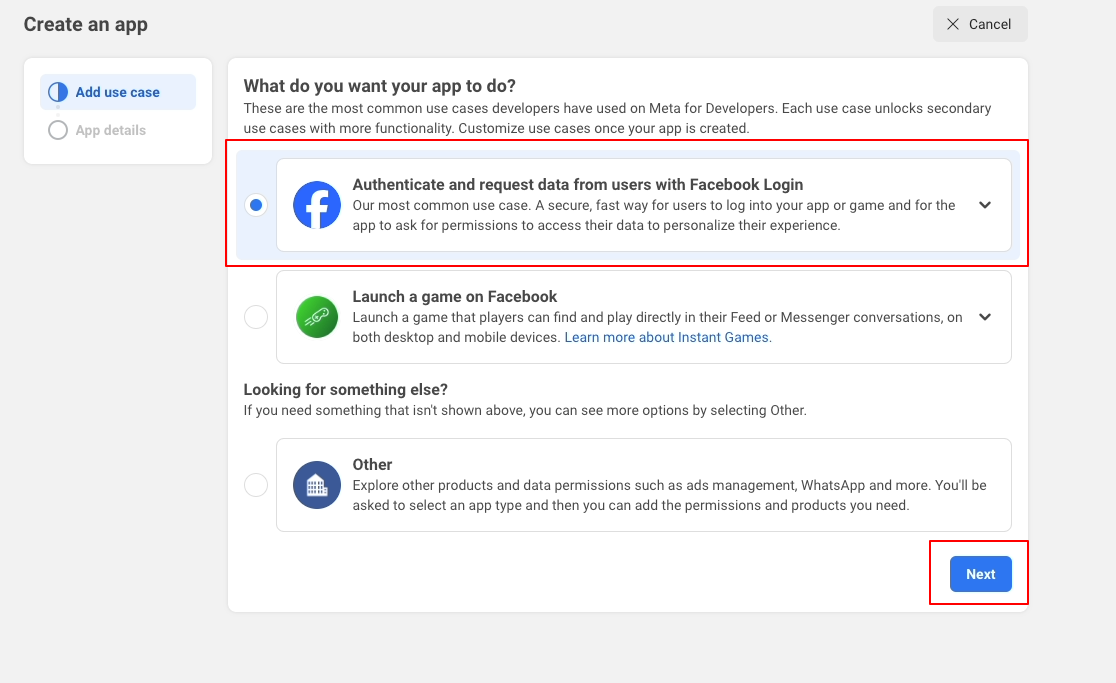
Click Authenticate and request data
from users with Facebook Login -> Next
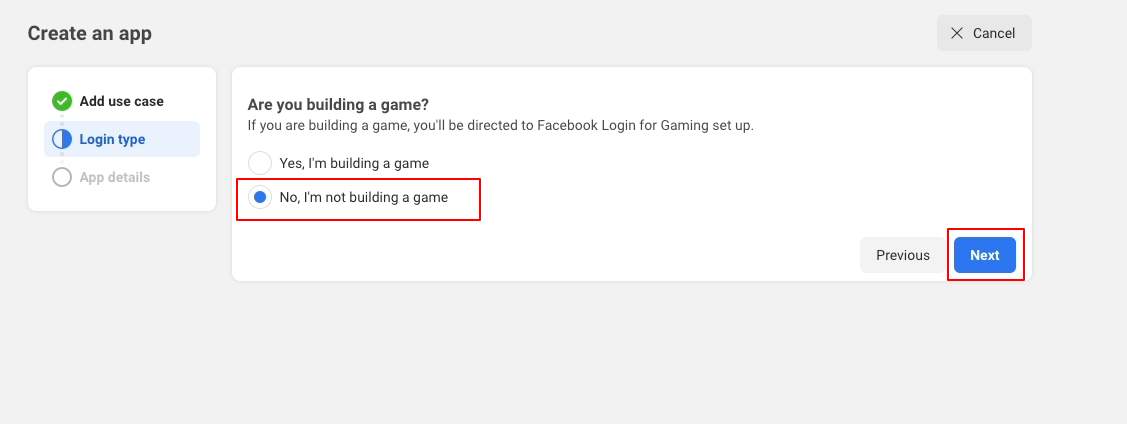
Click No, I'm not building a game
-> Next
Put app name and contact email ->
Create app
Go to:
Facebook Login for IOS - Quickstart again and select your app
Go to:
Register and Configure Your App with Facebook and select your app, put your app
id and save it
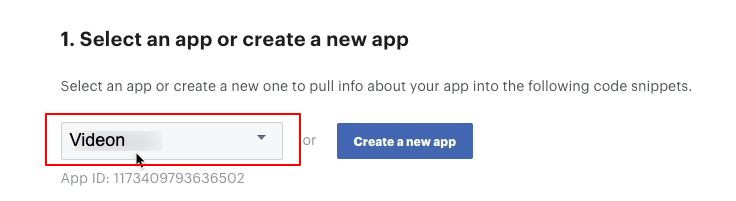
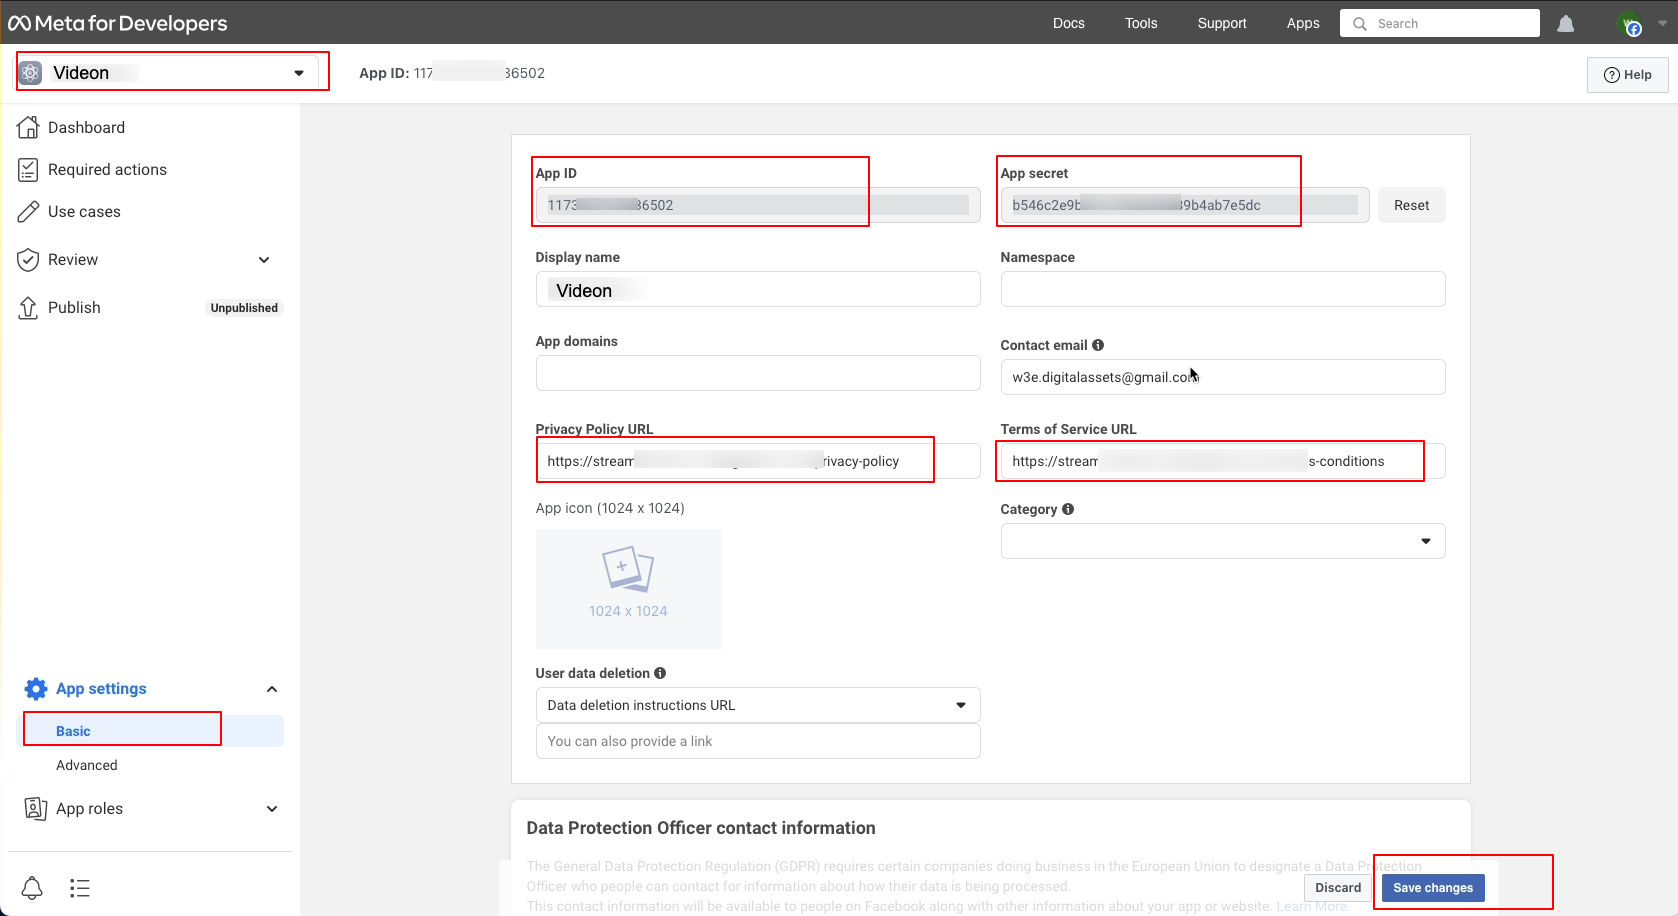
Go to Facebook Developer Console,
select your project -> App settings-> Basic -> add Privacy Policy URL & Terms of Service
URL. Copy the App Id and App secret
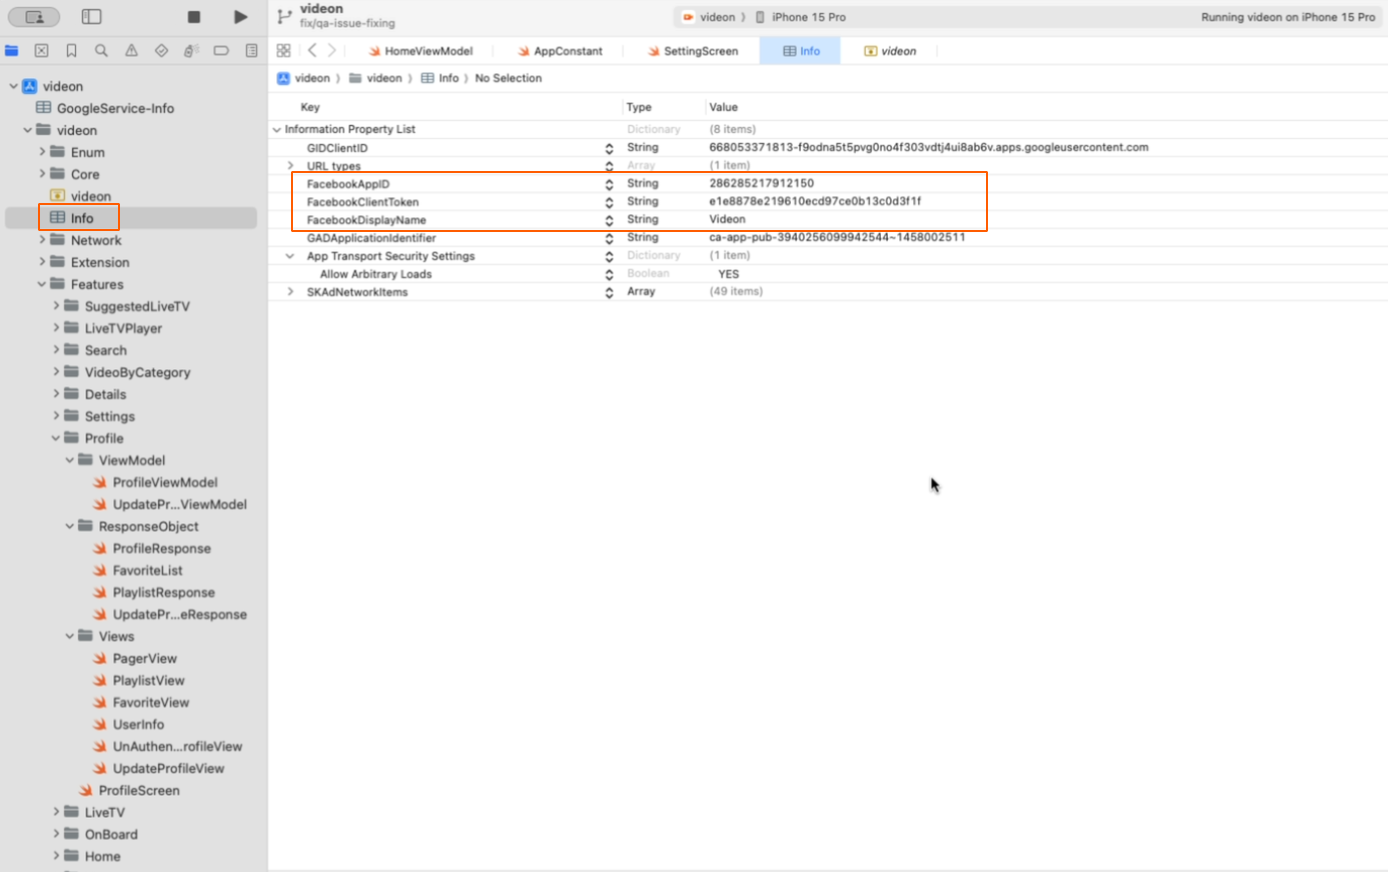
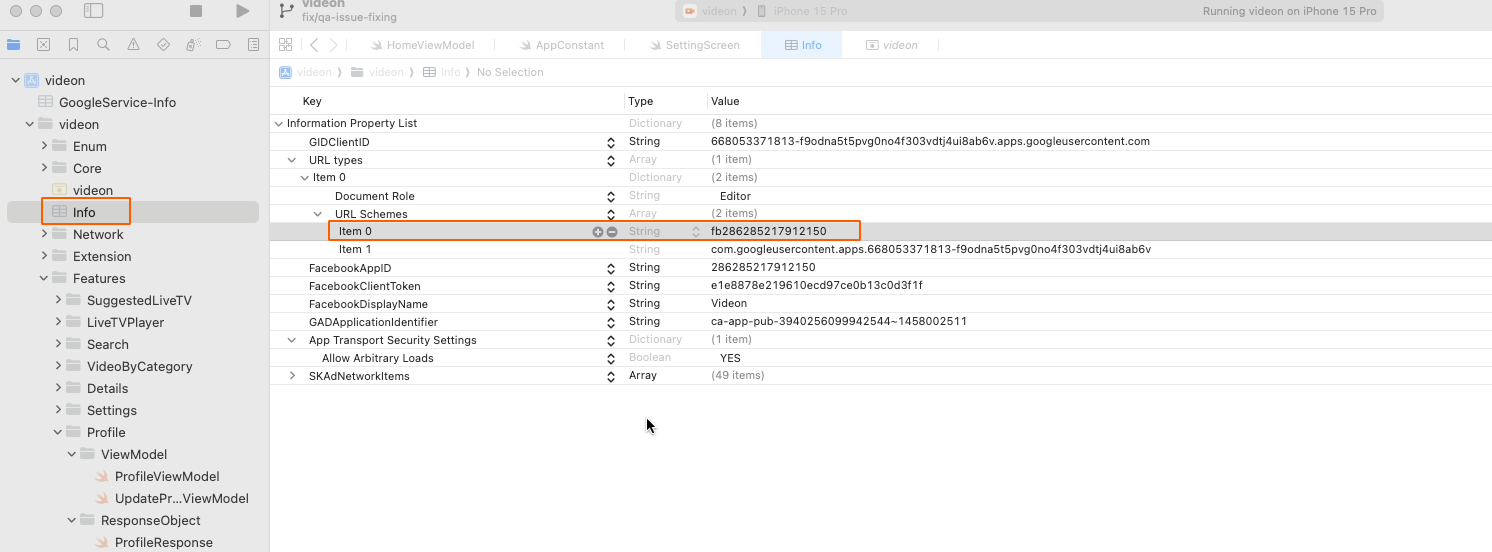
Open Info.plist and change the
values for 'FacebookAppID ' and ' FacebookClientToken' and 'FacebookDisplayName' to your
own
Also change the app id from here
9- Configure Push Notification
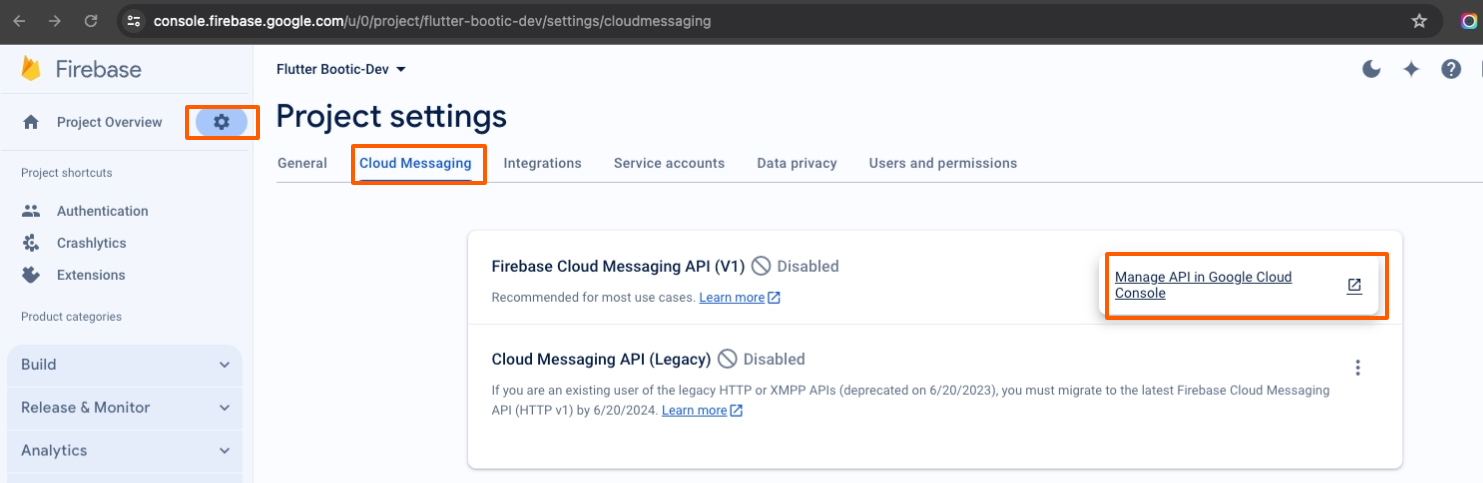
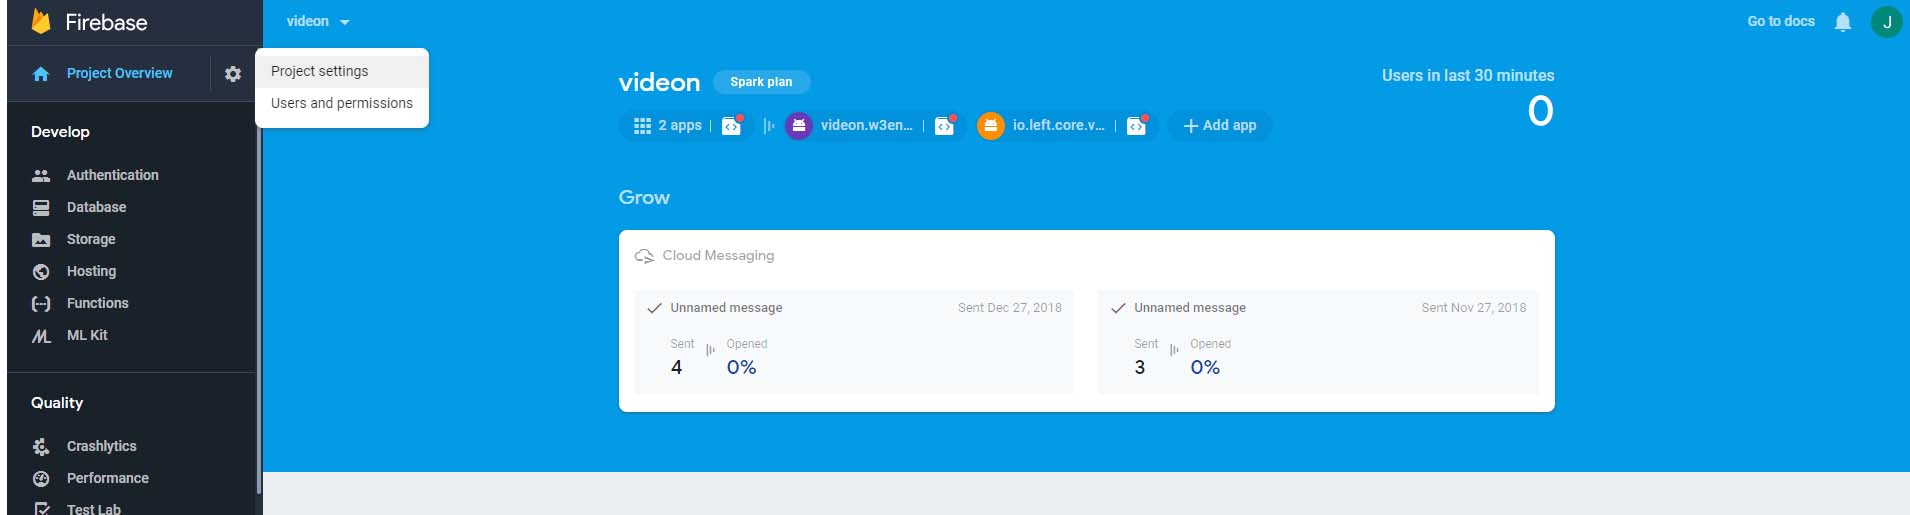
Open the Firebase Console and
select your project. Click the Settings icon on the left sidebar and choose Cloud
Messaging.
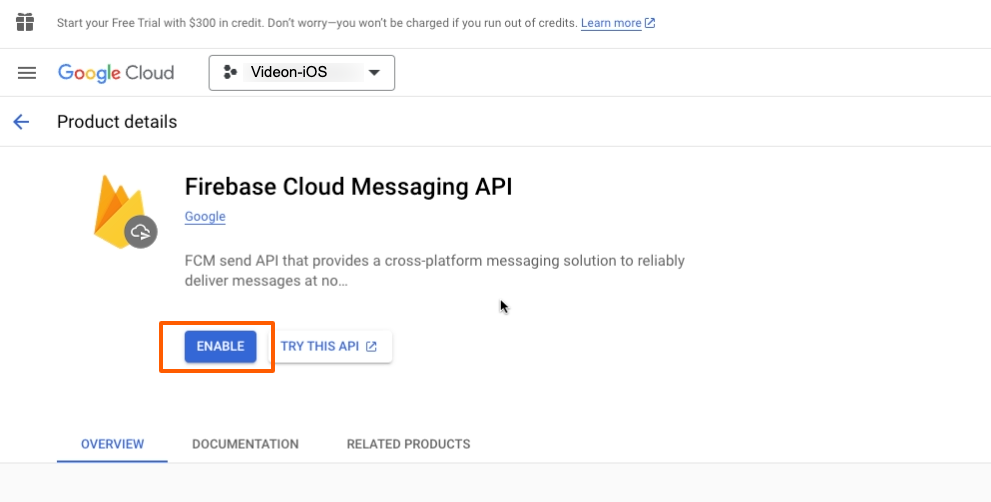
Click on the Manage API in Google
Cloud Console link, which opens the Google Cloud Console in a new tab. Ensure the
Firebase Cloud Messaging API is enabled. If it's not, enable it
Ensure the Firebase Cloud Messaging
API is enabled. If it's not, enable it
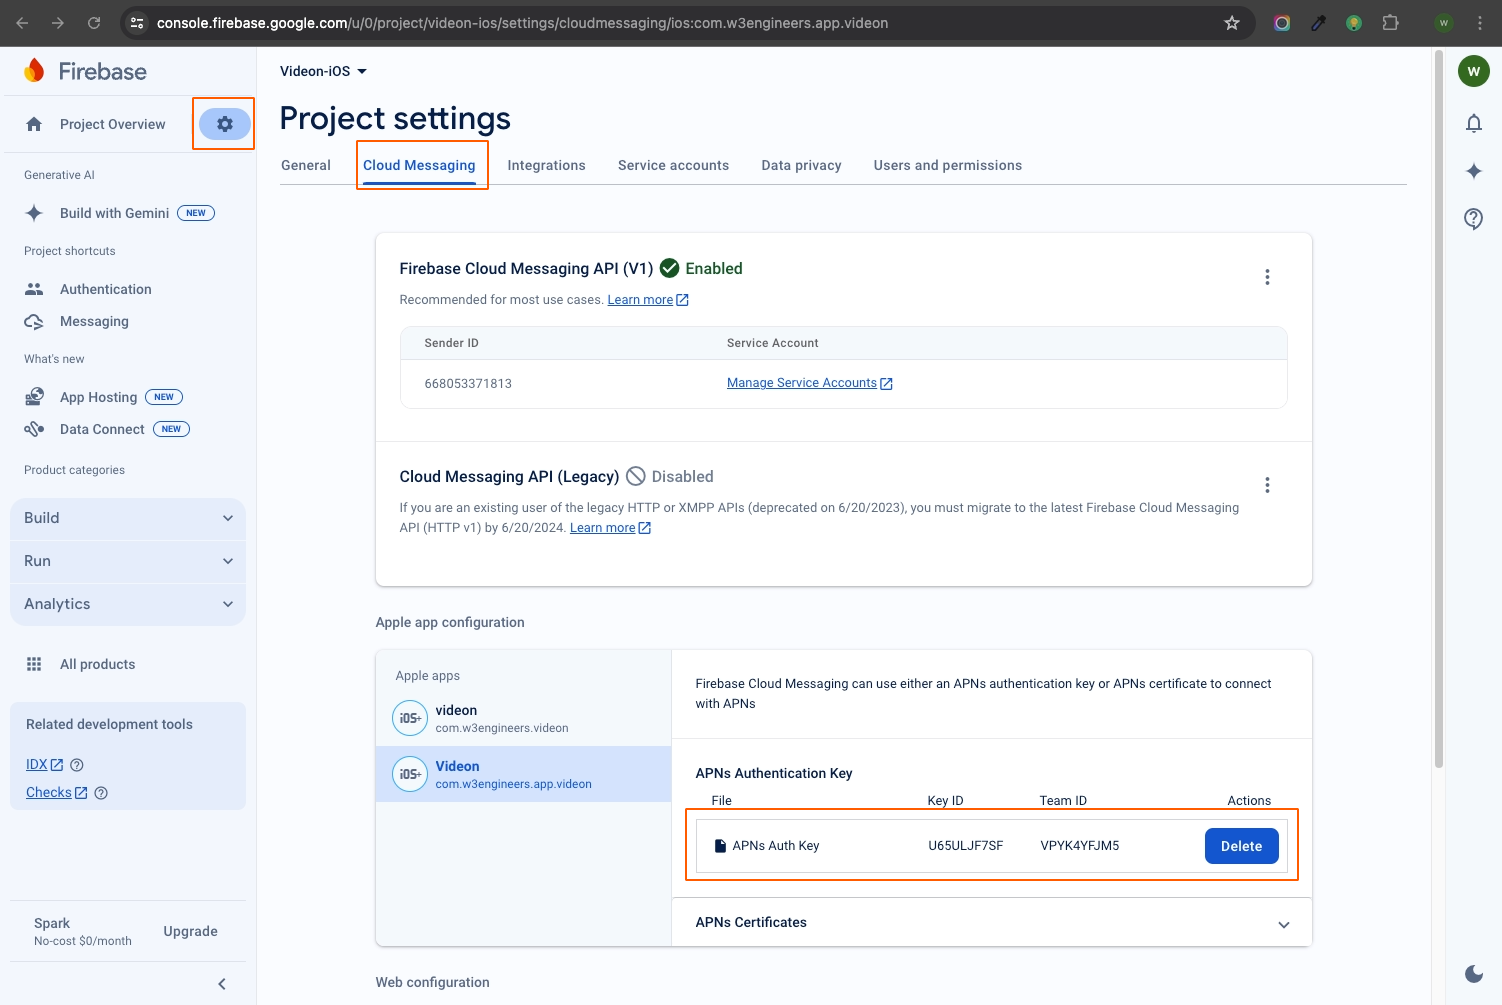
Now upload the APN's from Apple
developer console
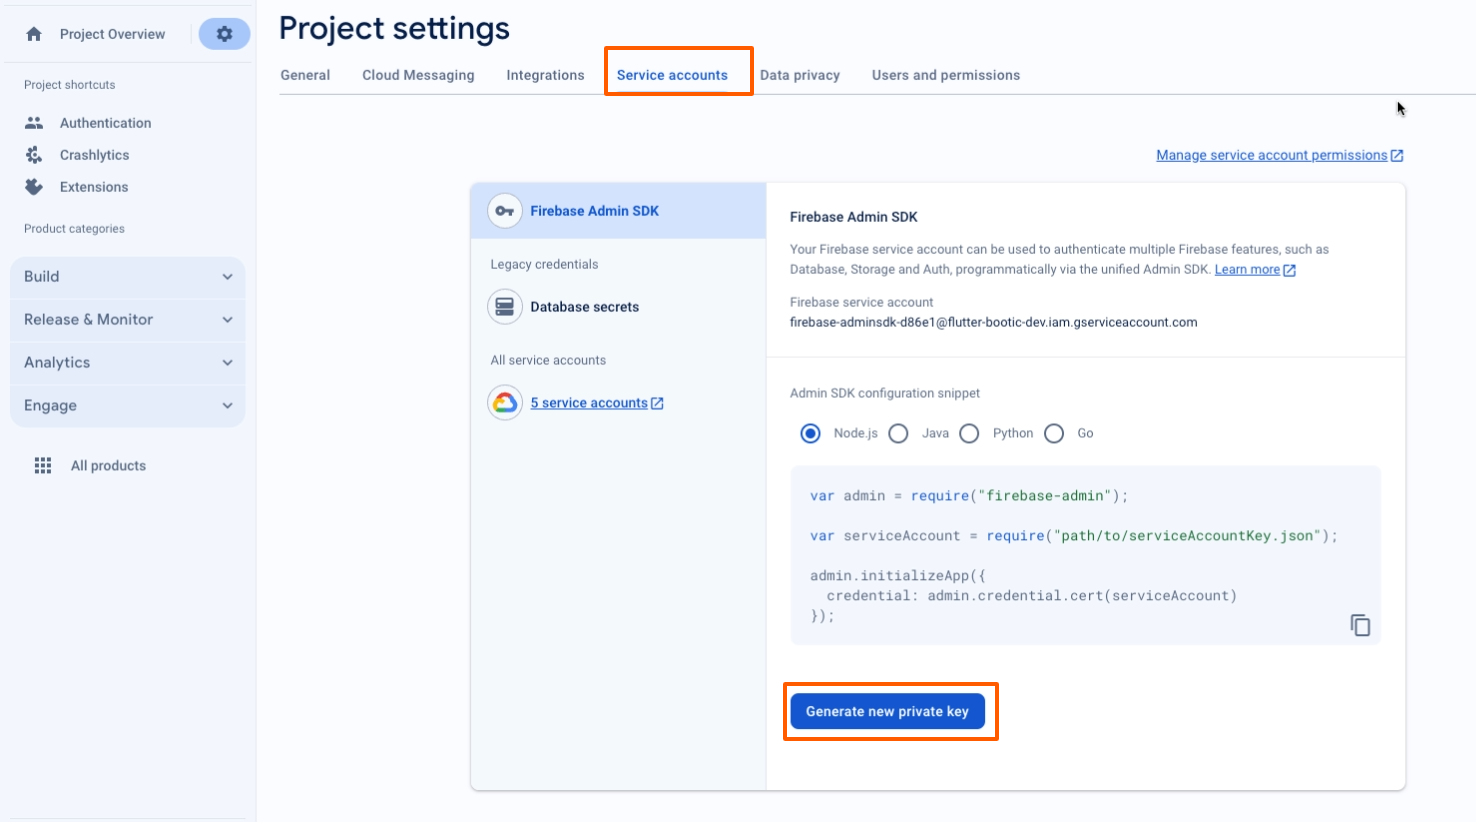
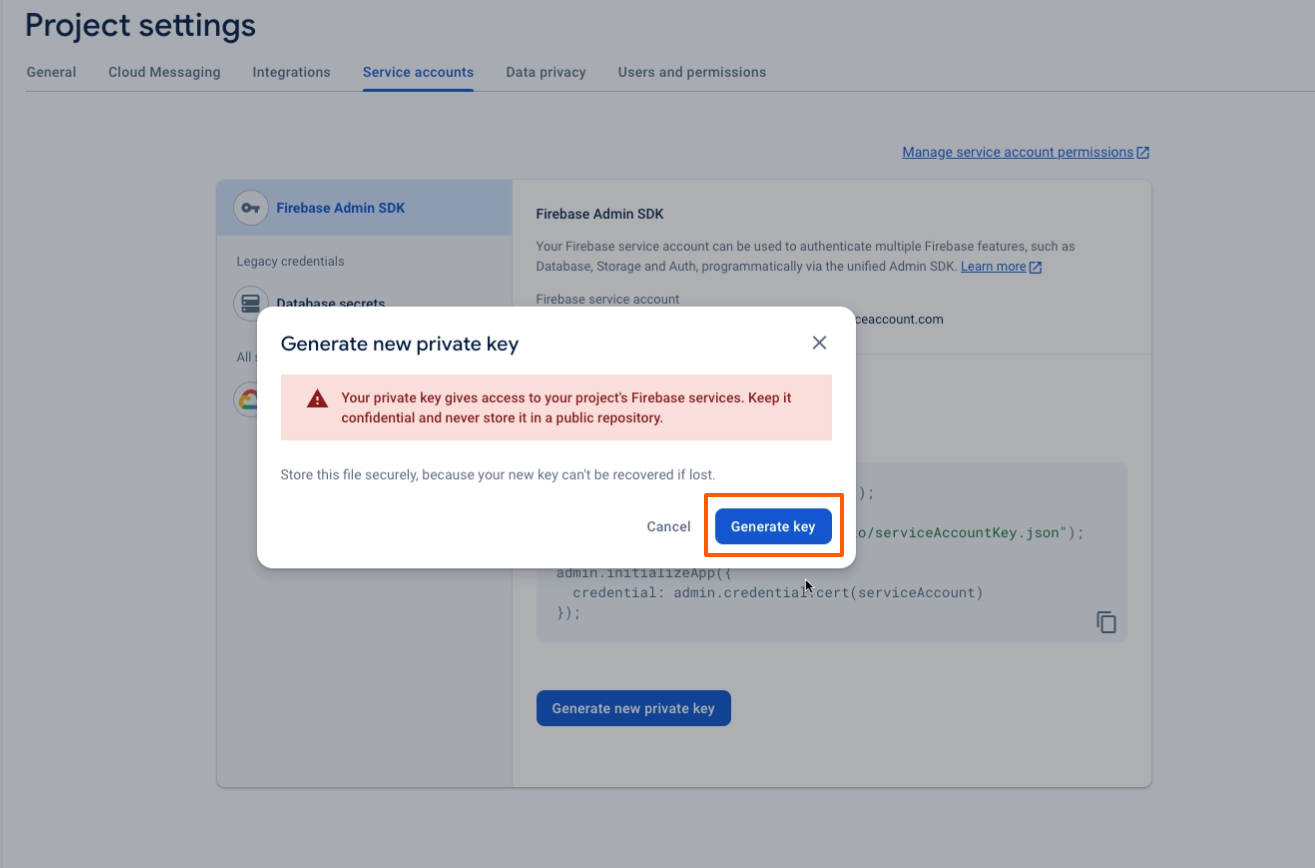
Go back on the Firebase Console and
click 'Service Account' button and click on the 'Generate new private key' button
Click Generate Key to download the
service account JSON file to your local machine.
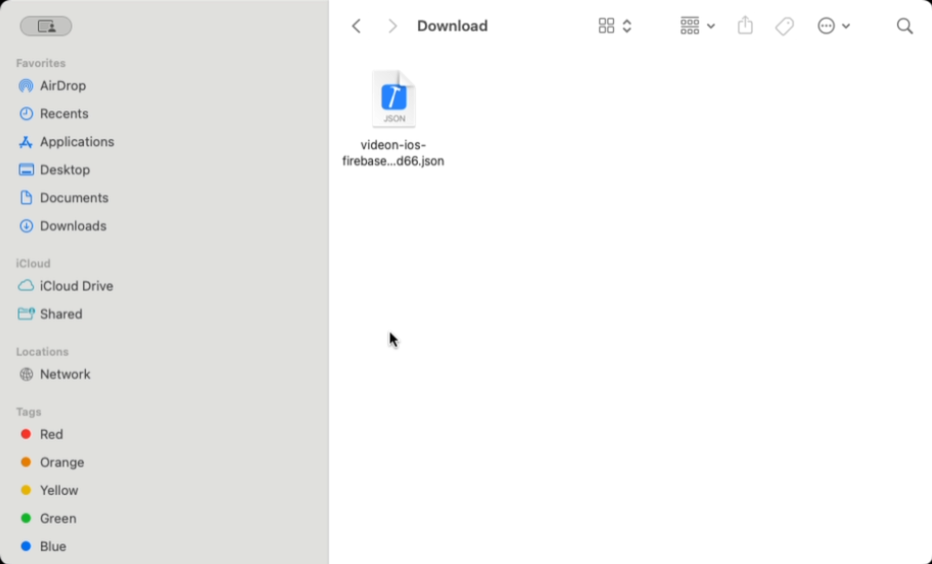
Locate the downloaded JSON file on
your computer and copy it
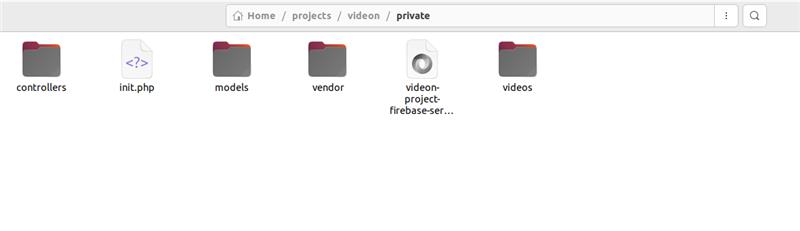
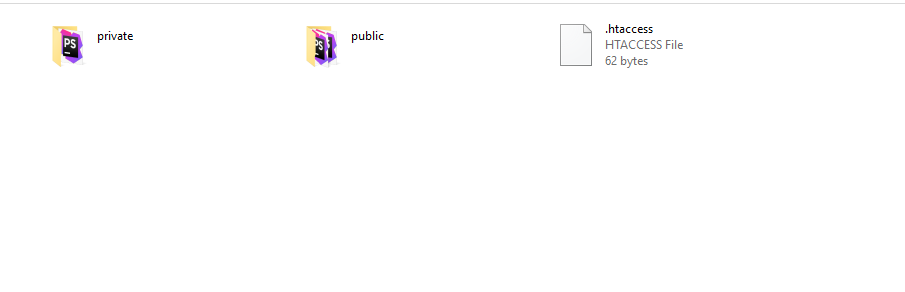
Locate the videon-admin -> private
folder and delete the 'videon-project-firebase-service-account.json' file
Now paste the coppied file, and
make sure you rename it by 'videon-project-firebase-service-account.json'
10 - Admob Configuration
Note : Real admob adds will be shown only after the publication into the
google play store.
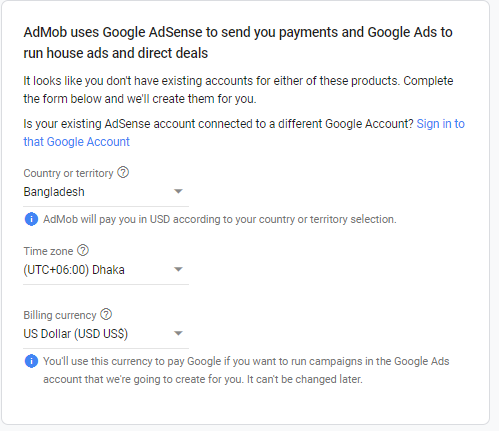
Login with your Email id
Go to this link
If its your first app tghen you
have to select your country,
timezone and currency
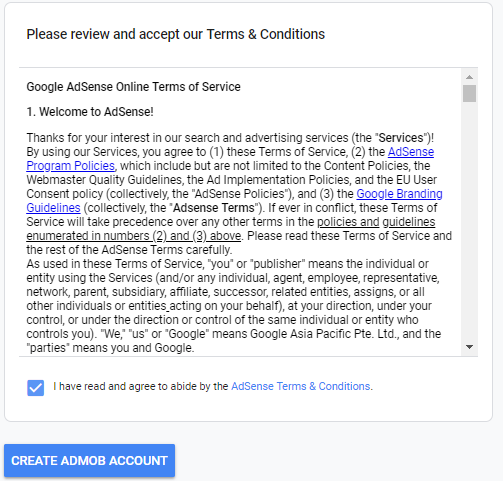
Then you have to agree of the terms
and condition and
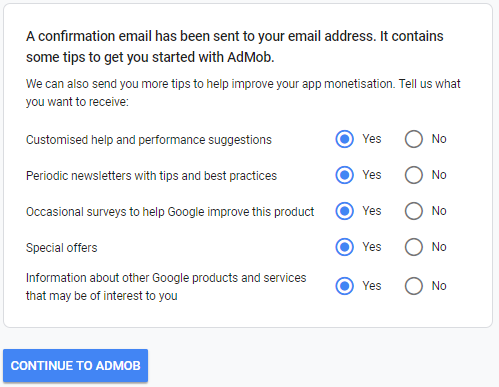
Create Admob Account
Then you click Continue to
Admob
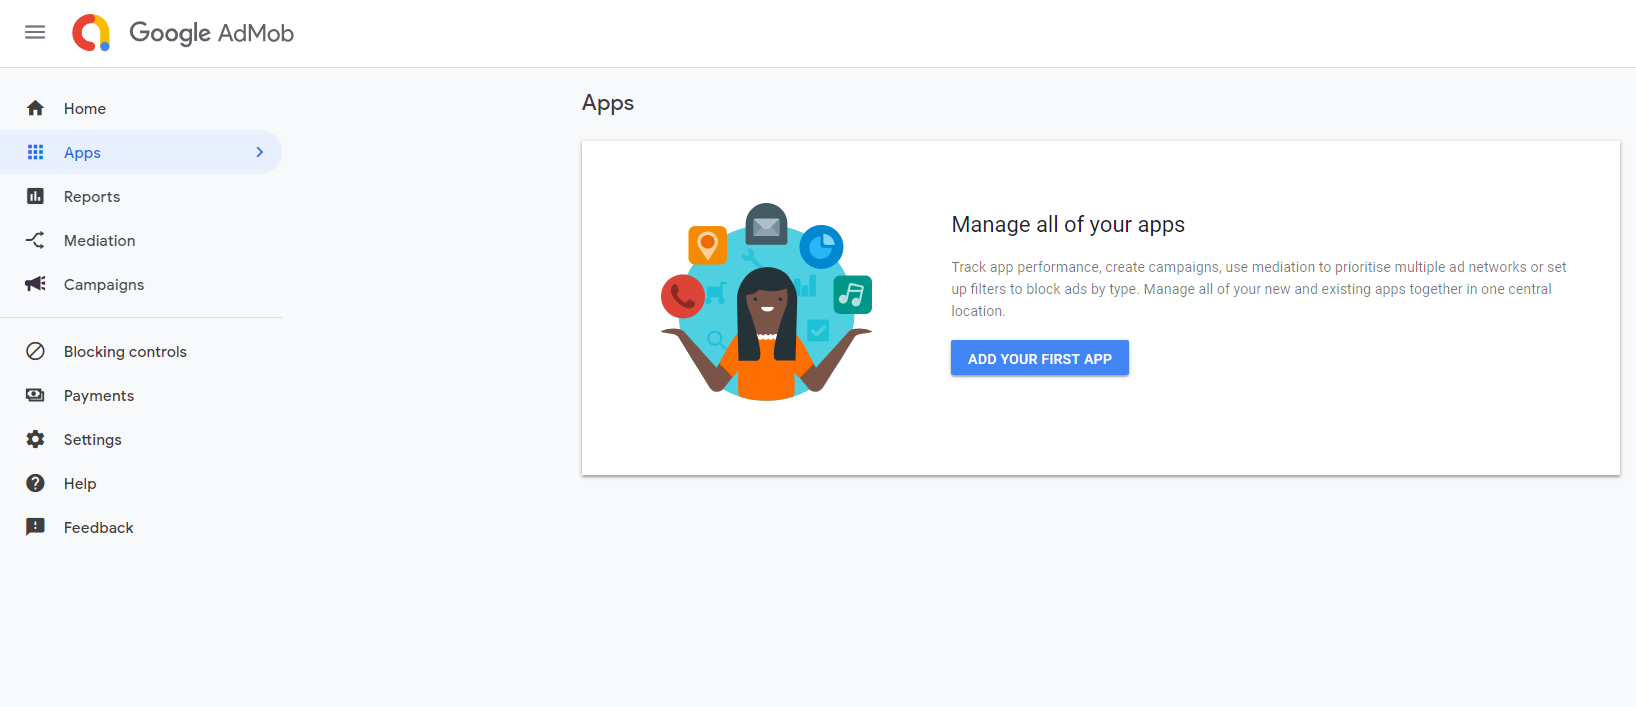
Then you click App
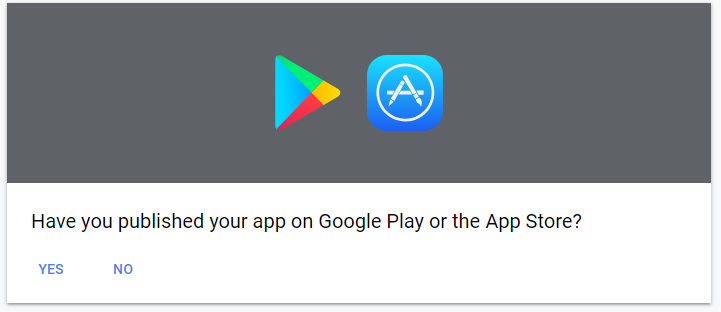
and Create your first app
If apps in play store then select
yes otherwise no
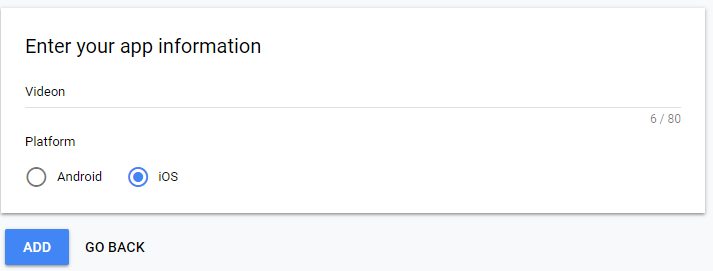
Then provide app information and
click add
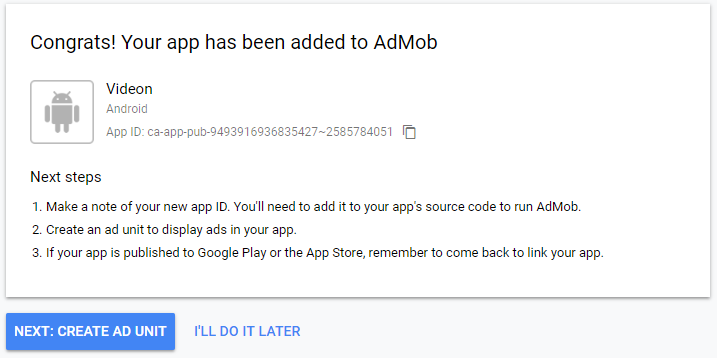
Then you will get an App
ID. Save it. You will need it later
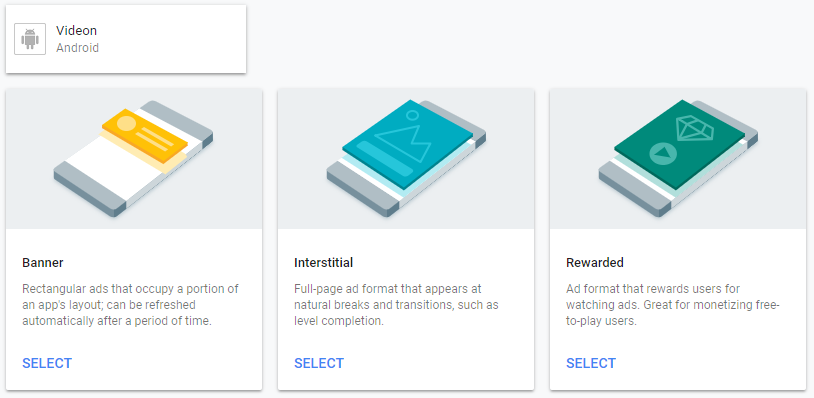
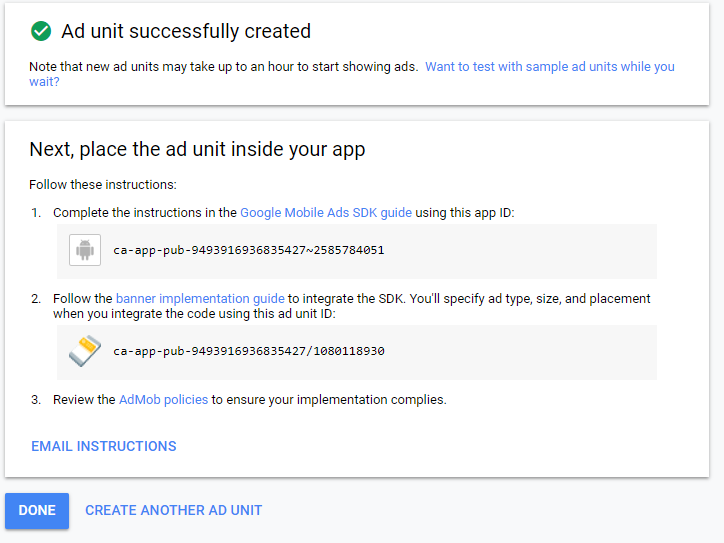
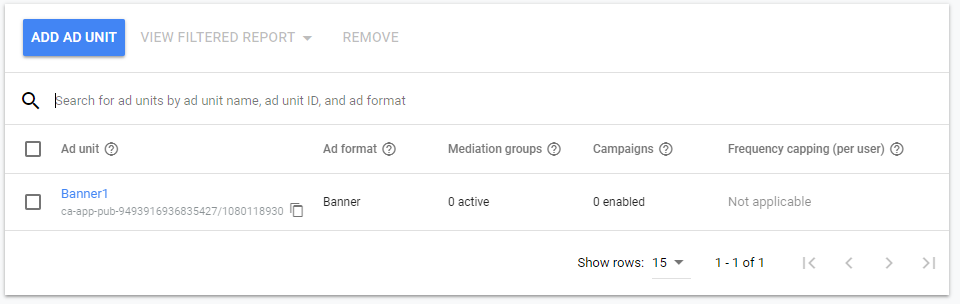
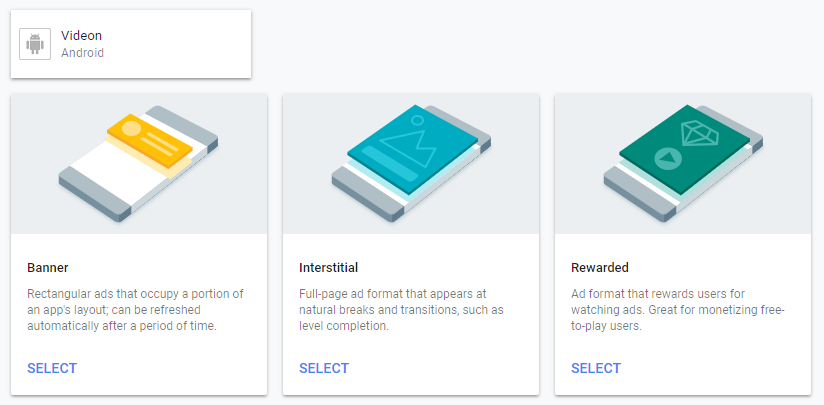
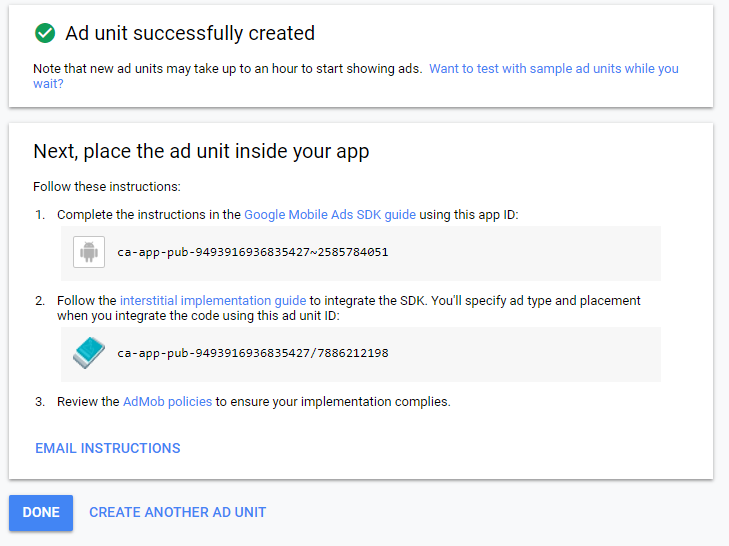
Then click on ‘ CREATE AD
UNIT ’ and you will find three type of
ads.
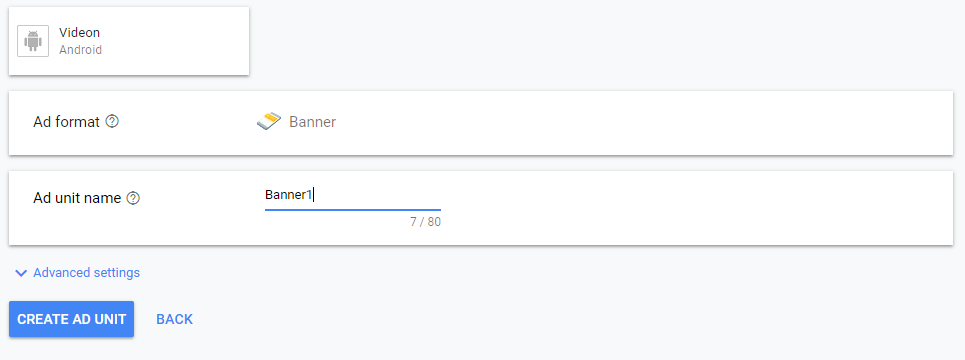
Select banner. Provide ad unit name
and click on ‘ CREATE AD UNIT ‘
Copy Banner
ad unit id
and save it. You will need it later
Then again go back and click
‘ ADD AD UNIT ’
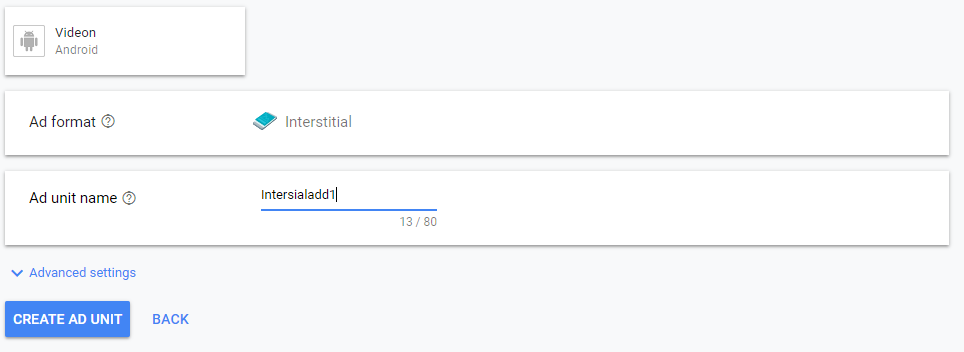
Select ‘ Interstitial
’ ad type.
You will find a page like this.
Provide ad unit name and select
‘ CREATE AD UNIT ’
Copy ad unit id and
save it . You will need it later .
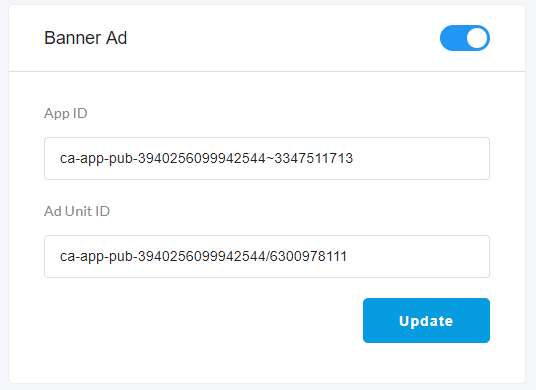
Now get saved Admob App ID,
Banner Ad Unit ID.
Then go to Admin Panel click Admob from sidebar. Put App ID and
Ad Unit ID
in the Banner Ad in the admin panel.
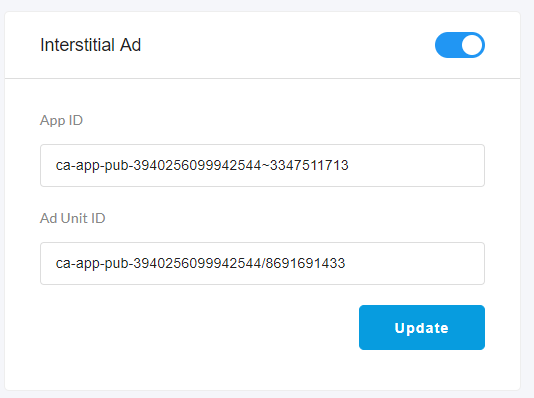
Now get saved Admob App ID,
Interstitial Ad Unit ID.
Then go to Admin Panel. Click Admob form sidebar. Put App ID and
Ad Unit ID
in the Interstitial Ad in the admin panel.
You can hide admob from the ap by
clicking the on/off toggle button form the header.
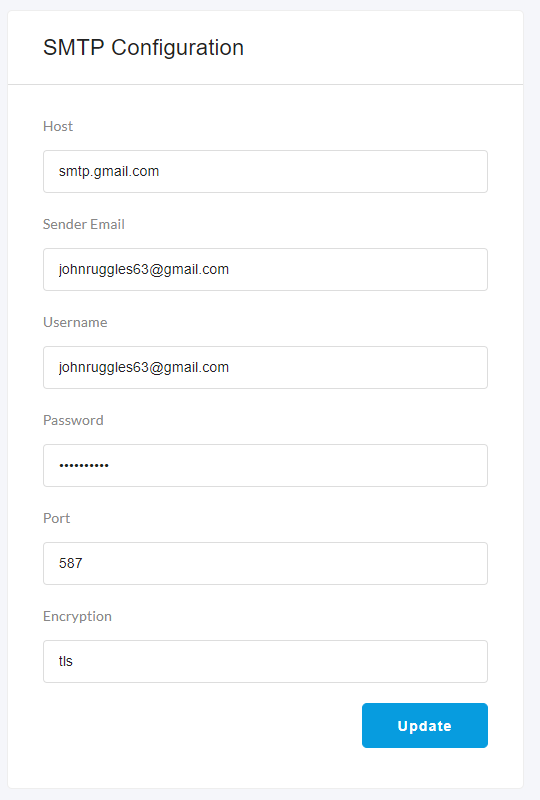
11 - SMTP Server Config
To send the confirmation email and
forgot password functionality
you have to configure your SMTP server. To configure the
SMTP server,
click the SMTP Configuration menu from sidebar
and change the credentials of the SMTP server.
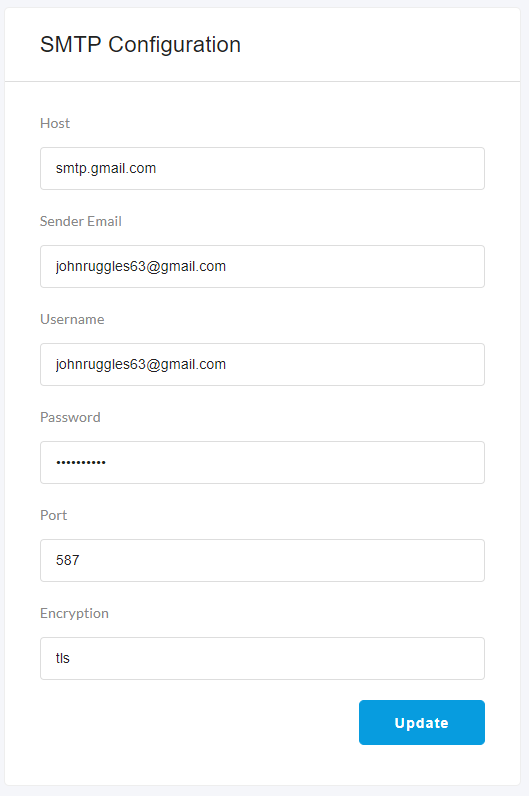
Host
Sender Email
Username
Password
Port
Encryption
11.1Google SMTP Server Config
Login to your Gmail account.
Then visit the link:
https://myaccount.google.com/security
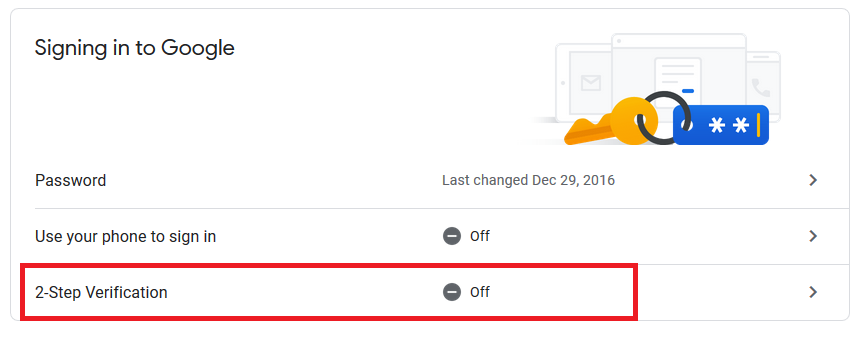
In the security page, turn off the
2-step verification
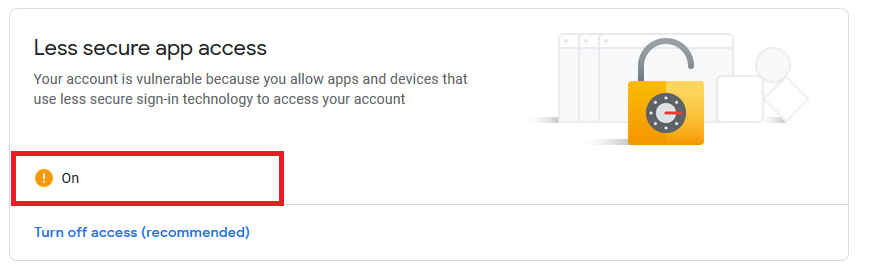
Turn on the less secure app
access
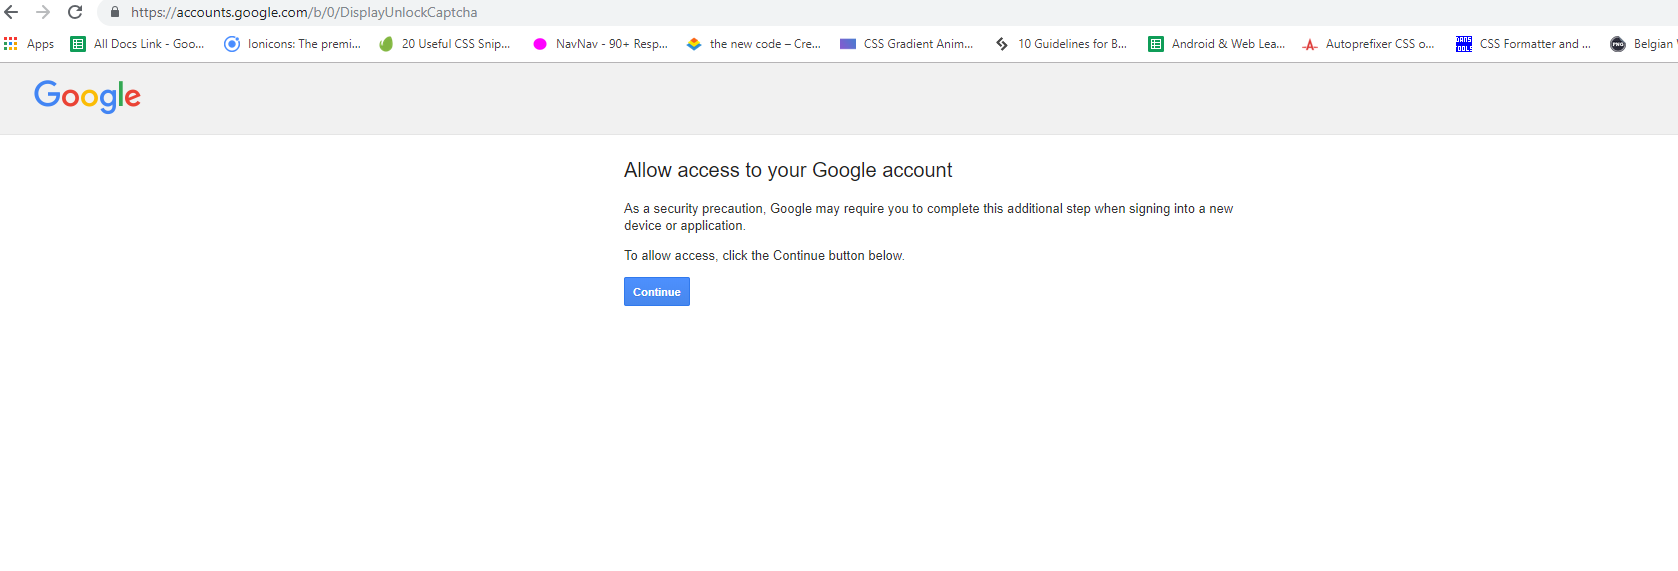
Also visit the link:
https://accounts.google.com/b/0/DisplayUnlockCaptcha
and enable it.
12 - Publishing the app in Appstore
This one is very good and detailed
updated instruction
https://codewithchris.com/submit-your-app-to-the-app-store/
If you prefere text only then you
can use this one:
https://medium.com/macoclock/how-to-submit-ios-app-to-app-store-c1e801ff817b
Admin Panel
13 - Folder Structure of Admin Panel
13.1Inside the project folder, you will see the following directories that
are important
to setup and customizing the admin panel.
13.2public directory: All the public files like outlook, uploaded
images/videos, apis are inside this directory.
public\api : List of all apis.
public\common\php : Common files like header,
footer, sidebar.
public\common\other : Custom Styte and Script file.
backend\plugin-frameworks: All the external style
and javascript files.
backend\uploads: All the uploaded image and video
files.
13.3private directory: All the private files like models, controllers files
are inside this directory.
private\controllers : All the controller files.
private\models : All the models.
private\vendor : External php scripts like
phpmailer.
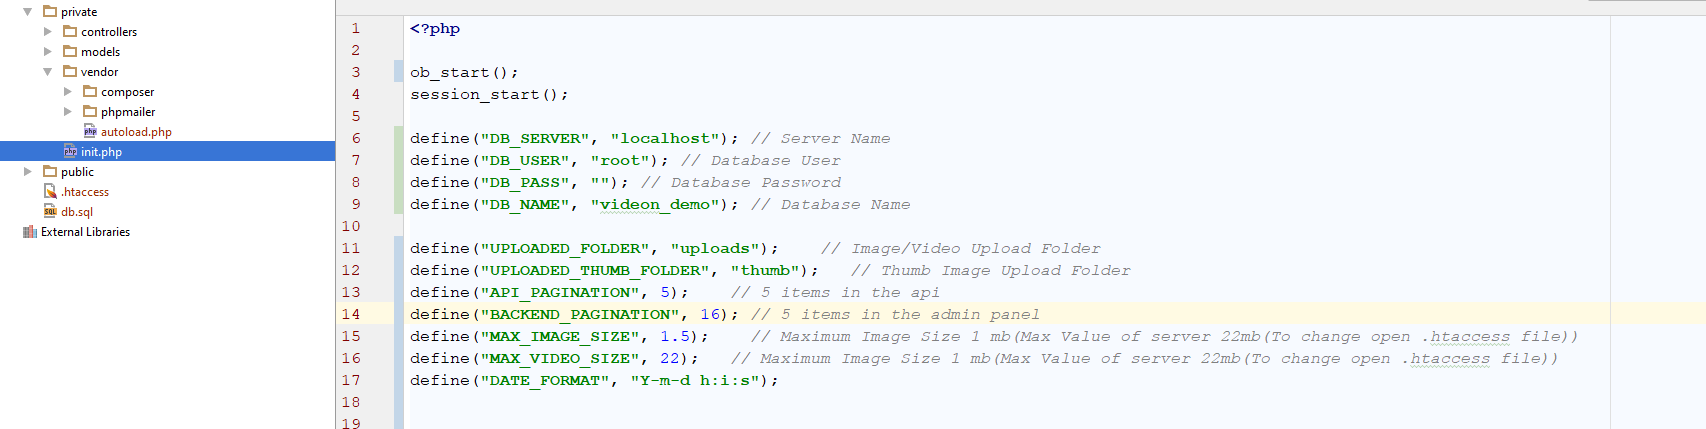
private\init.php : All the settings like database
credential, uploaded folder name, item count for pagination.
Please make sure you have change the database
credential in the
private/init.php file.
Please make sure you have set the writable 777 permission to the
public/uploads and public/uploads/thumb
folder
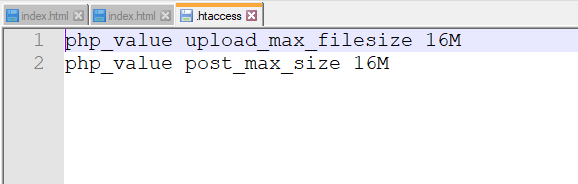
15.4Changing maximum file size
For changing the maximum file size
of the server,
first you must change the
post_max_size and
upload_max_filesize of the server and then restart the server.
For details please visit the following link
Click
Here
In the root of our project there is
a .htaccess file.
You can change this file to
configure the upload file
size of the server.
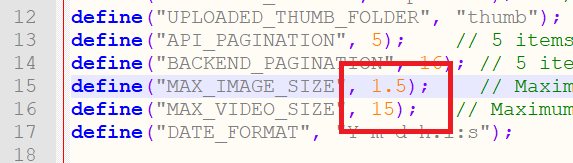
Also you nedd to change the
following constants form init.php file.
define("MAX_IMAGE_SIZE", 1.5)
define("MAX_VIDEO_SIZE", 15)
Open private > init.php
Go to line 15 and 16
Change the value of
MAX_IMAGE_SIZE and MAX_VIDEO_SIZE
14 - Functionality of Admin Panel
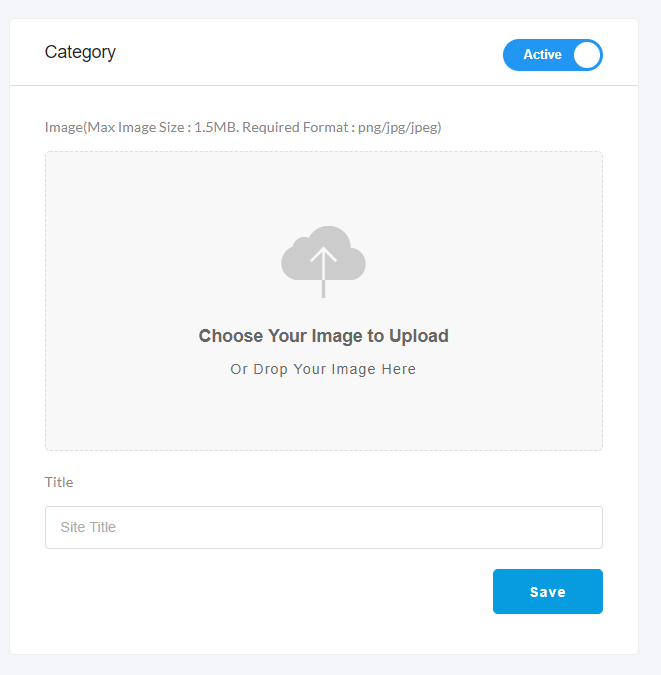
14.1Category
Admin have to add category in order
to upload videos.
Admin must be uploaded the category image and set the category name.
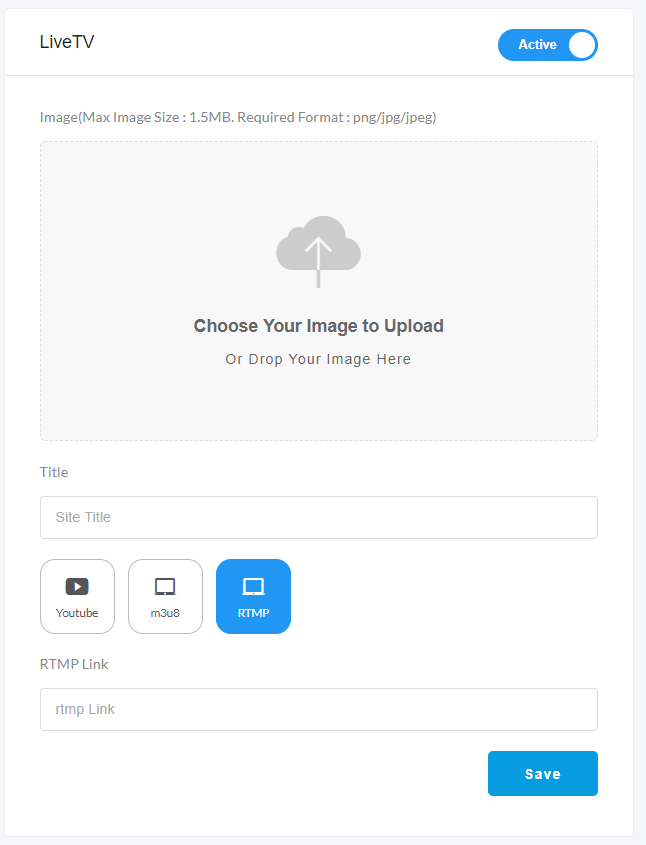
14.2Live TV
Admin can add Live TV.
Admin must be uploaded the livetv image and set the title and link.
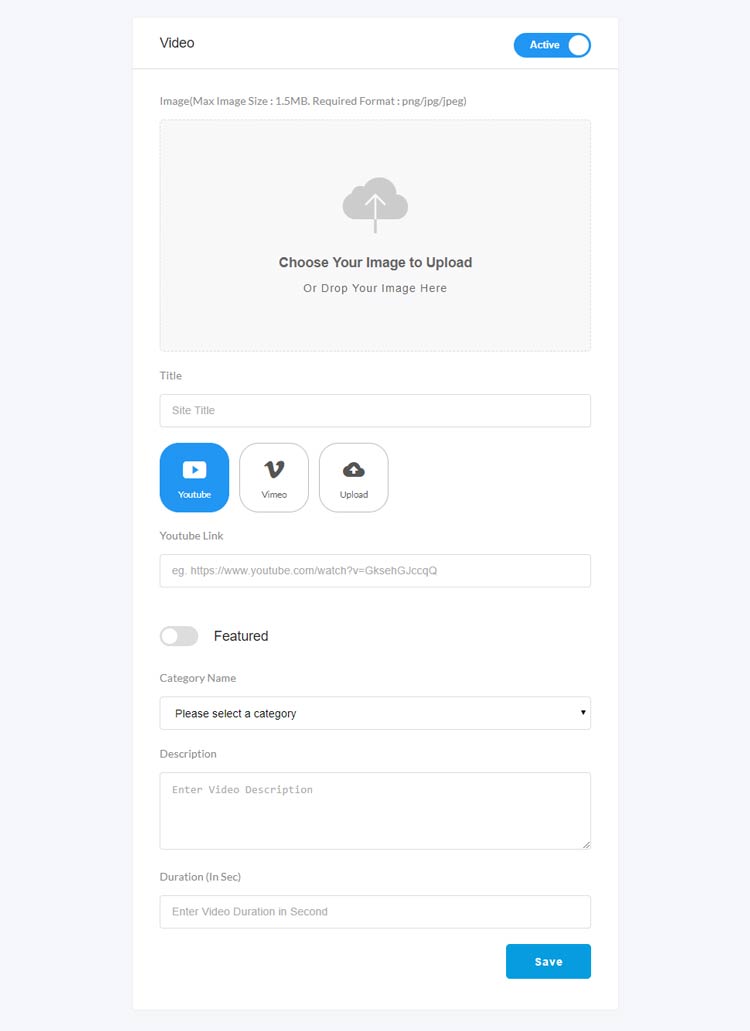
14.3Videos
Admin can upload different types of
videos.
Admin must upload the image for
any type of video. Then enter the video title and select the video type ( youtube,
vimeo, upload ).
For Youtube and Vimeo admin will have to put the url of the videos. But when admin will
choice the
upload option, then admin have to upload the video from his computer. Also if admin
choose youtube or vimeo,
then admin have to put the Duration (In Sec) in the field. If admin
choose upload option
then the duration would set automatically. Featured is optional. Admin
have to put something in the
description field.
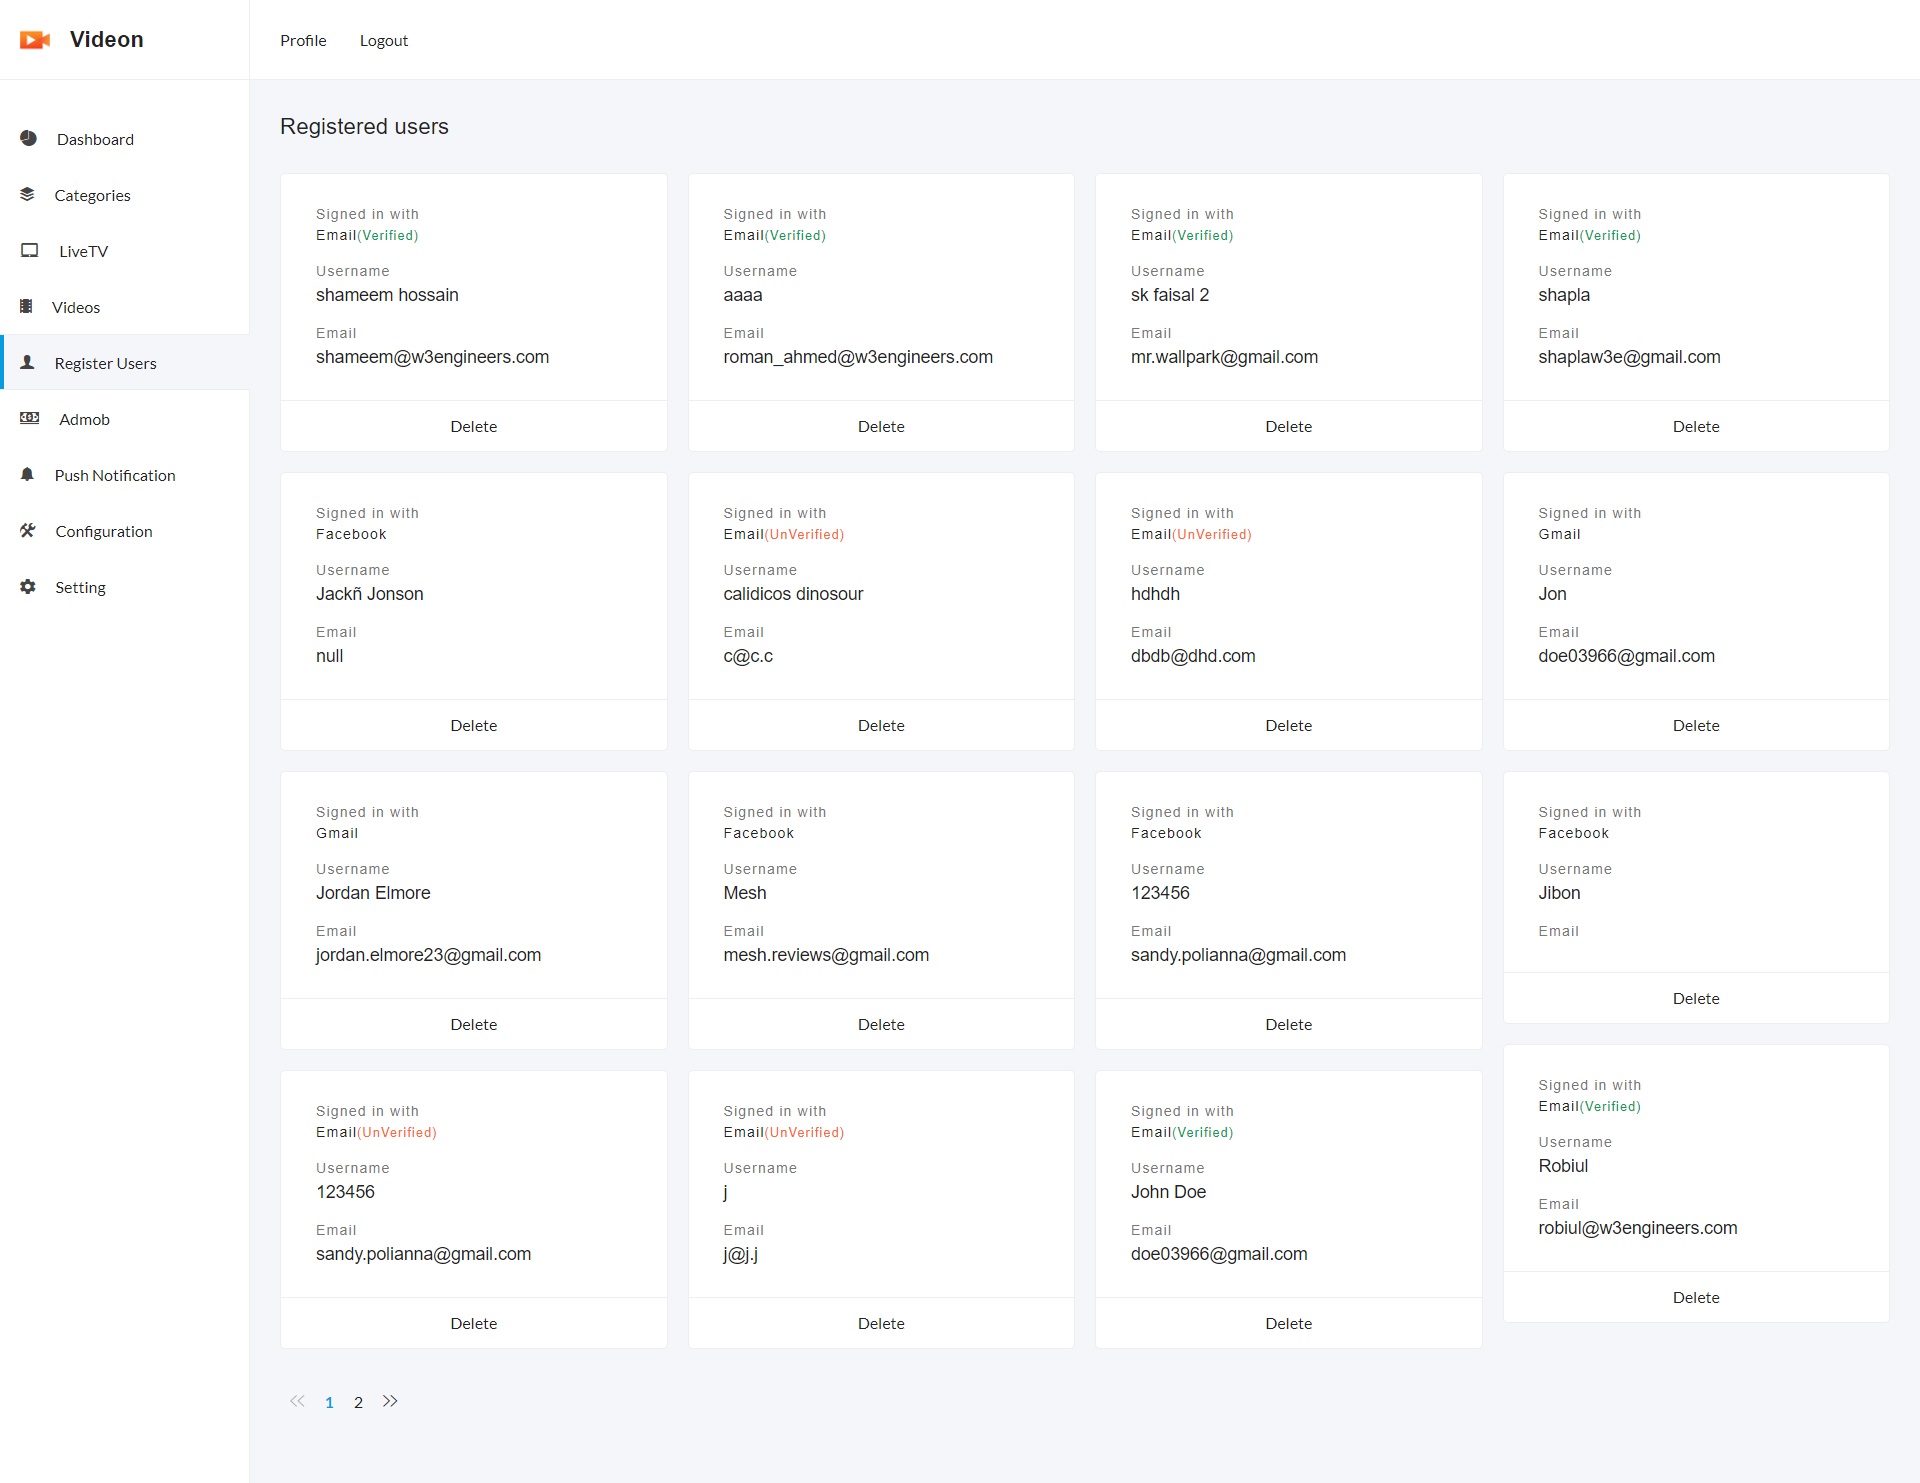
14.4Registered Users
In the Registered Users page admin
can see all the registered users
of the app.
14.5Google Admob
Admin can configure admob
credentials from admin panel.
Also admin can on/off admin from the on/off button in the admob page.
14.6Push Notification
Admin can send push notification
from the admin panel.
First, Admin have to put the AuthKey in the AuthKey field.
To get the
Auth key
First go to
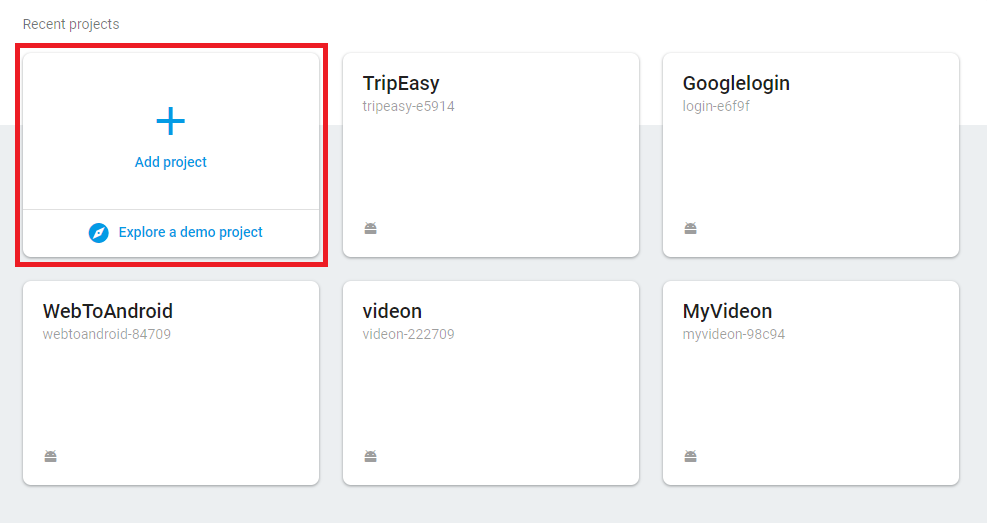
the https://console.firebase.google.com.
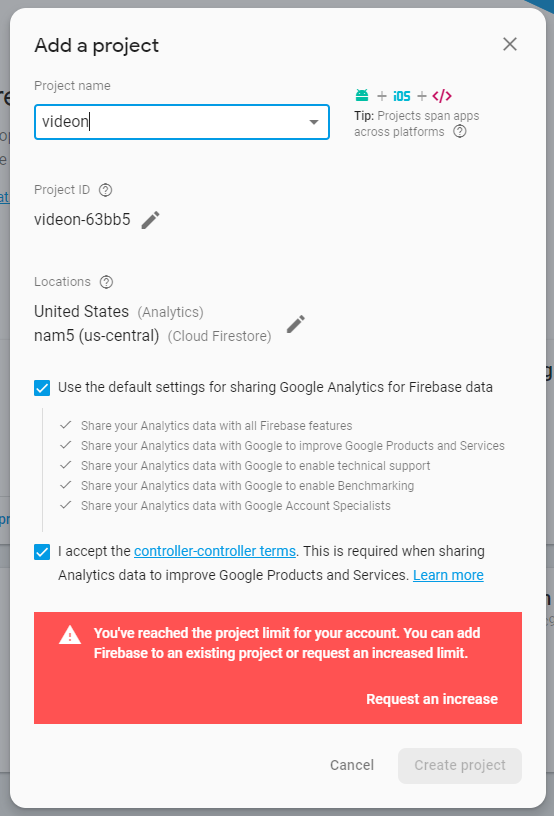
Click Add Project
Put project name, country and create a project.
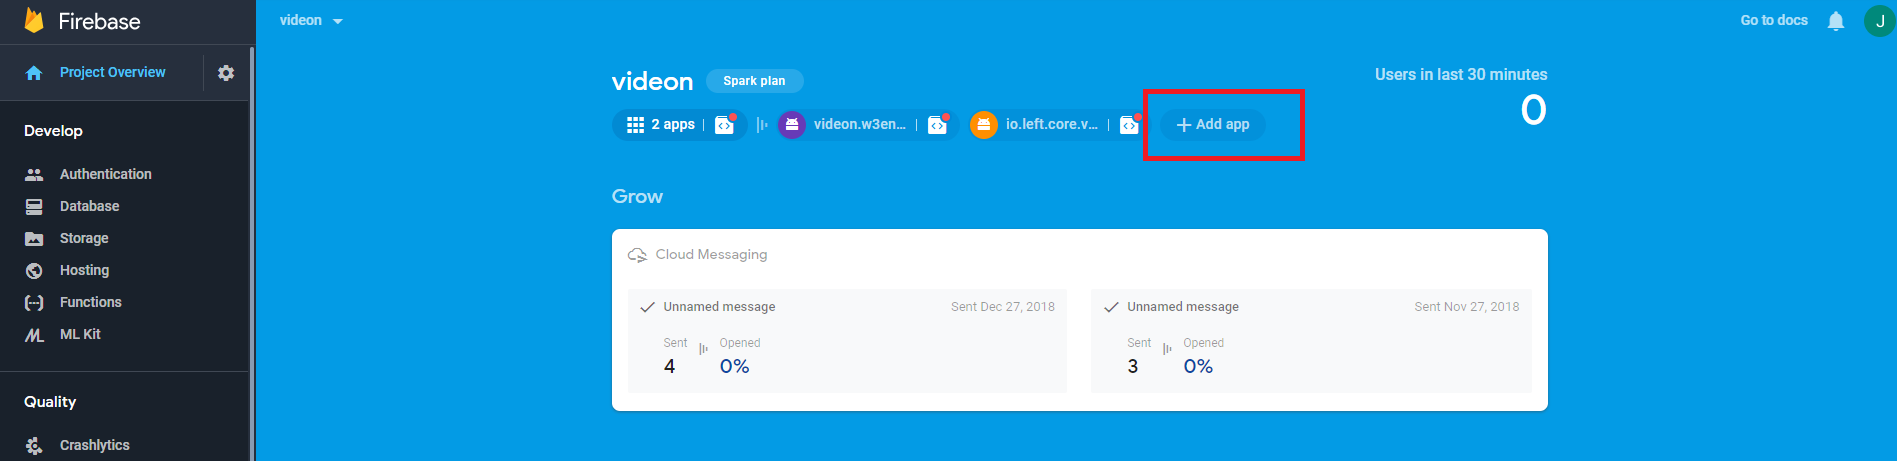
Click Add App
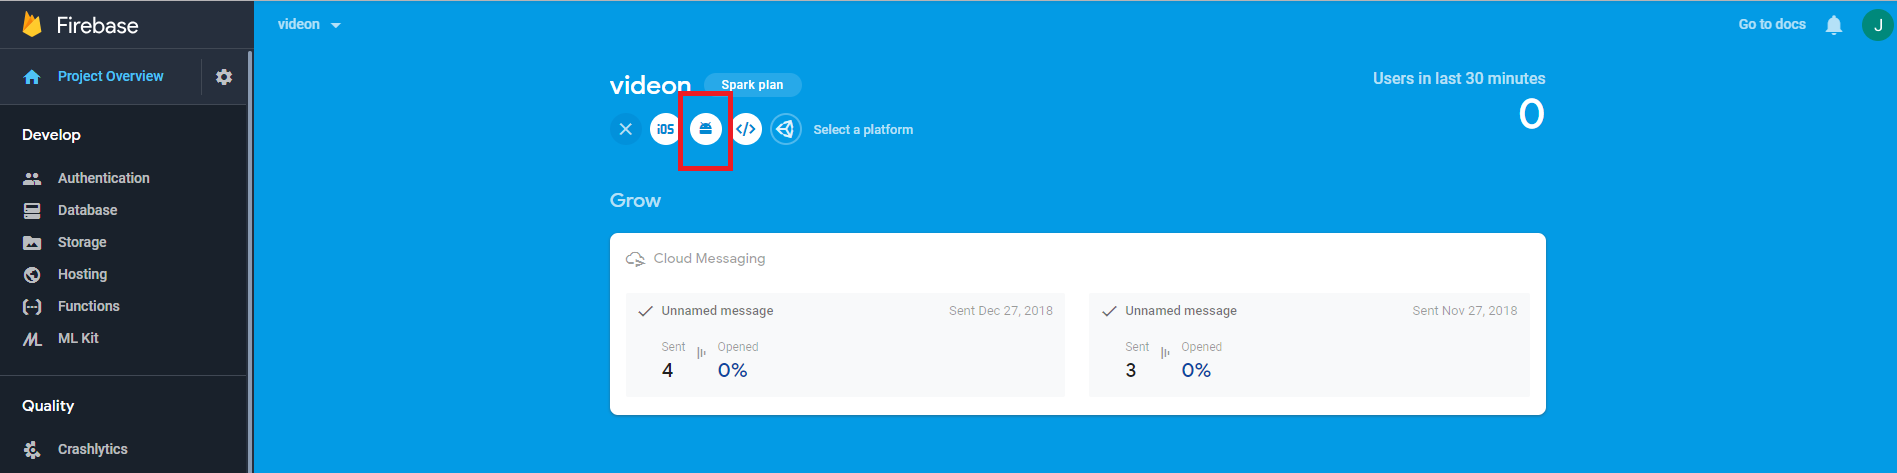
Click Android Icon
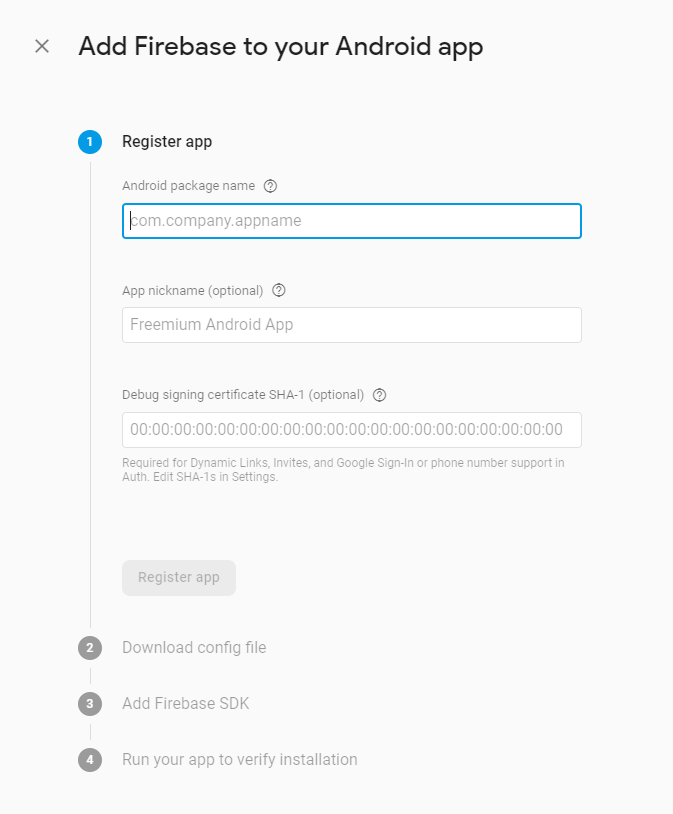
Put the package name
Click Register App
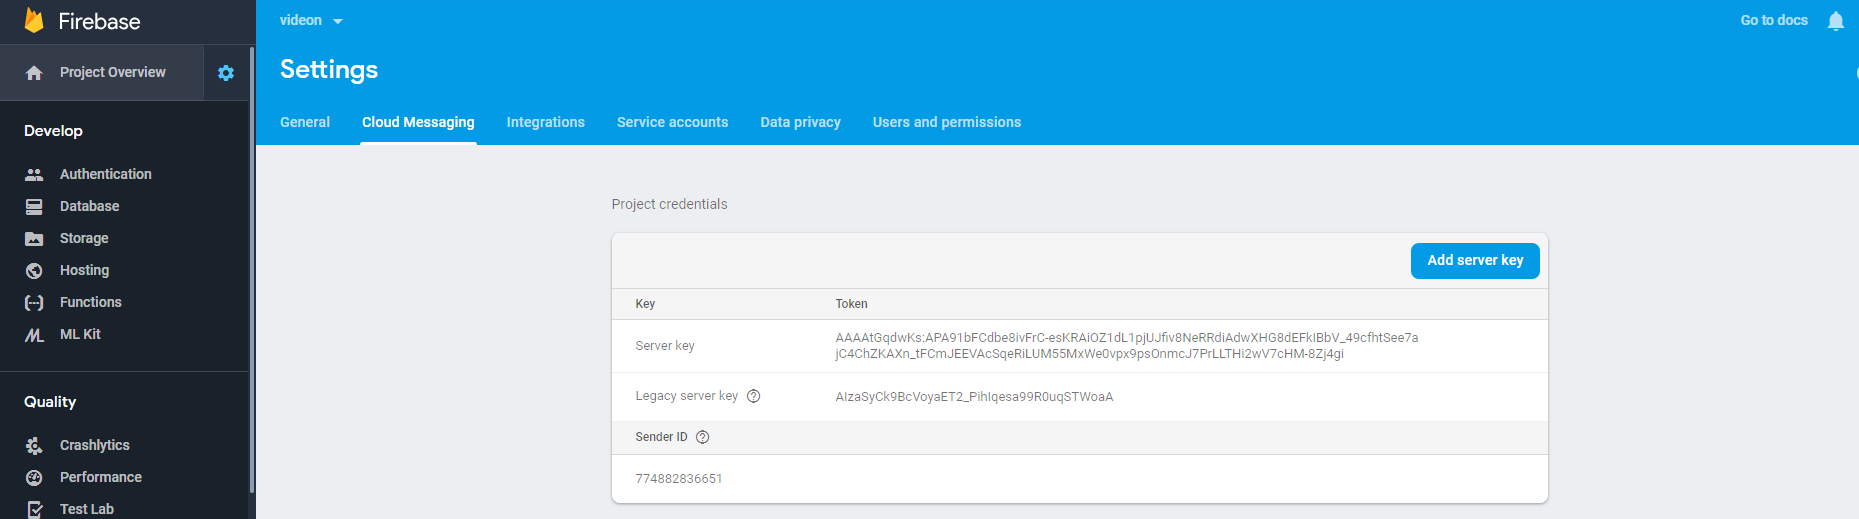
Click Setting icon on project setting
Click Cloud Messaging and copy the
server key and paste it in the auth key field in the admin panel.
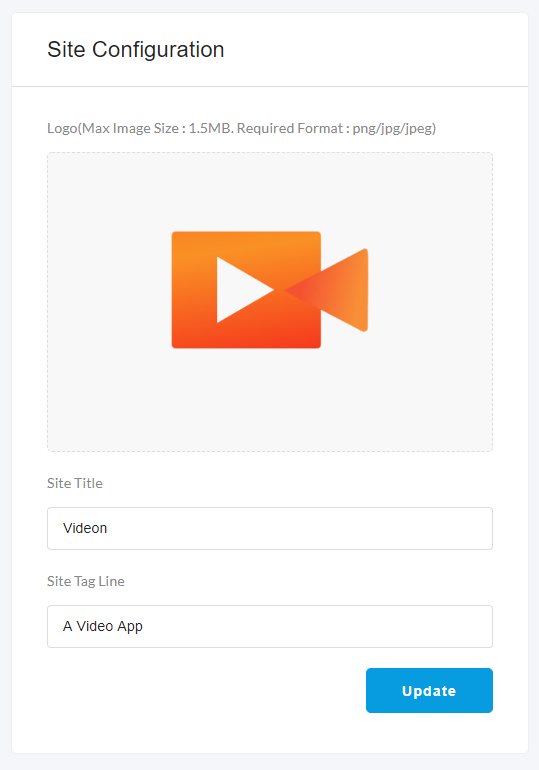
14.7Configuration
In the configuration page, admin
will be able to change the icon, site title
and site tag line in the Site Configuration form .
Also, admin will be able to
configure the smtp server
credentials for the user registration process from the app.
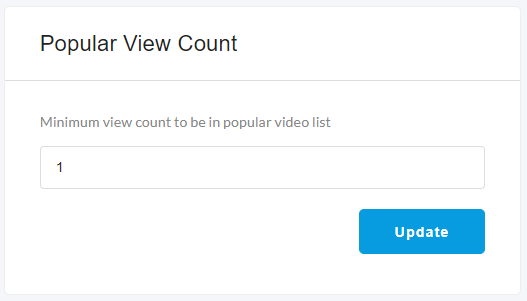
14.8Setting
From the setting page, Admin will
be able to change the api key,
which used in the app.
Also, Admin will be able to change
Minimum view count to be in popular video list.