Streamz
A music streaming website with admin panel
by: W3 Engineers Ltd.
Email: info@w3engineers.com
At first thank you for purchasing this template. If you have any question or any problem
regarding
this template, feel free to Contact
us via
info@w3engineers.com.
1 - Introduction
Streamz is built with PHP. It's a music streaming website with admin panel. Where user can
listen music. There is a backend where, admin can set up the configuration form backend.
Admin can manage tracks. Admin can create/edit/delete/update tracks.
Features
- Admin panel with PHP
- More than 20 pages
- UI Material Design
- Easy to install
- Easy to customize
- Super friendly code
- Well commented code
- Basics knowledge for setup
- Equip with all modern features
2 - Folder Structure
2.1Unzip the file.
2.2You see the following folders:
Streamz (contain the necessary files)
db.sql (sql file)
3 - Requirements
We have made important steps yellow for up and running the project.
4 - Installation
PHP version 7+ required(So update your Xampp control panel or install new
one).
Database Setup
In order to setting up database , first you create a database streamz_db”.
Then you can easily import the db.sql file in your server.
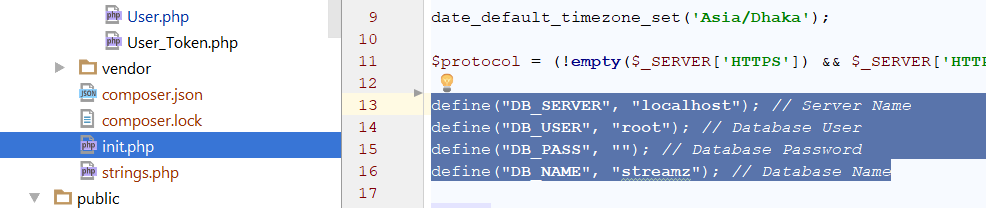
Link the database to admin panel
For linking up, first you will find the file from this directory:
Insert the dbname (if it is empty),
username, password.
You also have to put the link of your server
in the DOMAIN_NAME without the http. If you running the server locally
put your IP address with the folder of the project. The link would look like
192.168.2.71/streamz/
Installation on Locally
Make sure that you have already installed
Xampp control panel.
Copy the streamz-admin folder and paste it in your
Xampp's htdocs folder.
Now run your Xampp Control Panel.
Create a database. Database name will be
"stramz_db" or any other name
Import the db.sql file in your created database.
(db.sql file is located in the Main_files.)
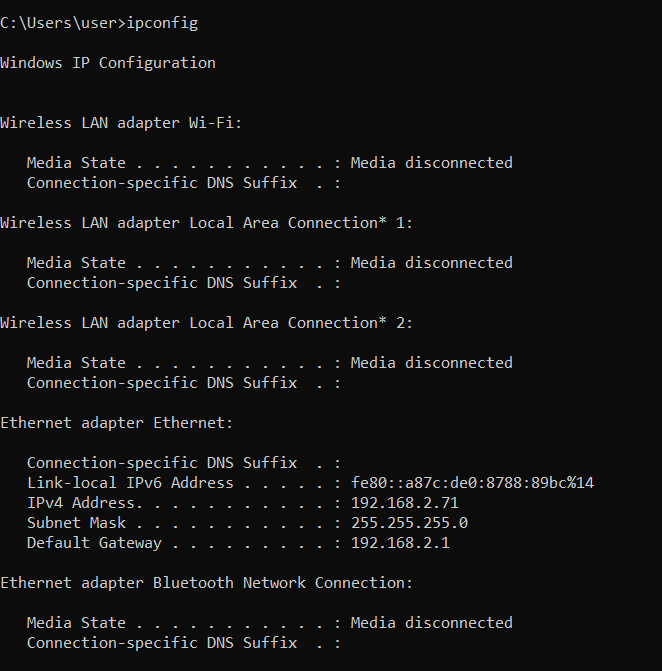
Find your pc ip address.
Open Command Promt and type => ipconfig
Then find the IPv4 address (example: 192.168.2.88), copy the address
Open your browser.In your browser url type:
http://your_ip_address/streamz-admin/admin
For example, my pc ip address is: 192.168.2.88
So the url will be: http://192.168.2.88/streamz-admin/admin
If you see the admin login page, then admin-panel work successfully.
Email: admin@gmail.com
Password: 123456
Installation on Server
To install it on the live server, First import the databse to the server.
Then copy the project folder and paste
it to your live server folder.
Please give the writeable 777 permission
to the following folders and the subfolders inside them:
admin\audio
admin\uploads
admin\uploads\thumb
Login as Admin:
UserName: admin@gmail.com
Password: 123456
Installation with terminal
Installing apache
sudo apt update
sudo apt install apache2
sudo ufw allow in "Apache Full"
sudo apt install apache2
Copy project to web root dir
sudo cp -R wallpark-admin /var/www/html/
Installing MySQL
sudo apt install mysql-server
Create Database(mysql)
create database streamz_db;
create user db_user;
grant all on wallpark_db.* to 'db_user'@'%' identified by 'admin123';
Import Database
mysql -h localhost -u root wallpark_db < wallpark_db.sql
Install PHP 7.2
apt-get -y install php7.2 libapache2-mod-php7.2
sudo apt-get install php7.2-mysql
sudo apt-get install php7.2-gmagick
sudo apt-get -y install php7.2-gd php7.2-imagick
systemctl restart apache2
Enabling mod_rewrite
sudo a2enmod rewrite
sudo systemctl restart apache2
sudo apt-get install php7.2-gmagick
systemctl restart apache2
Edit host
If you want to change the server link. Edit this following file. If you don't want to change the link of the server,
you can skip this step.
sudo nano /etc/apache2/sites-available/000-default.conf
For more detail, Please follow the link below.
https://www.digitalocean.com/community/tutorials/how-to-set-up-apache-virtual-hosts-on-ubuntu-14-04-lts
Restart server
sudo systemctl restart apache2
Permission
Please give the writeable 777 permission
to the following folders and the subfolders inside them:
admin\audio
admin\uploads
admin\uploads\thumb
Login as Admin:
UserName: admin@gmail.com
Password: 123456
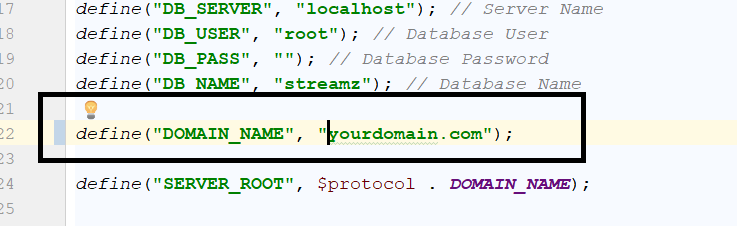
You also have to put the link of your server
in the DOMAIN_NAME without the http. If you running the server locally
put your IP address with the folder of the project. The link would look like
192.168.2.71/streamz/
5 - Configure the project
You will find all the necessary settings in the
private/init.php file
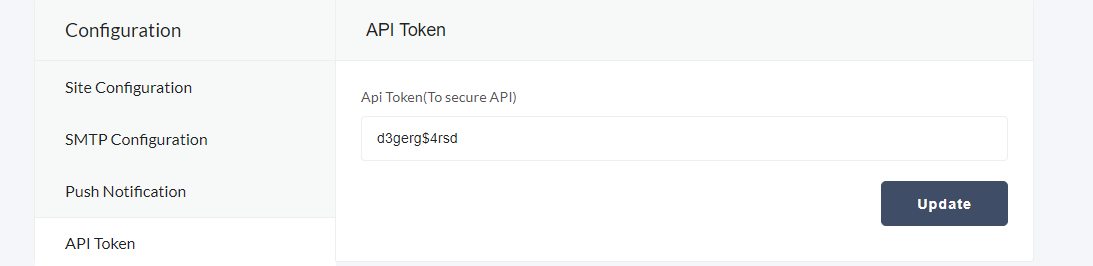
API Token for Admin
admin has to put the token in the
ADMIN_TOKEN value. This token and the token form the admin panel must be same in order to run the
project.
define("ADMIN_TOKEN", "d3gerg$4rsd");
Time Zone
You can configure the time zone in the onit.php file.
Find then following code and change the time zone.
date_default_timezone_set('Asia/Dhaka');
Databse Setup
To establish the datbase connection you have to configure
the database and put the credetials in init.php file.
Server URL
You have to change the server URL in order to run the project.
define("DOMAIN_NAME", $protocol . "localhost/streamz/");
Google Login
To configure the Google Login you have to first
generate Client ID and Client Secret and put those credentials in init.php file.
Facebook Login
To configure the Facebook Login you have to first
generate Facebook App ID and App Secret and put those credentials in init.php file.
Folder
If you want to change any folder name. First change the
folder name and change the constant name for init.php file.
Pagination item count
You can change the pagination item count for both
front end and admin panel. By changing the following constants.
define("API_PAGINATION", 12);
define("BACKEND_PAGINATION", 10);
File Upload
You can chnage the maximum size of the
uploaded image and audio by changing the following constants. Size is defined by MB.
define("MAX_IMAGE_SIZE", 1.5);
define("MAX_AUDIO_SIZE", 10);
You have to change the following lines form .htaccess also.
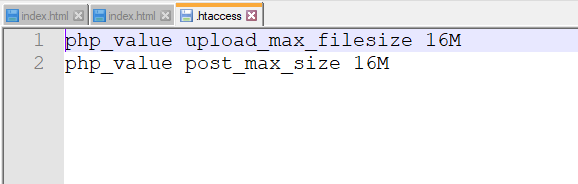
php_value upload_max_filesize 20M
php_value post_max_size 20M
File upload count for multiple file upload
You can change the count of the
uploaded image and audio by changing the following constant.
define("MAX_FILE_COUNT", 10);
Suggested search item count
You can change the count of the suggested
itemn in the search.
define("SEARCH_TERM_COUNT", 15);
Downalod link active timing
You can change the timing for the active
download link. Time is defined by Minutes.
define("DOWNLOAD_LINK_ACTIVE_TIMING", 10);
Uploaded image ratio
You can change the ratio of the uploaded image
form the admin panel by changing the following.
define("IMAGE_RATIO", "1/1");
Supported audio files
You can change the supported audio type by chnaging the
following codes.
define("SUPPORTED_AUDIO", ["mp3", "wav", "m4a"]);
define("SUPPORTED_AUDIO_MIME", ["audio/mpeg", "audio/x-wav", "audio/x-m4a", "application/octet-stream", "video/mp4"]);
6. Google Login
Go to the
Google API Console.
Select an existing project from the projects list,
or click NEW PROJECT to create a new project:
Enter the Project Name.
Under the Project Name,
you will see the Google API console automatically creates a project ID.
Optionally you can change this project ID by the Edit link. But project ID must be unique worldwide.
Click on the CREATE button and the project will be
created in some seconds.
In the left side navigation panel,
select Credentials under the APIs & Services section.
Select the OAuth consent screen tab,
specify the consent screen settings.
In Application name field, enter the name of your Application.
In Support email filed, choose an email address for user support.
In the Authorized domains, specify the domains
which will be allowed to authenticate using OAuth.
Click the Save button.
Select the Credentials tab, click the Create
credentials drop-down and select OAuth client ID.
In the Application type section, select Web application.
In the Authorized redirect URIs field, enter the redirect URL.
Click the Create button.
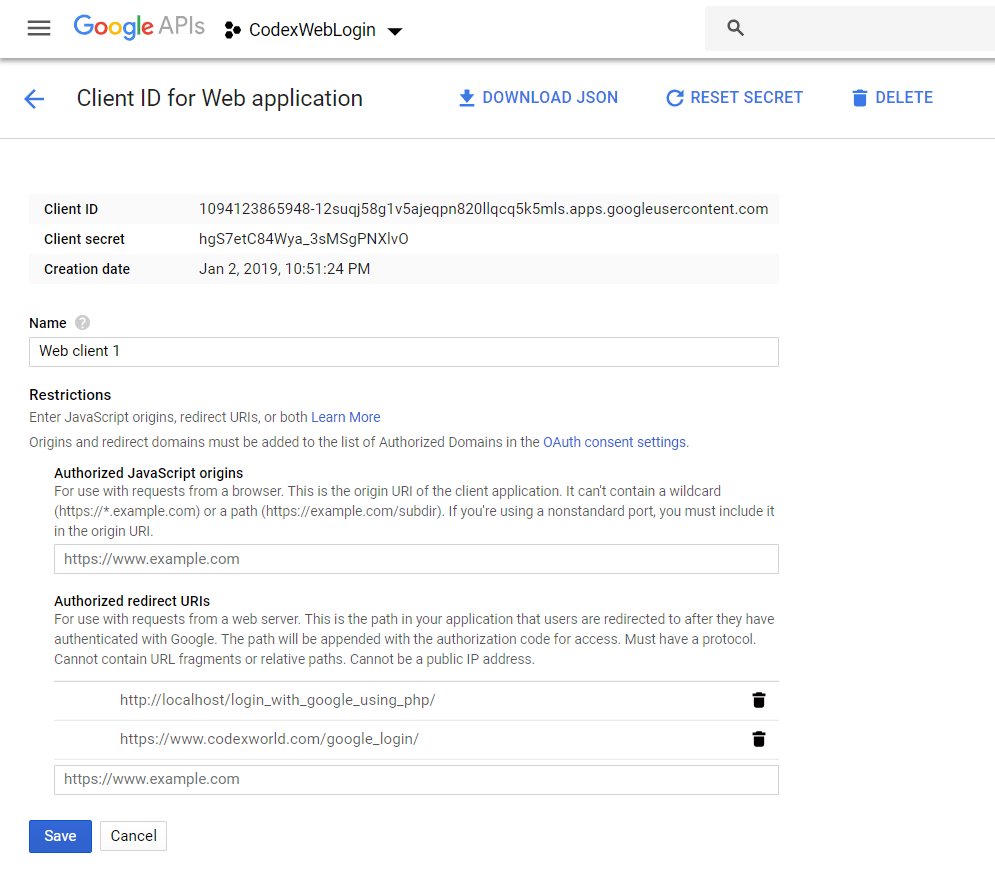
A dialog box will appear with OAuth client details,
note the Client ID and Client secret. This Client ID and Client secret allow you to access the Google APIs.
Note that: This Client ID and Client secret
need to be specified in the script at the time of Google API call.
Also, the Authorized redirect URI needs to be matched with the redirect URL that specified in the script.
Now paste the Client ID, client secret and redirect URL
in the init.php file.
If you find any difficulty to cofigure please check
the youtube video or read
the article
7 - Sign in with Facebook
To implement Facebook Login system for the application,
the first step is the creation of an app through the Facebook account.
Sign into the Facebook and go to
developer.facebook.com
Once there, create an app.
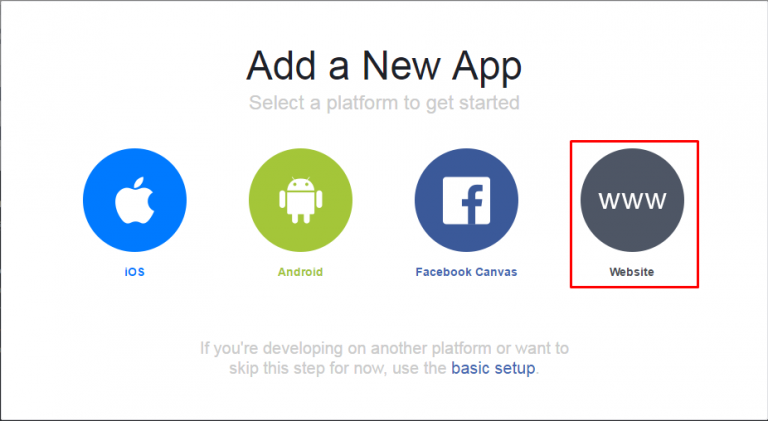
Click Add New App button and select
Website as the platform.
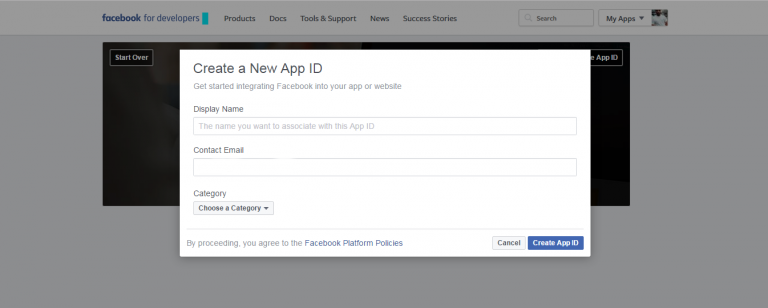
Enter the app’s name, an email id and select a category
for the application. Now click Create App Id button. This will create an app in Facebook.
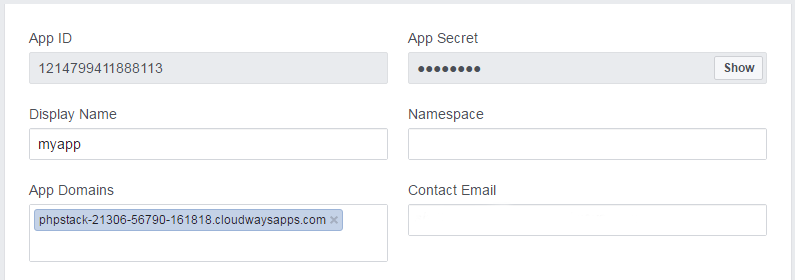
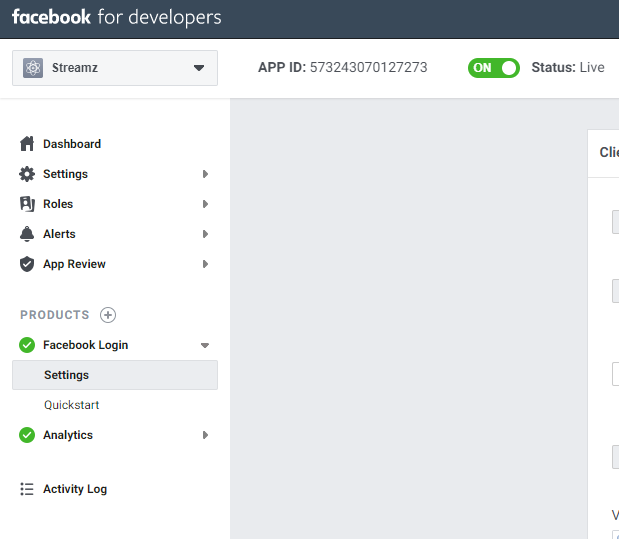
Now go to Settings, where the App Secret and App ID
could be found. These ids will be used in the PHP application. Remember to add the website’s URL in App Domains.
Down the page, Click the Add Platform tab.
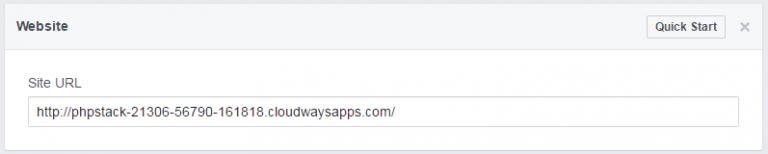
Add website as a platform and enter the URL of the
This finishes the creation of the Facebook App.
The next step is to create a server on a fast and reliable hosting platform.
I have opted for Cloudways PHP stack server.
Now paste the App ID, App secret and redirect URL
in the init.php file.
At last make the staus of the app live
Now go to the facebook login > setting
Put your server link in the Valid OAuth Redirect URIs
If you find any difficulty to cofigure please check
the youtube video or read
the article
8 - SMTP Server Config
SMTP configuration form server
To send the confirmation email and forgot password functionality
you have to configure your SMTP server.
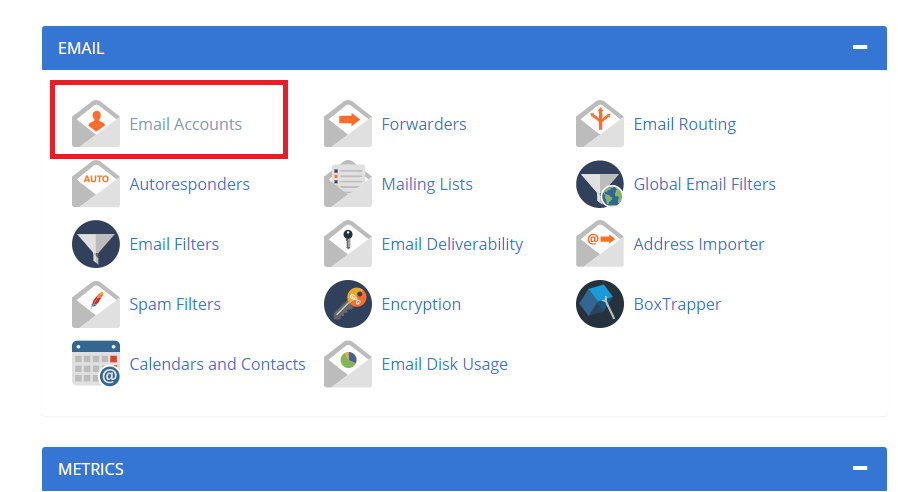
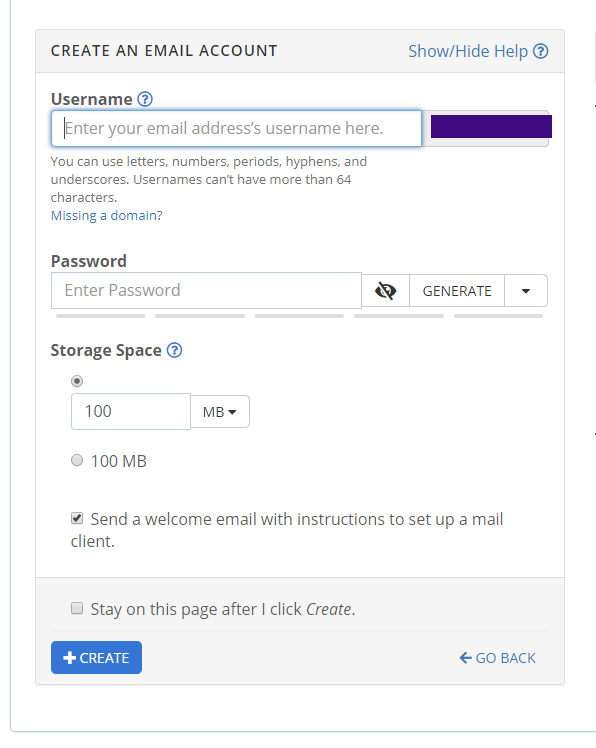
Login to your cpnael. Find Email Accounts. And click
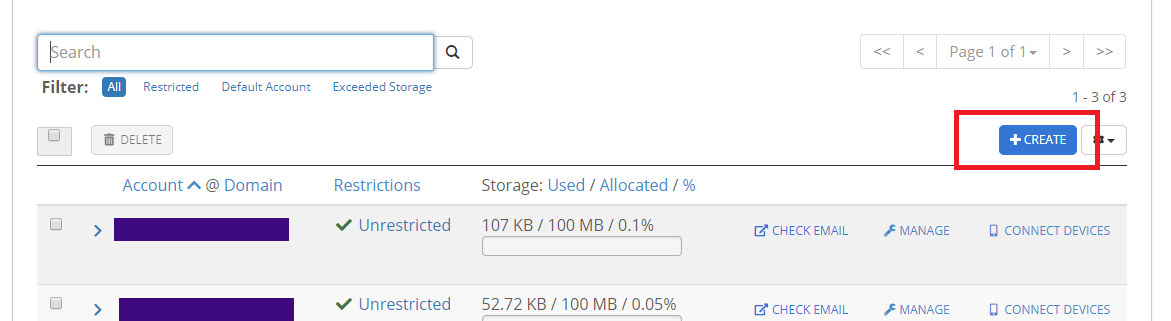
Click Create
Fill up the form and create an email account. Copy the password
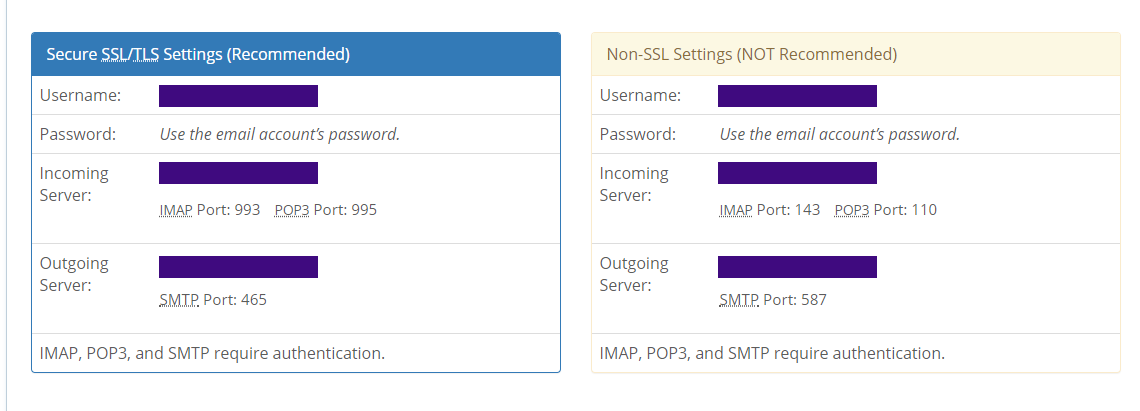
Click connected device
Here you will see two sections for the setting. Use SSL if you have
SSL in your server other wise use non-ssl. and put all the credentials in the admin panel.
To configure the SMTP server,
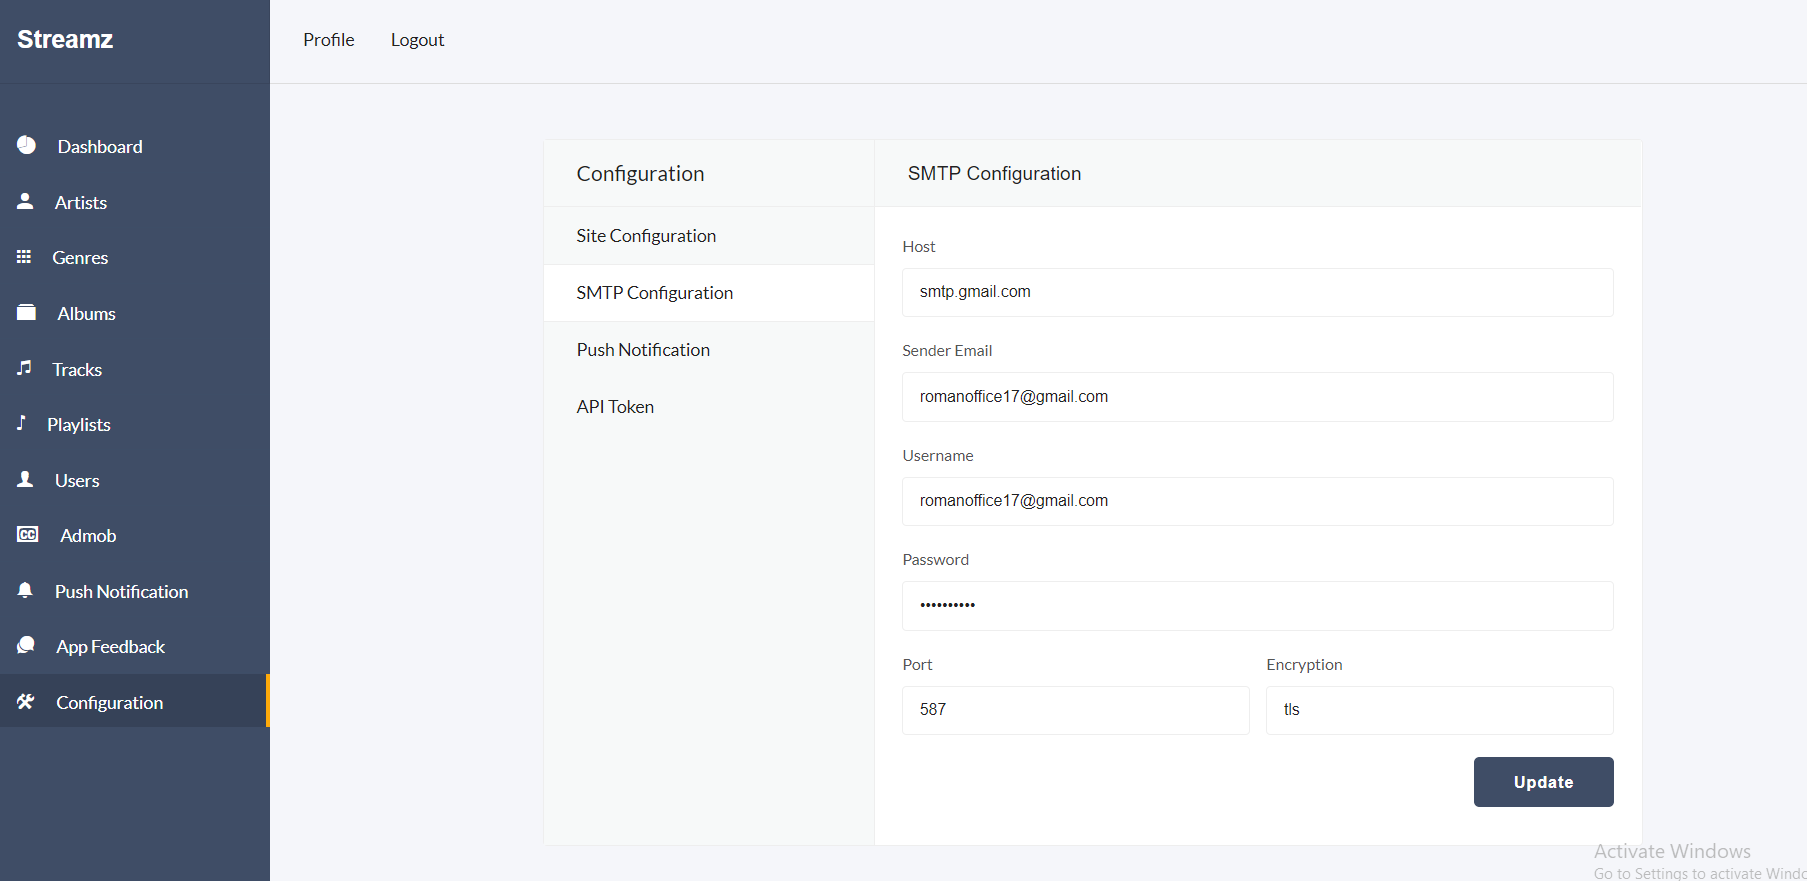
click the Configuration >> SMTP Configuration menu from sidebar
and change the credentials of the SMTP server.
Host
Sender Email
Username
Password
Port
Encryption
Google SMTP Server Config
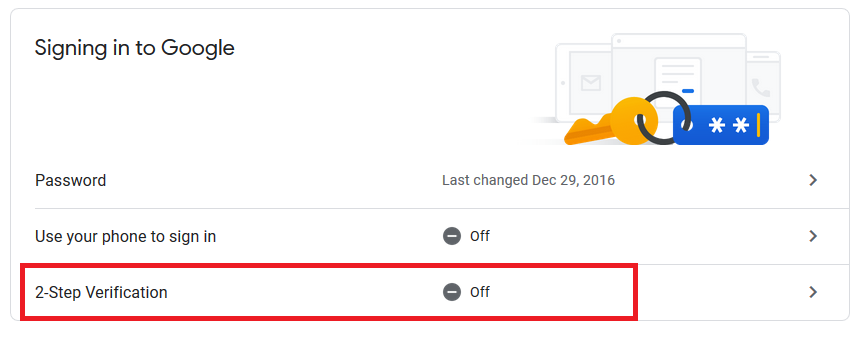
Login to your Gmail account.
Then visit the link:
https://myaccount.google.com/security
In the security page, turn off the 2-step verification
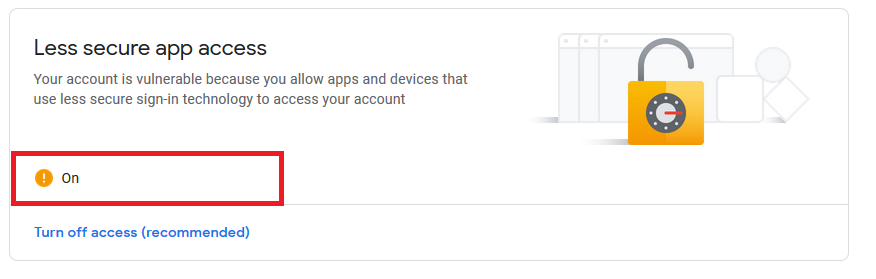
Turn on the less secure app access
Also visit the link:
https://accounts.google.com/b/0/DisplayUnlockCaptcha
and enable it.
Admin Panel
9 - Folder Structure of Admin Panel
Inside the project folder, you will see the following directories that are important
to setup and customizing the admin panel.
home directory: All the public files, uploaded images/audios, apis are inside this directory.
api : List of all apis.
admin\common\php : Common files like header, footer, sidebar.
admin\common\other : Custom Styte and Script file.
admin\plugin-frameworks: All the external style and javascript files.
admin\uploads: All the uploaded image and video files.
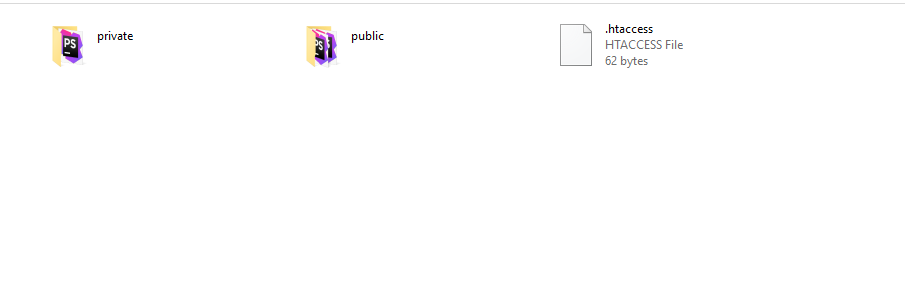
private directory: All the private files like models, controllers files are inside this directory.
private\init.php : All the settings of the backend.
private\models : All the models.
private\vendor : External php scripts like phpmailer.
private\init.php : All the settings like database credential, uploaded folder name, item count for pagination.
Please make sure you have change the database credential in the
private/init.php file.
Please make sure you have set the writable 777 permission to the following folders
admin\audio
admin\uploads
admin\uploads\thumb
Changing maximum file size
For changing the maximum file size of the server,
first you must change the
post_max_size and
upload_max_filesize of the server and then restart the server.
For details please visit the following link
Click Here
In the root of our project there is a .htaccess file.
You can change this file to configure the upload file
size of the server.
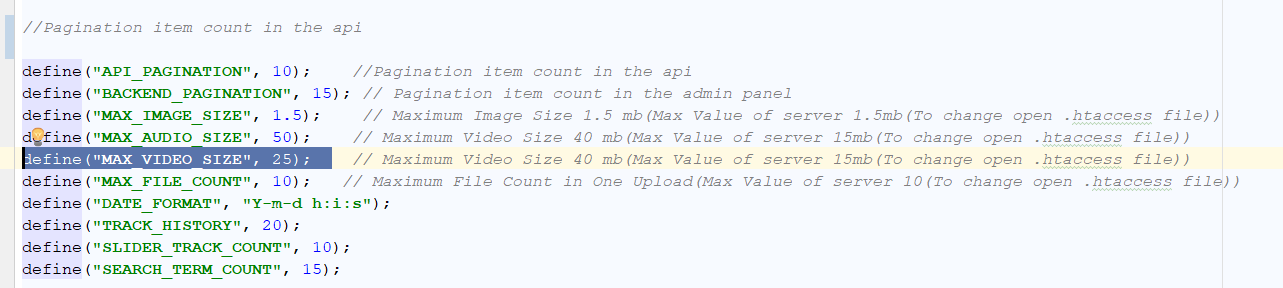
Also you nedd to change the following constants form private\init.php file.
define("MAX_IMAGE_SIZE", 1.5)
define("MAX_AUDIO_SIZE", 50)
define("MAX_VIDEO_SIZE", 25)
Open private > init.php
Change the value of MAX_IMAGE_SIZE and
MAX_VIDEO_SIZE and MAX_AUDIO_SIZE
10 - Functionality of Admin Panel
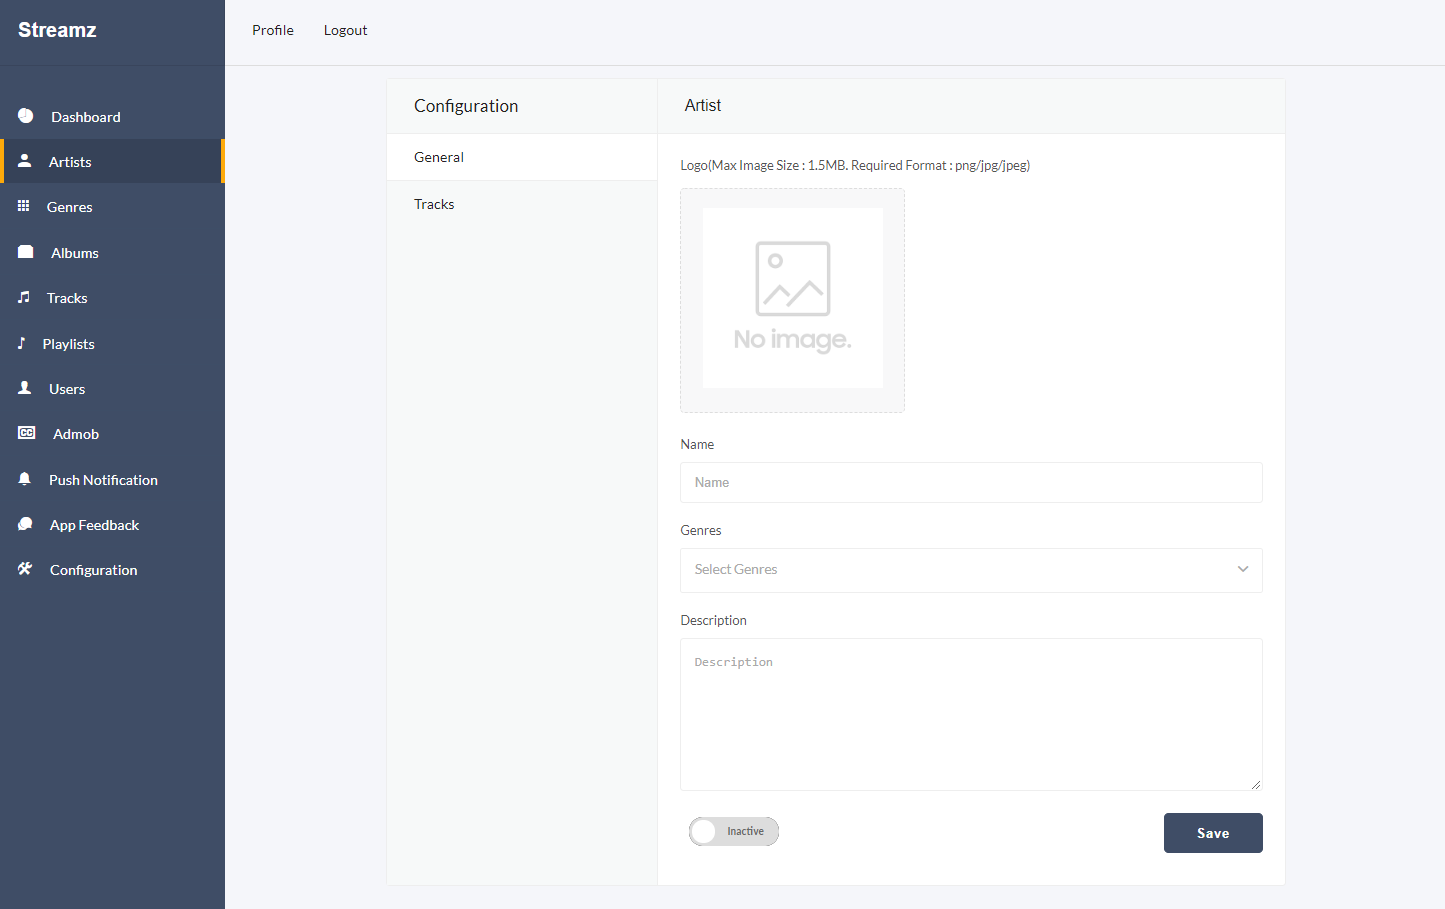
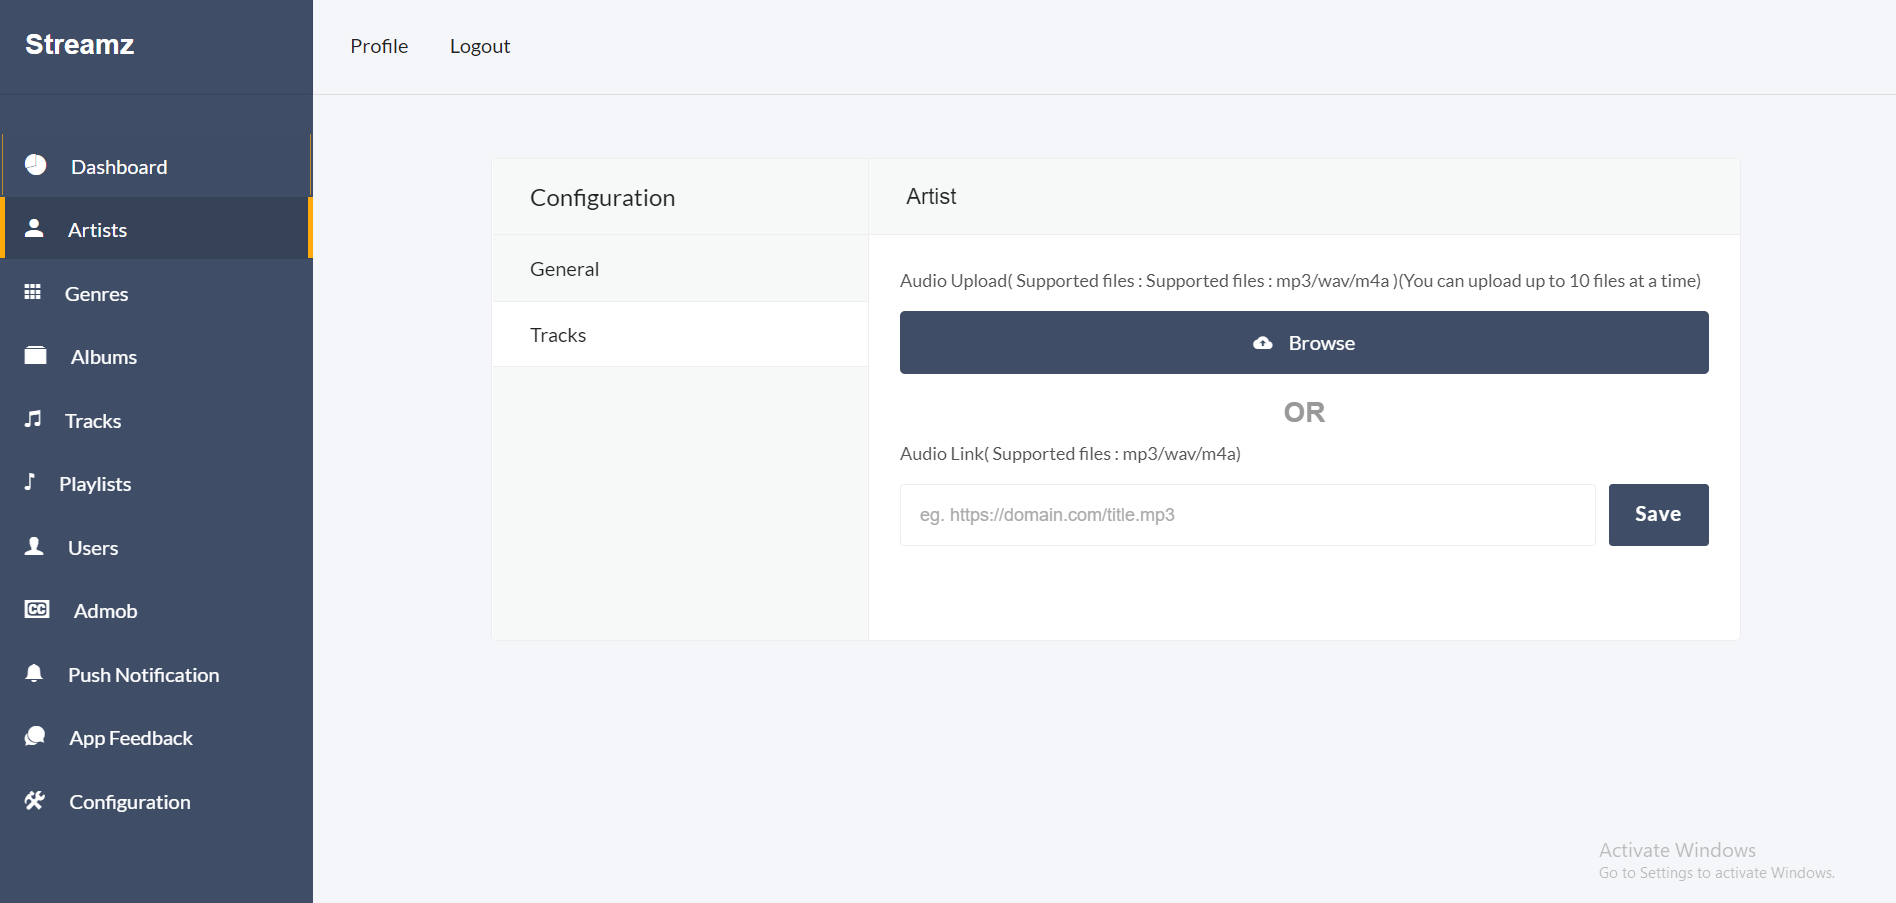
Artist
Admin have to create an artist in order to create track. Put the image,
artist name, genre of the artist(If you didn't create any genre, please add a genre), description and the make the artist active
by clickin the switch button and add the artist.
Admin can upload multiple tracks from the tracks option form the
artist > tracks
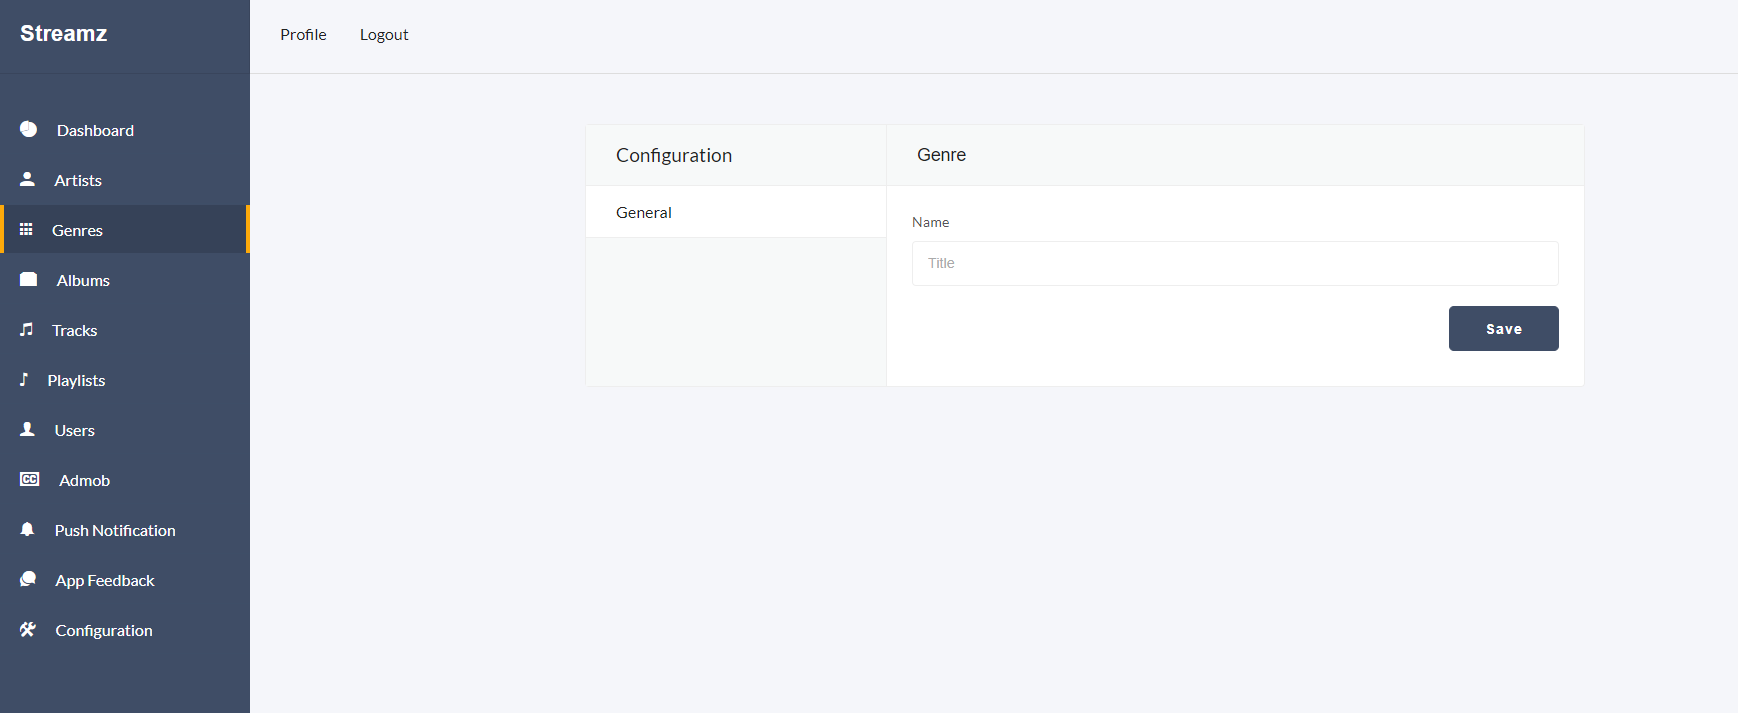
Genres
Admin can view / create / update / delete the genres from
the genre sidebar.
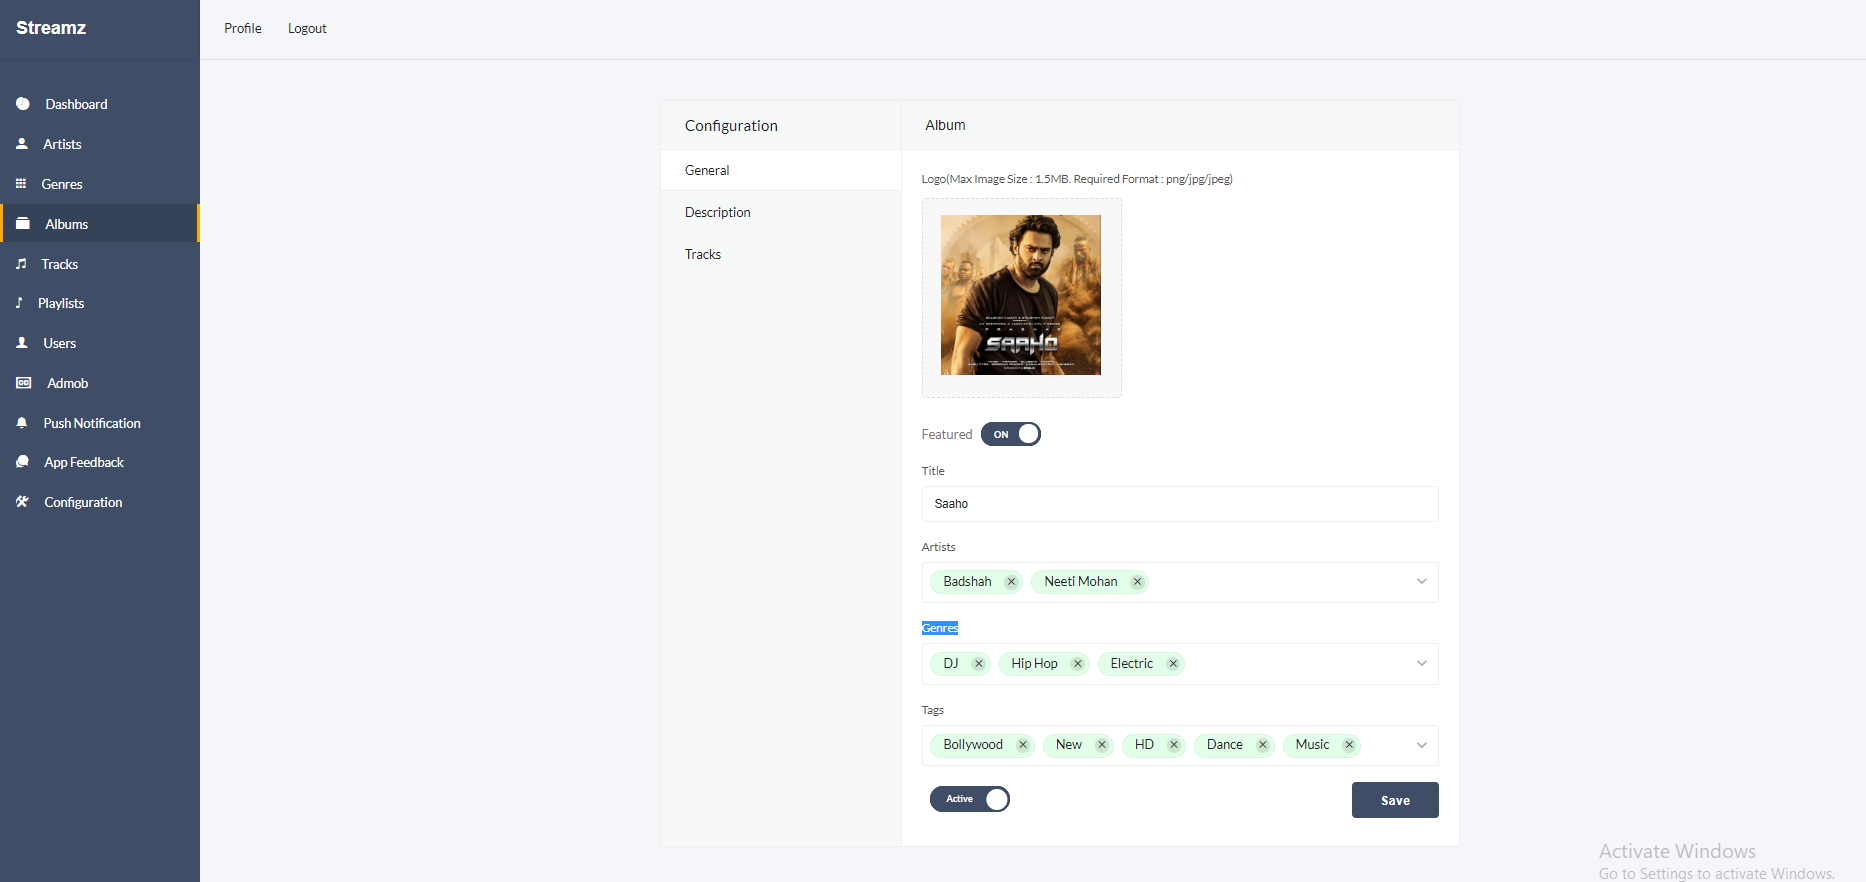
Albums
Admin can view / create / update / delete the albums from
the albums sidebar. First Upload the image of the album. Admin can make the album featured( This is needed for the
slider of the app. All the featured album will be shown in the slider of the app). Put the title, artist,
Genres, Tags (This is optional). And make the album active.
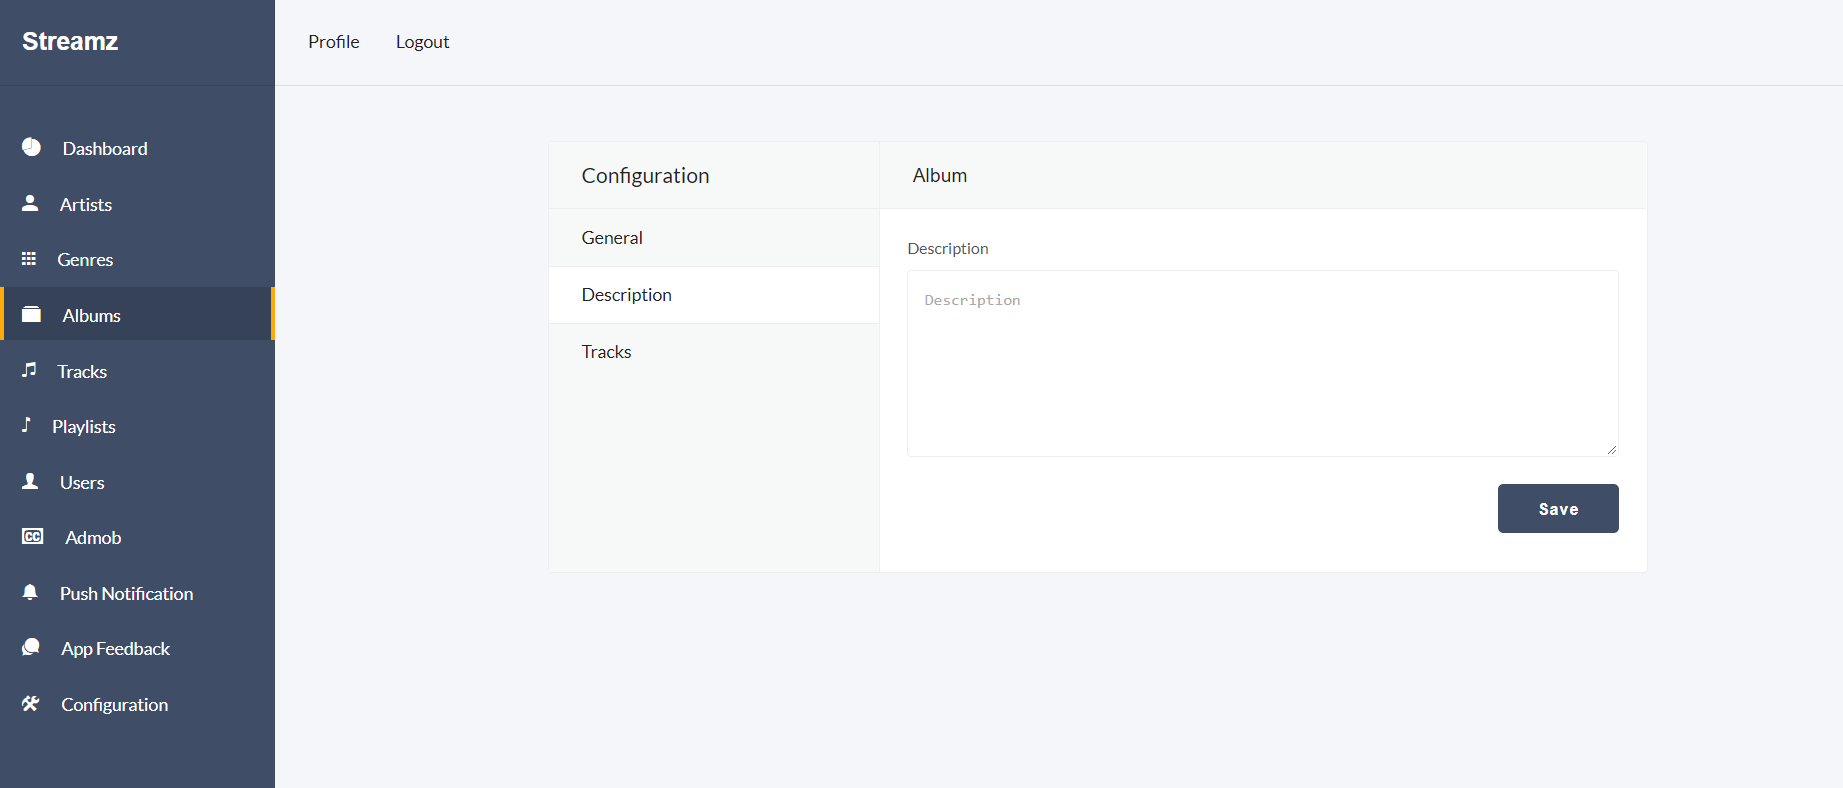
Admin can put the description of the album in the
album > description
Admin can upload multiple tracks from the tracks option form the
album > tracks
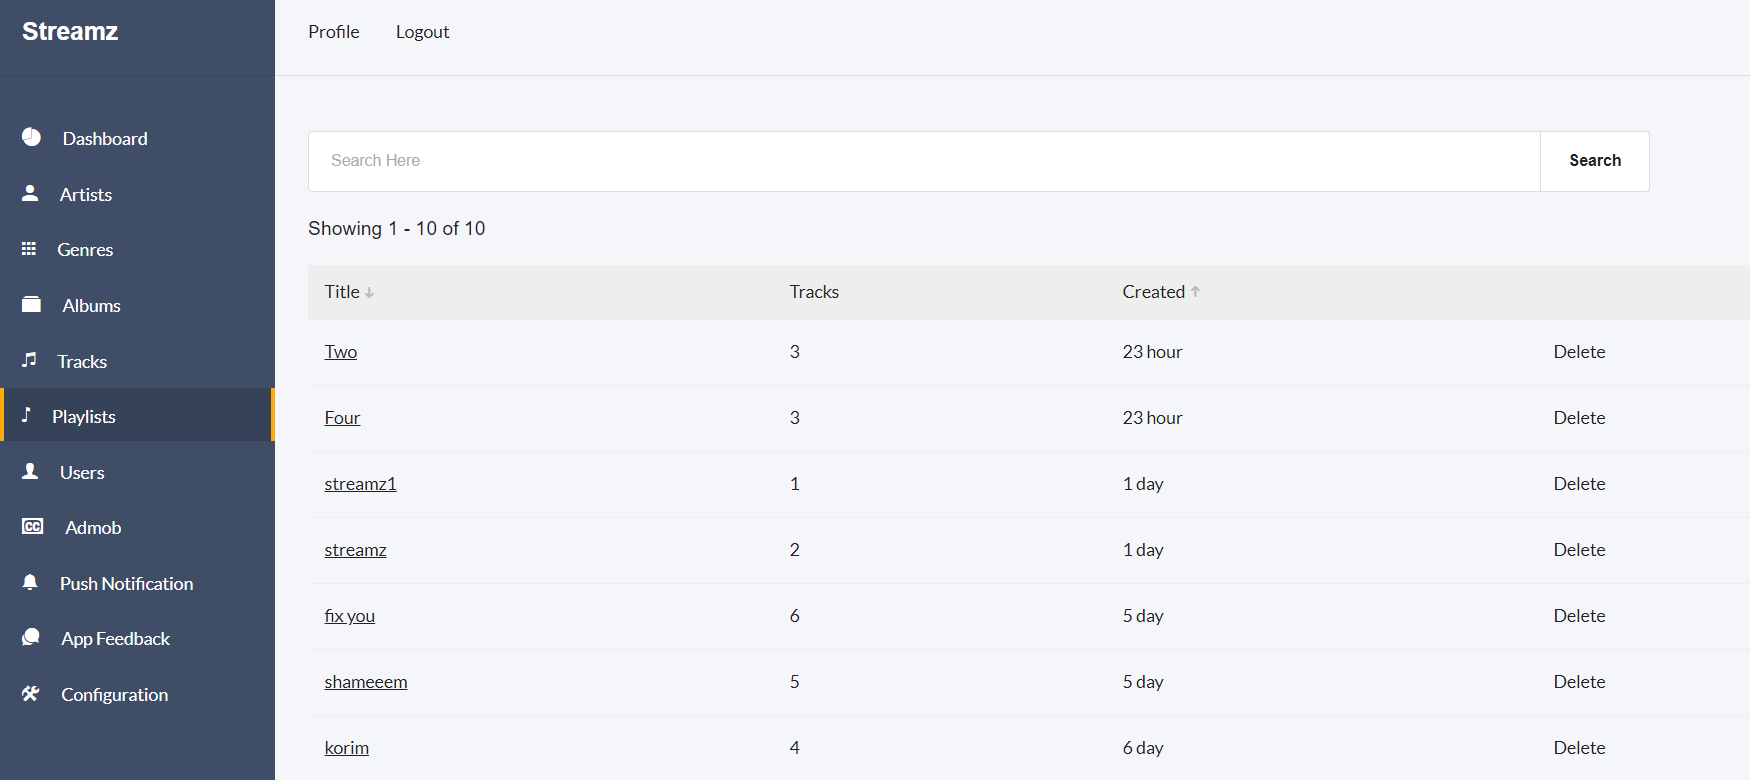
Playlist
All the playlist is being showin in this page.
admin can view and delete a playlist from here.
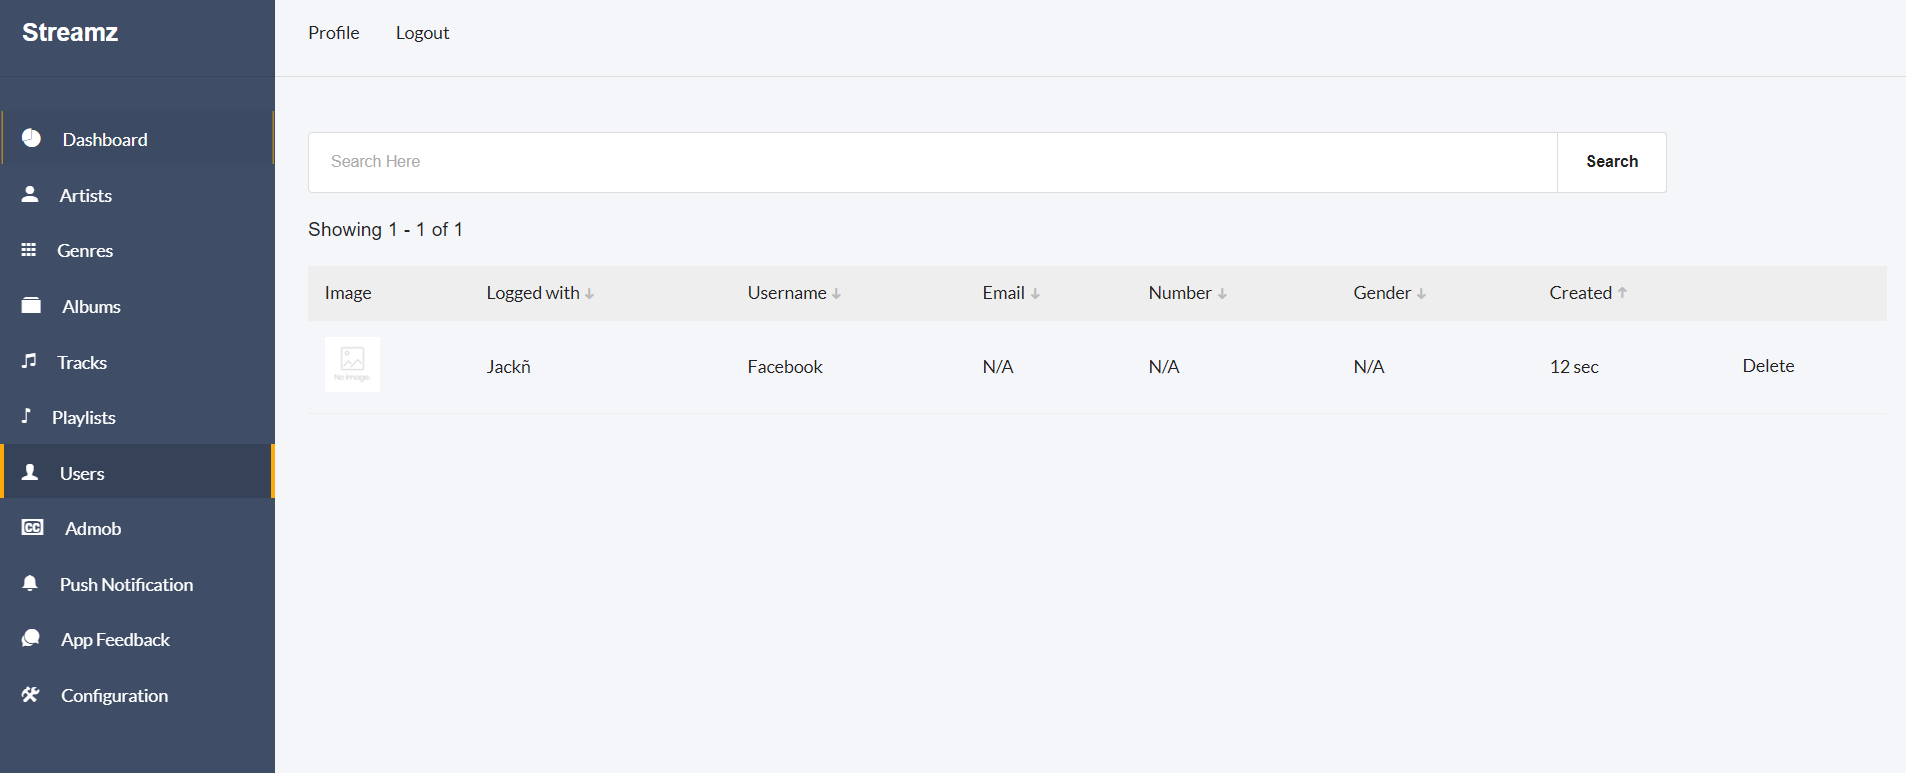
Users
In the Users page admin can see
all the registered users of the app. And can delete a user form here
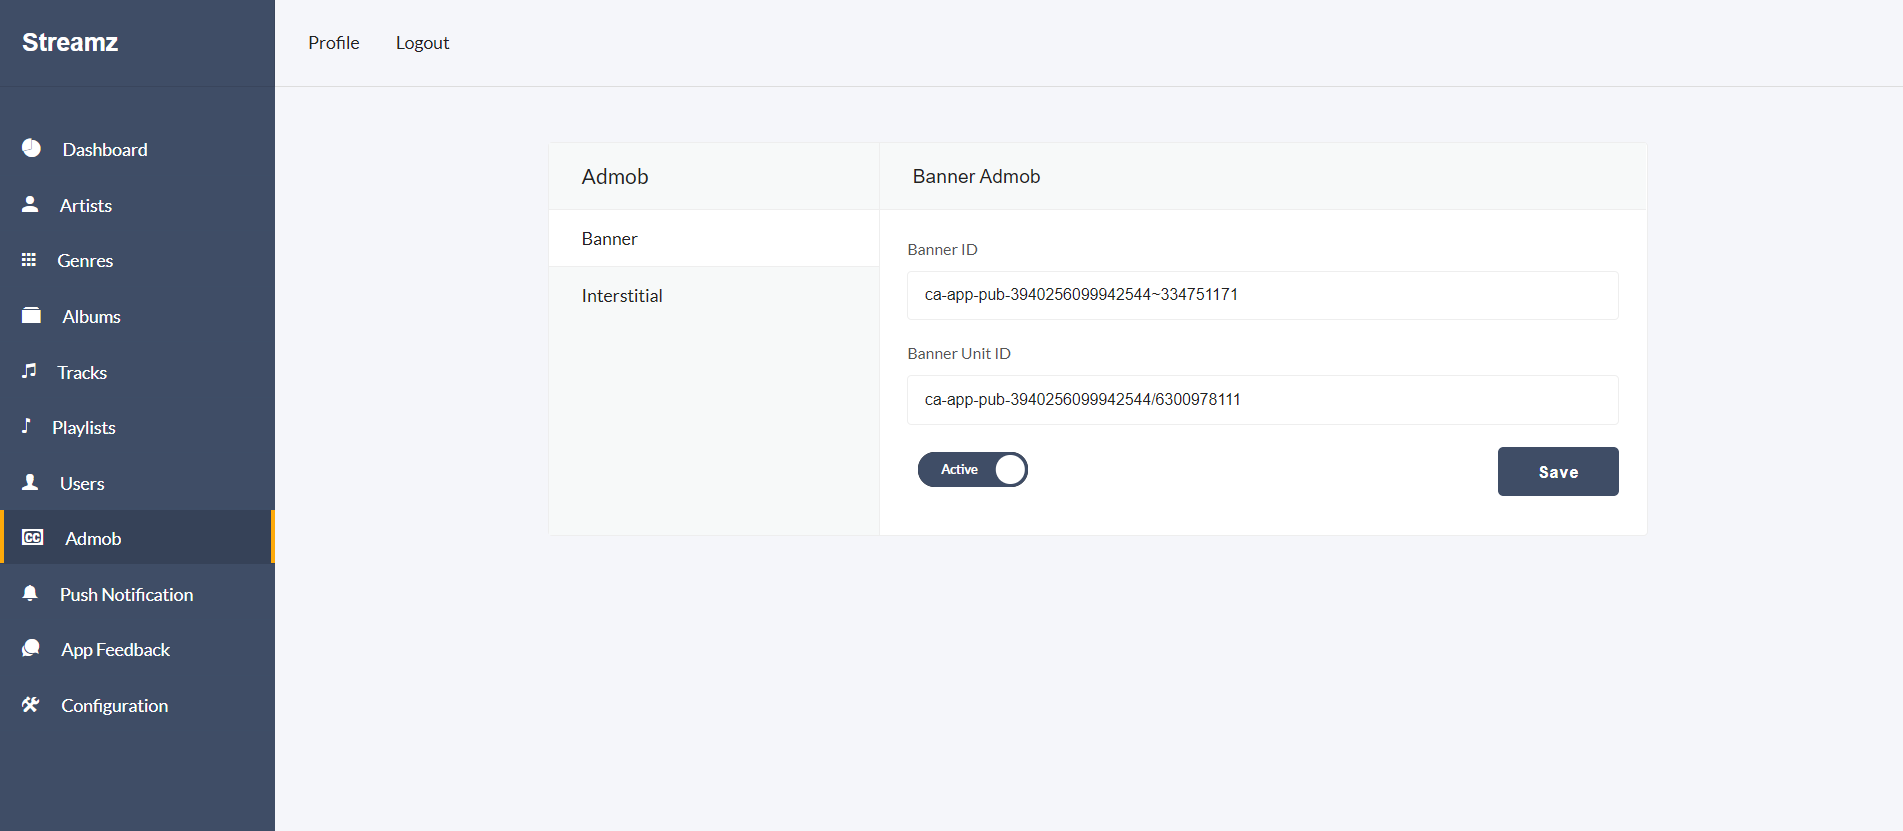
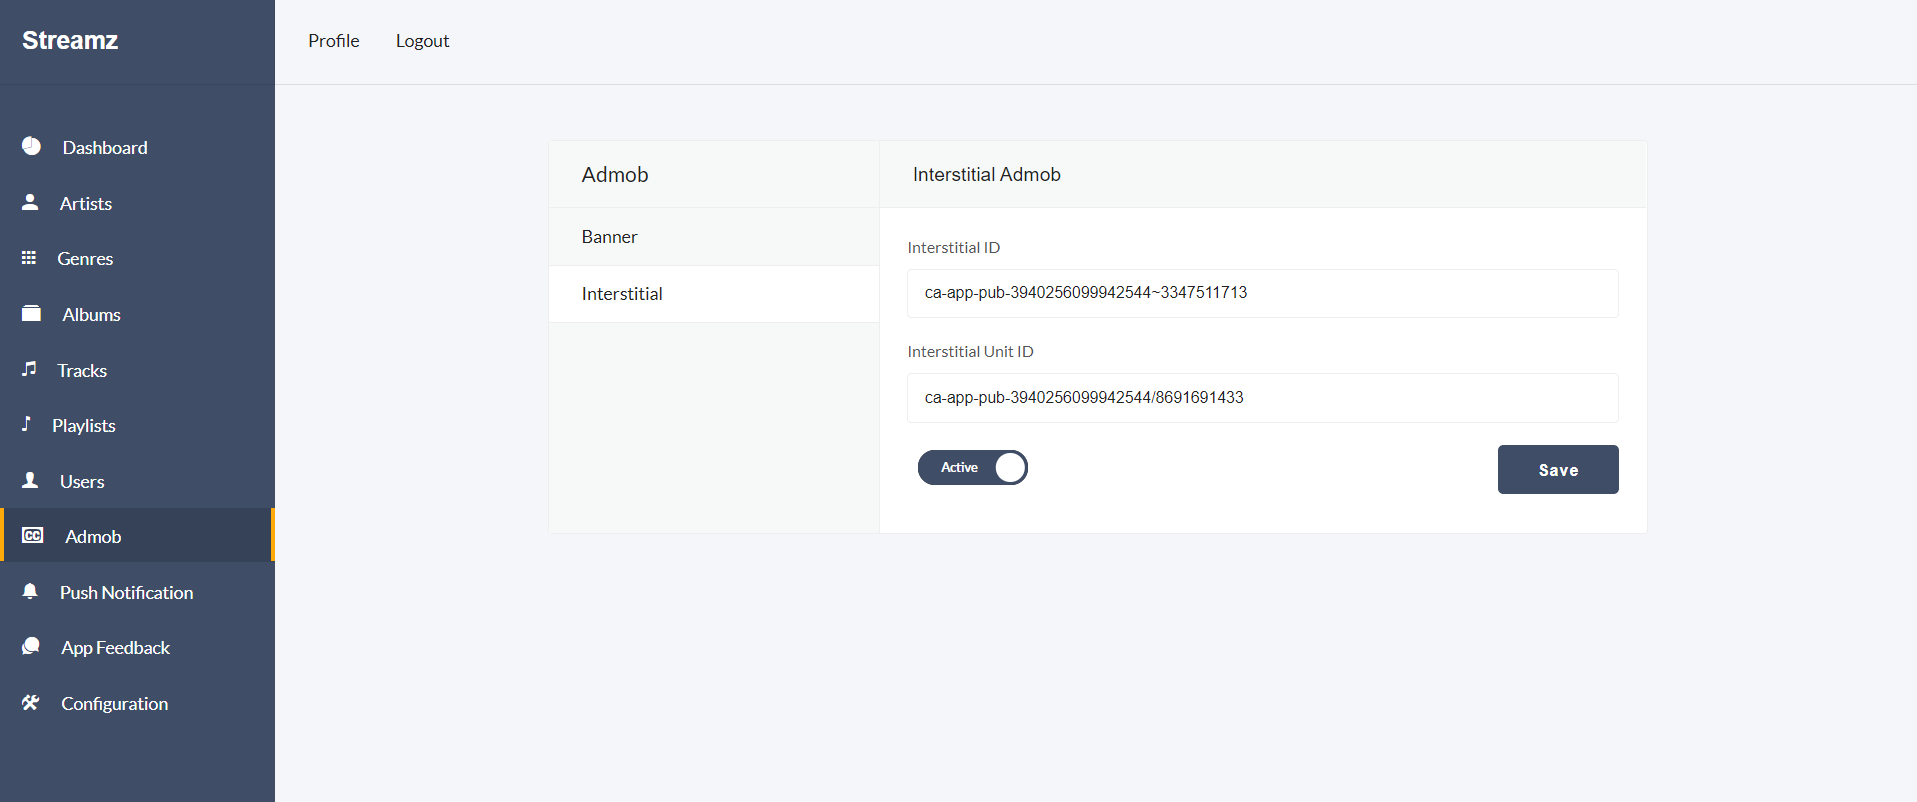
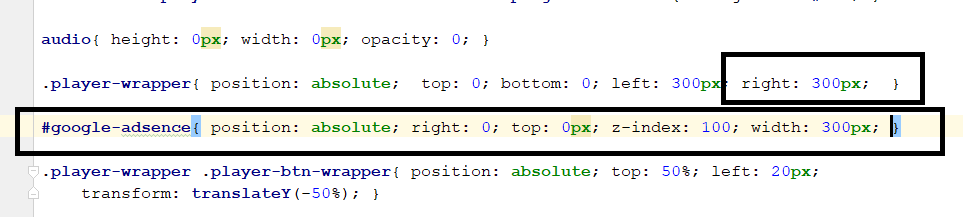
Google Admob
Admin can configure admob credentials from admin panel.
Also admin can on/off admin from the toggle button in the admob page.
Configuration
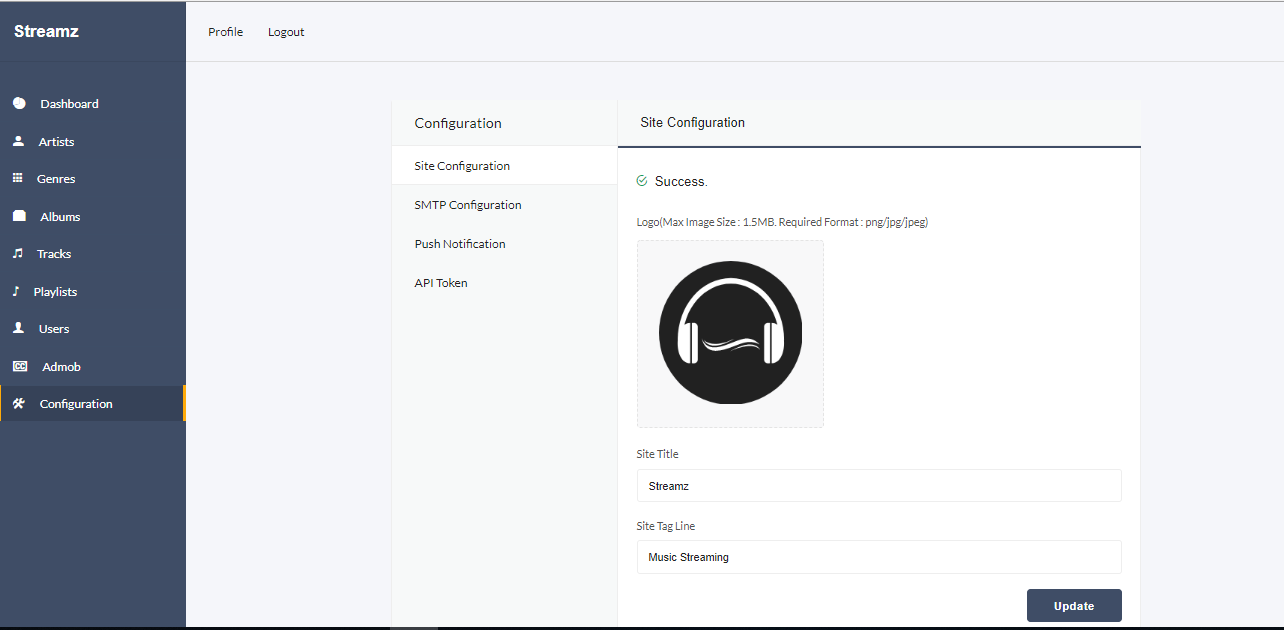
In the configuration page, admin will be able to
change the icon, site title and site tag line in the Configuration > Site Configuration.
In the configuration page, admin will be able to
change SMTP configuration form Configuration > Site Configuration.
In the configuration page, admin will be able to
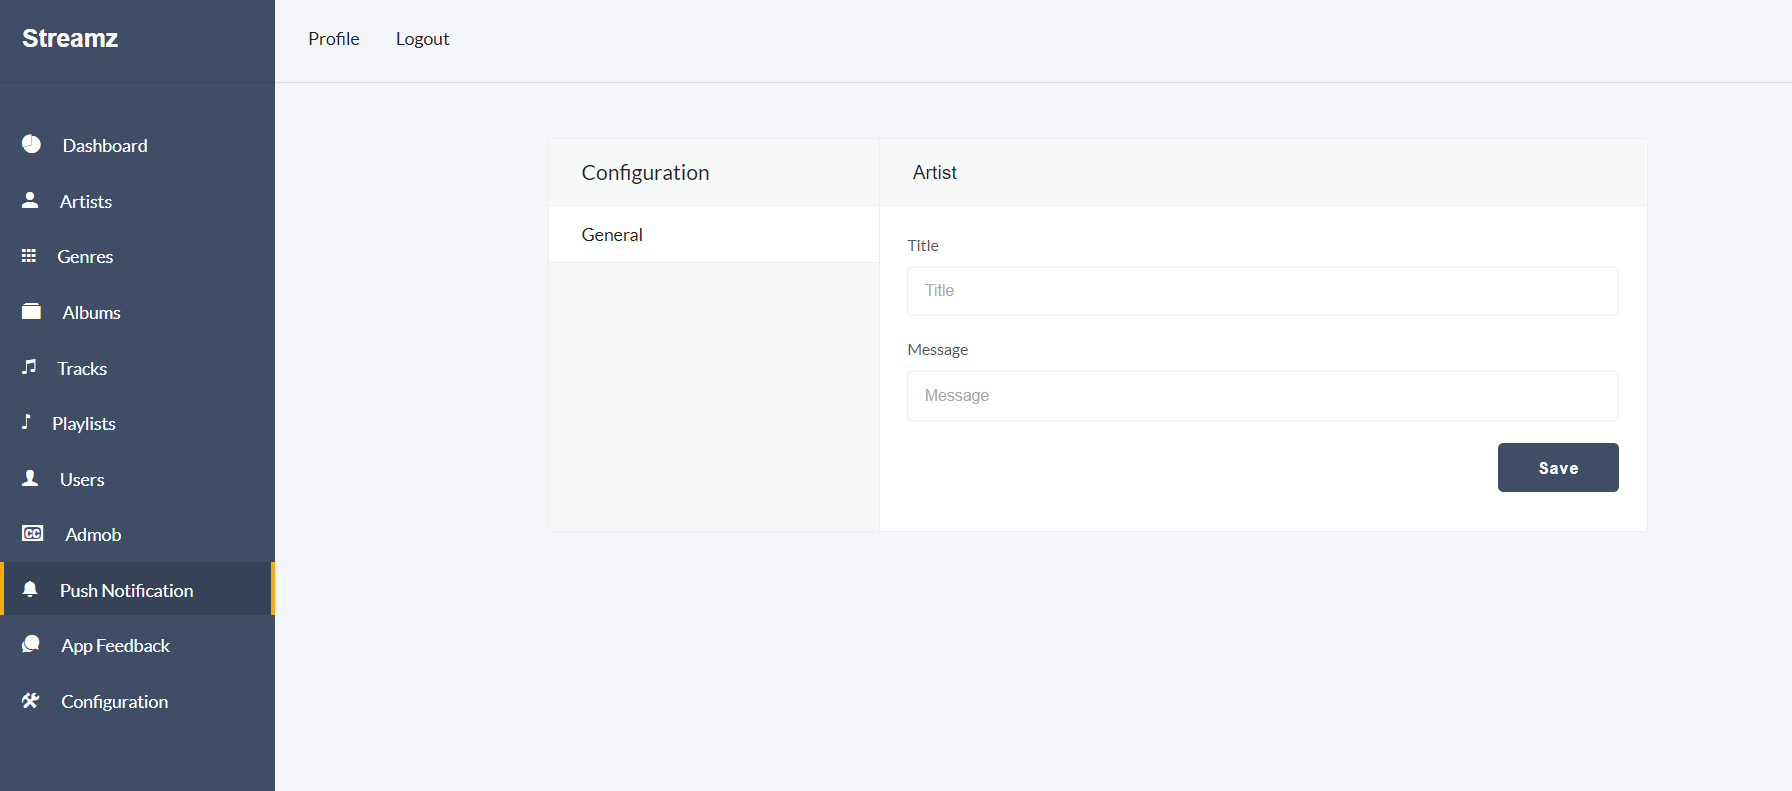
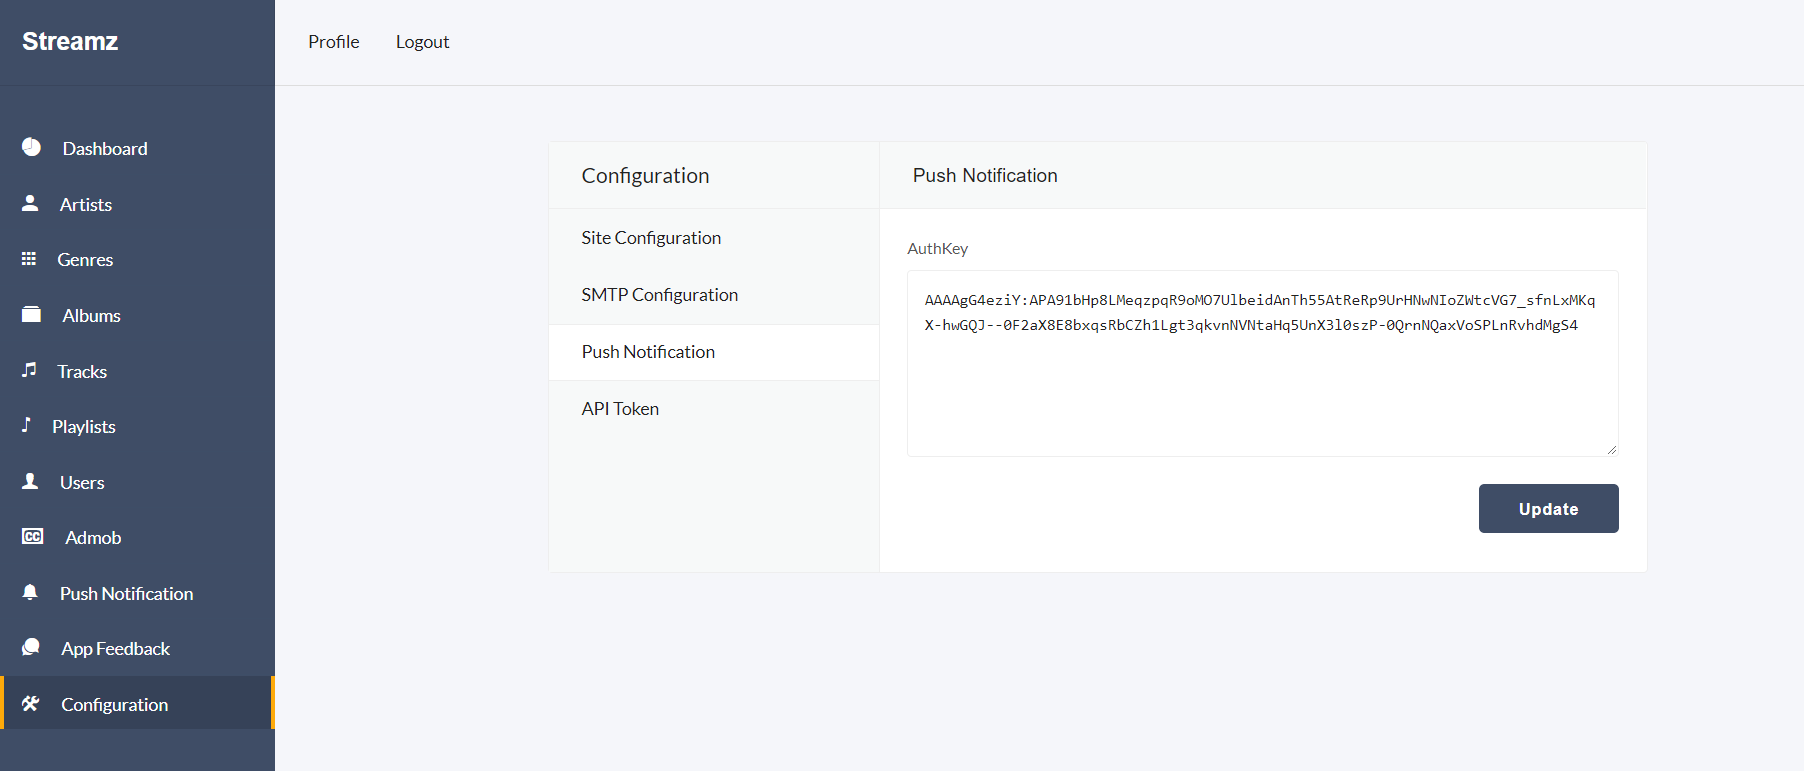
change Firebase Auth for the push notification form Configuration > Push Notification.
To secure the API we have used the api token.
This token is being used in the frontend website to secure the API. Admin can change the
Api Token form Configuration > API Token. For more information check
Section 5