LUDO SIX - A board game developed in Android
by: W3 Engineers Ltd.
Email: info@w3engineers.com
At first thank you for purchasing this template. If you have any question or any problem
regarding
this template, feel free to Contact
us via
info@w3engineers.com.
1 - Introduction
LUDO SIX is a board game developed in Android that can be played by Bot, 1, 2,3, or 4 players. This game is very amazing and used updated technology.
This game is an android supported game. This game is an offline base game.
The player can play two types of games. One is the LUDO board another is SNAKES.
At the beginning of the game, the Player will get the Tutorial for game playing instruction. Then the Player will get the profile name written option. After profile name input two options type of option will be shown one is the LUDO board another is SNAKES. The player can select one game for play. Then the player can select how many players he wanted to play. A player needs a host to play the game to tap on the “Host Game” button. The Host player will get the list of players. The host can add the player from the player’s list. While the host will try to add the player to his list, then a request will send to the player an invitation to add to his board. While the other player accepts the invitation then the host can start the game by a tap on the “Start” button. The players will get the LUDO board for play.
.
Ludo Source Code has been written in such a way that can easily be understandable and has been properly
commented on and documented within each script written in JAVA.
Features
- Supported platform Android ( JAVA)
- Bot, 1,2, 3, 4 players game
- SNAKES Board
- Source code has been properly commented and documented in itself and can easily be understood.
- Good Graphics
- Easy to customized
- Using google nearby for local communication
- No need internet. It is an offline game
- Smooth animation
- Easy to play
- Easy to install
- Super friendly code
- Well commented code
- Basics knowledge for setup
2 - Folder Structure
2.1Unzip the file.
2.2You see the following folders:
ludo-six.zip (Contains the android files)
Documentation
LUDO App Configaretion.mp4 (Contains the tutorial video)
3 - Customizing the App
3.1Rename Package.
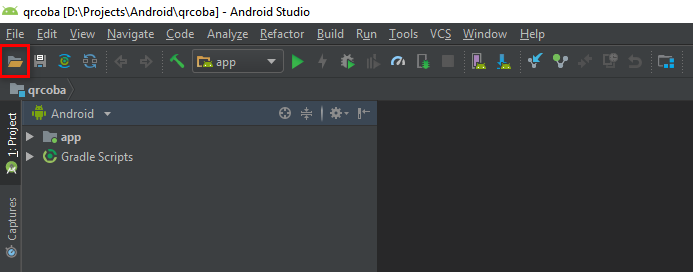
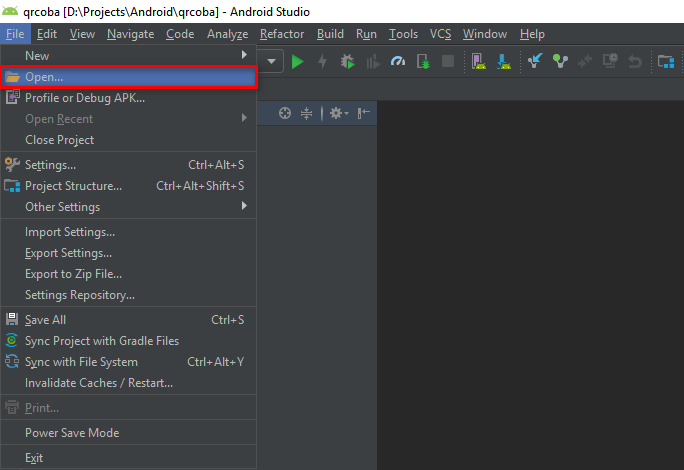
Open Android Studio
Open the project using one of the following methods, (see Figure 1, 2, 3)
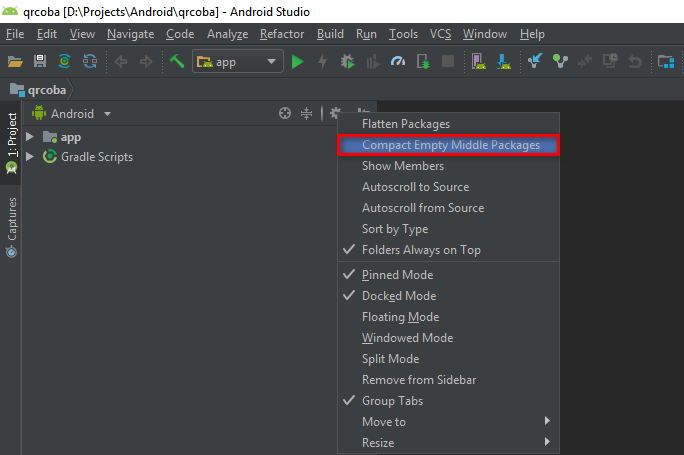
In your project pane, click on the little gear icon
Uncheck / De-select the Compact Empty Middle Packages option
Your package directory will be broken into individual directories now.
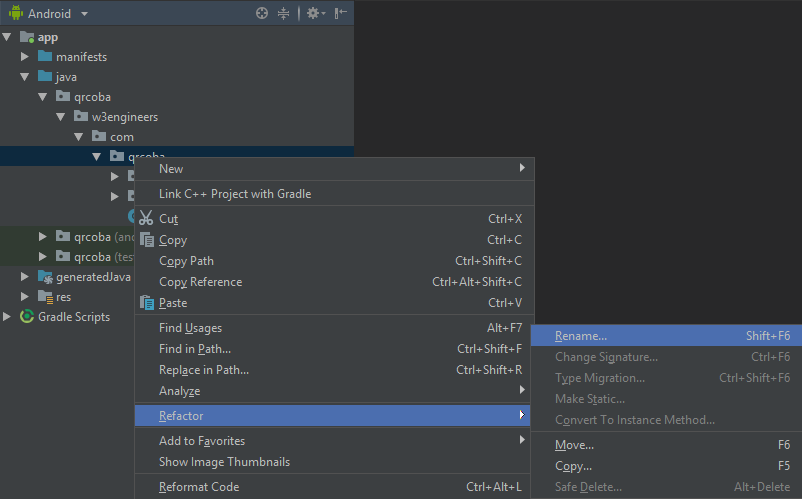
Individually select each directory you want to rename
Right-click on it
Select Refactor
Click on Rename
In the Pop-up dialog, click on Rename Package
Enter the new name and hit Refactor
Click Do Refactor at the bottom and allow a minute to let Android Studio update all changes
Note: While renaming com in Android Studio, it might give you a warning.
In such case, select Rename All.
Open your AndroidManifest.xml file. Change the package to your
new package name under the manifest tag.
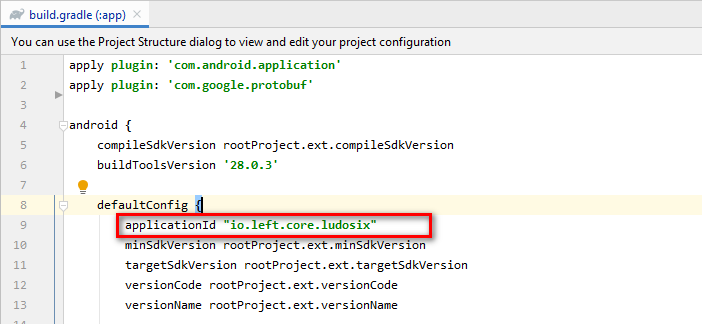
Now open your build.gradle (app) file. Update the applicationId to
your new package name and sync gradle.
Open values-> strings.xml file.
Rename the item file_provider_authority similar to your new package name. Have to add a unique text.
Clean and rebuild
Done
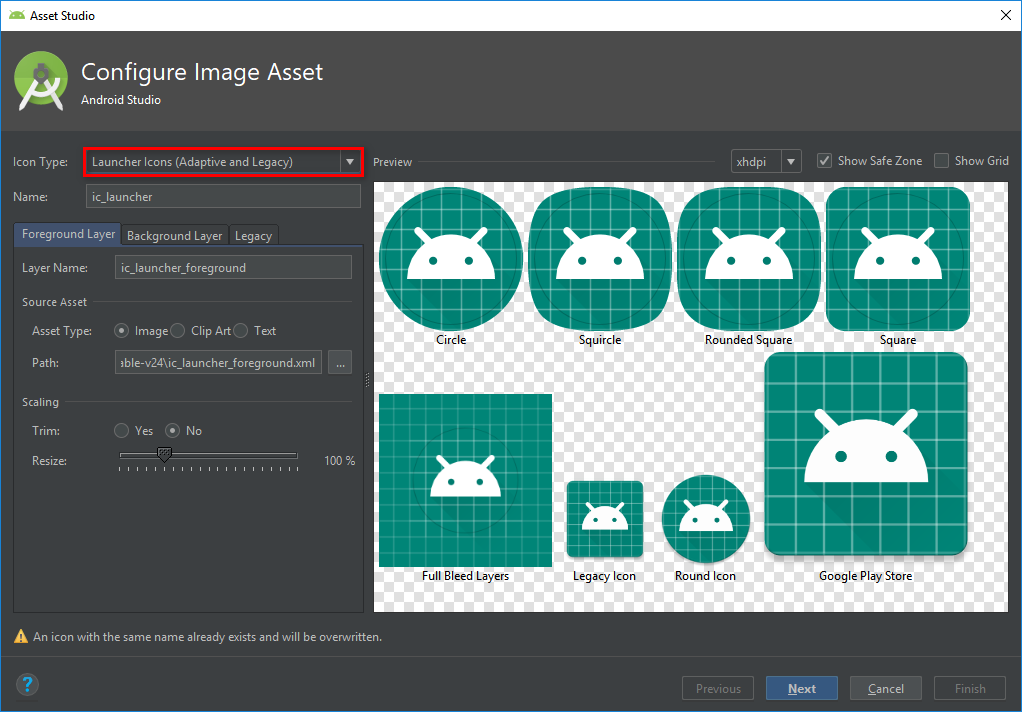
3.2Change App Logo
Right-click on the res folder.
Click on the New, then Image Asset.
Select Launcher IconsIcons (Adaptive and Legacy) and
set Foreground Layer, Background Layer.
Click on Next
Click on Finish. Done.
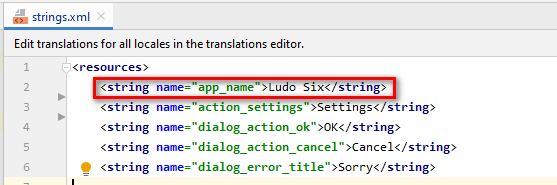
6.3Change App Name.
To change Application name go to the values > strings.xml file
Change the app_name item.
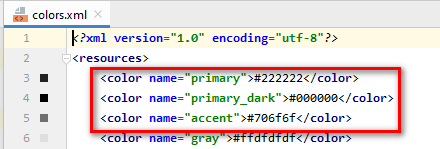
3.4Change App Color.
Go to the values > colors.xml file
Change the colorPrimary, colorPrimaryDark, colorAccent item values
4 - Installation
A dedicated socket server
NodeJS have to be installed in order to run the server
Installation on Locally
Make sure that you have already installed NodeJS.
Copy the LudoSix-server.zip file in any directory and unzip.
Explore the LudoSix-server folder and open the terminal on this directory
Open Command Prompt and firstly type => npm install then press enter, after finishing it type => node app.js node app.js
If you are asked to give any permission by showing a popup, allow that permission.
If you get “Server listening at port 3000” message on terminal (cmd), then your local is ready for accessing from the client.
Find your pc ip address.
Open Command Prompt and type => ipconfig
Then find the IPv4 address (example: 192.168.2.88), copy the address
Then find the IPv4 address (example: 192.168.2.88), copy the address
Open your android studio and open your app's source code.
Find the Constants interface located under com.w3engineers.theme.util.lib.internet package, then input BASE_URL according to formet http://192.168.2.88:3000
Then build your project android project and enjoy the online feature.
Note: Don’t close the terminal when you are accessing the local pc’s server.
Installation on Server
Installing in Ubuntu / Debain
Step 1 : At first you need to Install NodeJS.
Run the following command:
$ sudo apt update --fix-missing
$ sudo apt update
$ curl -sL https://deb.nodesource.com/setup_14.x -o nodesource_setup.sh
$ sudo bash nodesource_setup.sh
$ sudo apt-get install -y nodejs
Step 2 : Install Unzip if it's not already in Server.
$ sudo apt install unzip
Installing in CentOS / Redhat
Step 1 : Install NodeJS.
Run the following commands:
$ sudo yum -y install curl
$ curl -sL https://rpm.nodesource.com/setup_14.x | sudo bash -
$ sudo yum install -y nodejs
# Check Version
$ node -v
Step 2 : Install Unzip if it's not already in Server.
$ sudo yum install unzip -y
Copy Code
Step 3 : Copy the LudoSix zip project in your server, Unzip and locate it into the
LudoSix-server folder by following command.
$ unzip LudoSix-server.zip
$ cd LudoSix-server
Step 4 : Now run the project using the following command, normally it will run using port 3000.
$ node app.js
It will run the app in the foreground, closing the terminal will close the app.
We need to run it in the background. To do this follow the below instruction.
- Run the command to install npm to run node in background(Require sudo permission)
- $ sudo npm install -g pm2
- To run in background
- $ pm2 start app.js
- To check the status
- $ pm2 start app.js
Step 5 : Check your server IP (Real IP). You can get your IP in linux by following command or asking your provider.
$ ip addr show
Step 6 : You can access your server using below formatted url:
http://Server-IP:3000
Installing in Windows
Step 1 : Install NodeJS by following command
npm install
Step 2 : Copy the project folder after unzipping and paste it to your live server folder.
Step 3 : Now run the project using the following command, normally it will run using port 3000.
node app.js
Step 4 : Check your server IP (Real IP). You can get your IP in windows by following command or asking your provider.
ipconfig
Step 5 : You can access your server using below formatted url:
http://Server-IP:3000
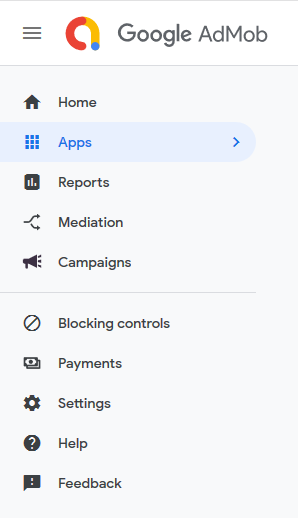
5 - Configure and Add Admob
Login with your Gmail account
Go to this
link
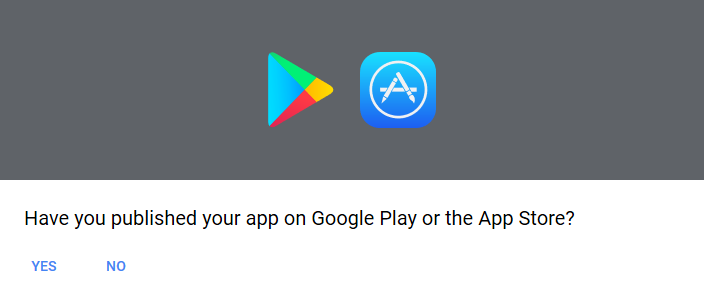
From Apps option create App
If your app is in play store then select
YES otherwise NO
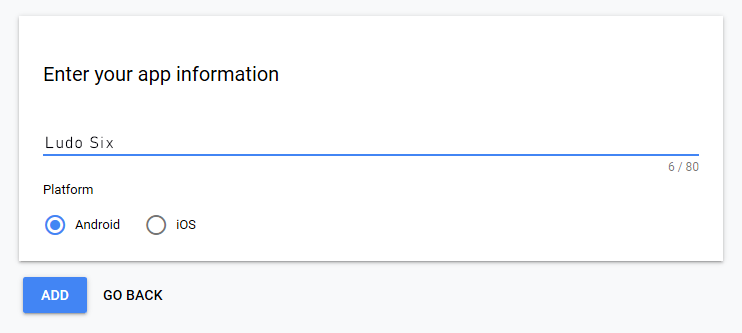
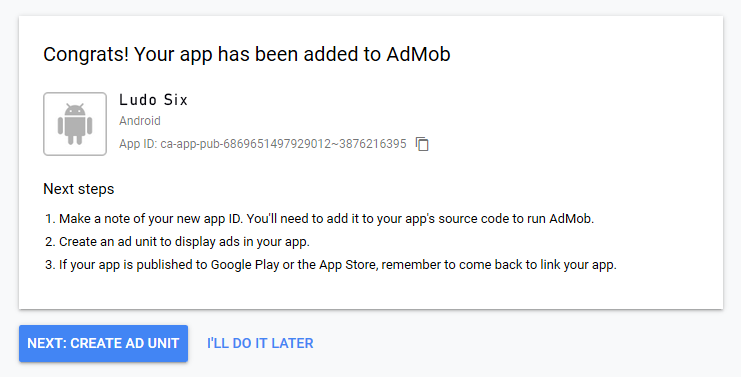
Then provide app information and click ADD
Then you will get an App ID.
Save it at values > string.xml file. You will need it later.
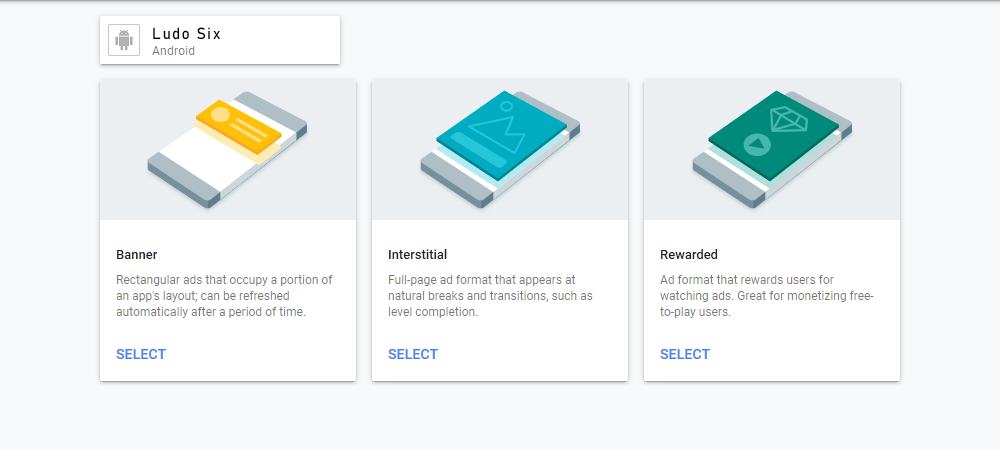
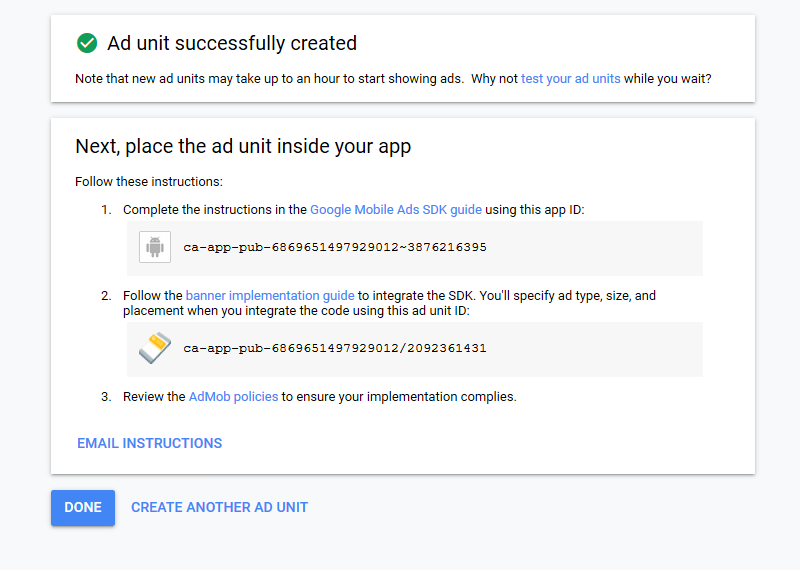
Then click on CREATE AD UNIT and you will find three ad types.
Only Banner and Interstitial types will be used here.
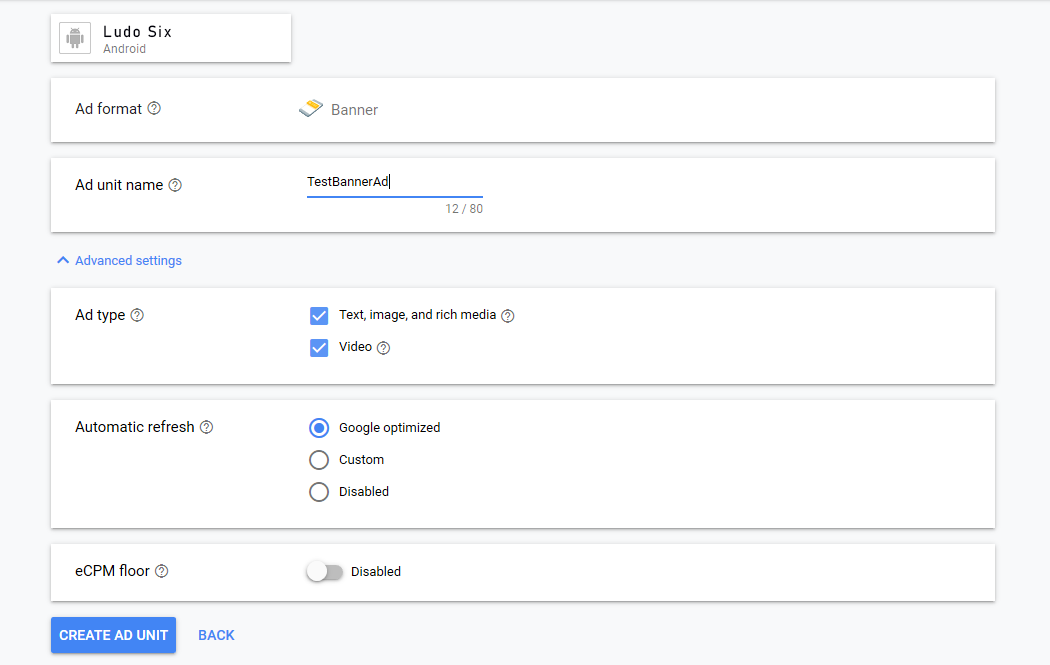
Select Banner type.
Provide Ad unit name and click on CREATE AD UNIT.
Copy Banner Ad unit id and save it .You will need it later.
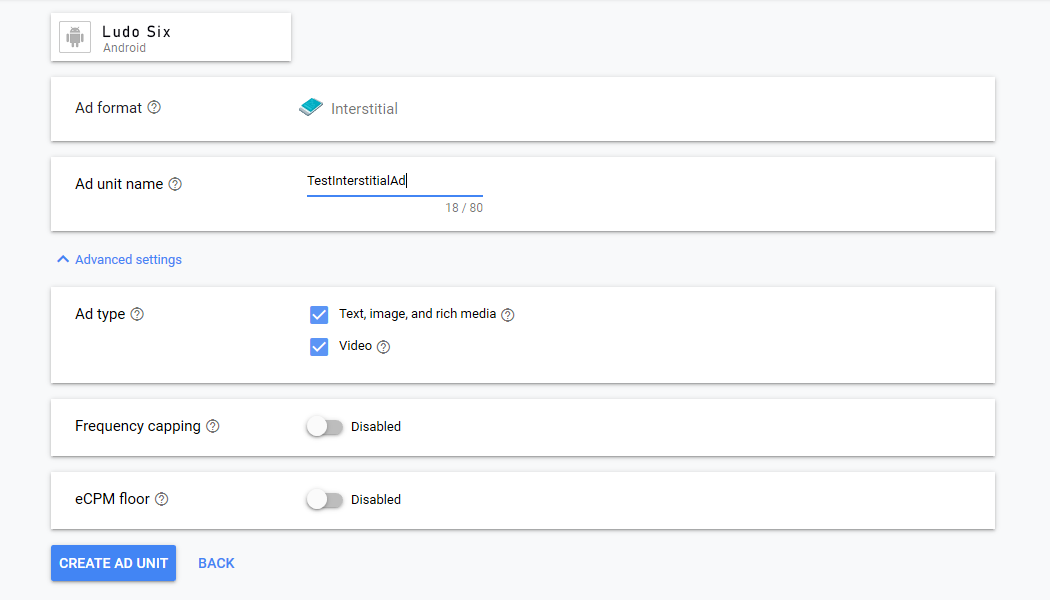
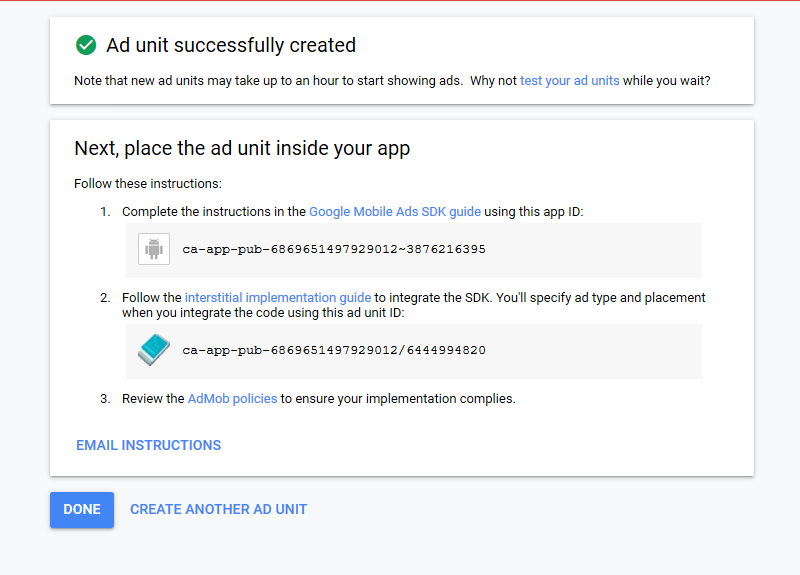
Then again go back to Ad types and select Interstitial Ad type.
Provide Ad unit name and select CREATE AD UNIT.
Copy the Interstitial ad unit id and
save it. You will need it later.
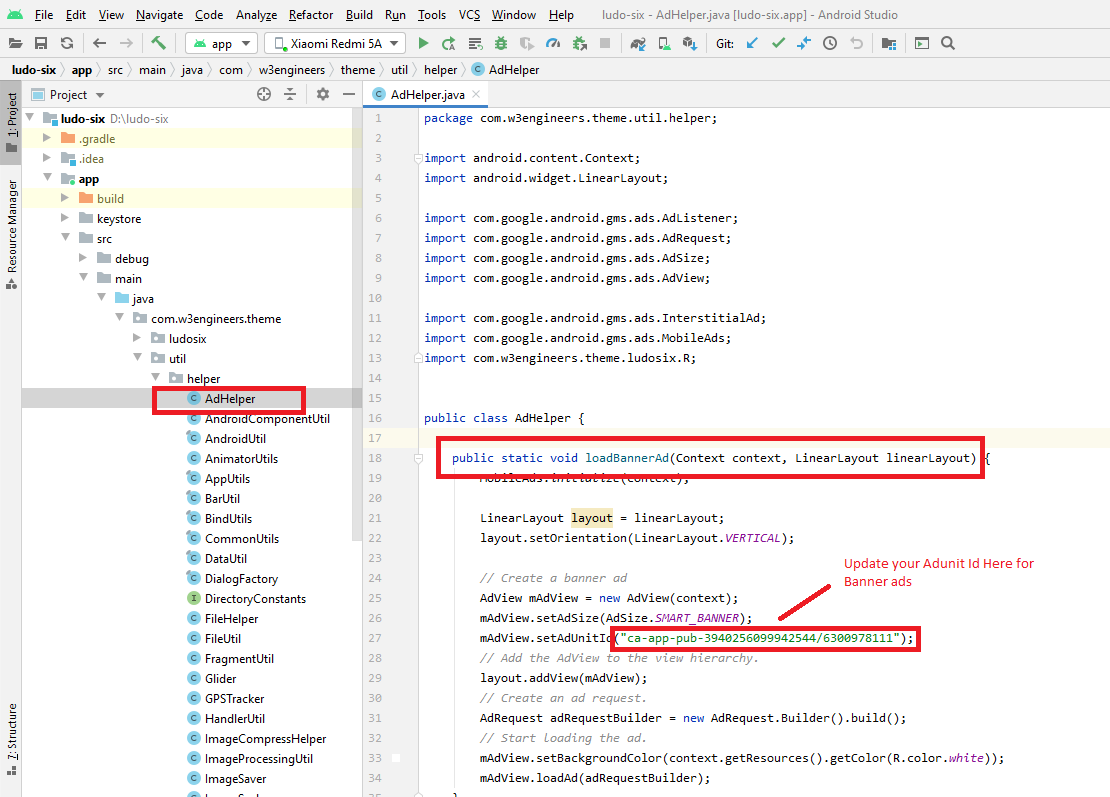
Now get saved Admob Banner and
Interstitial Ad unit id.
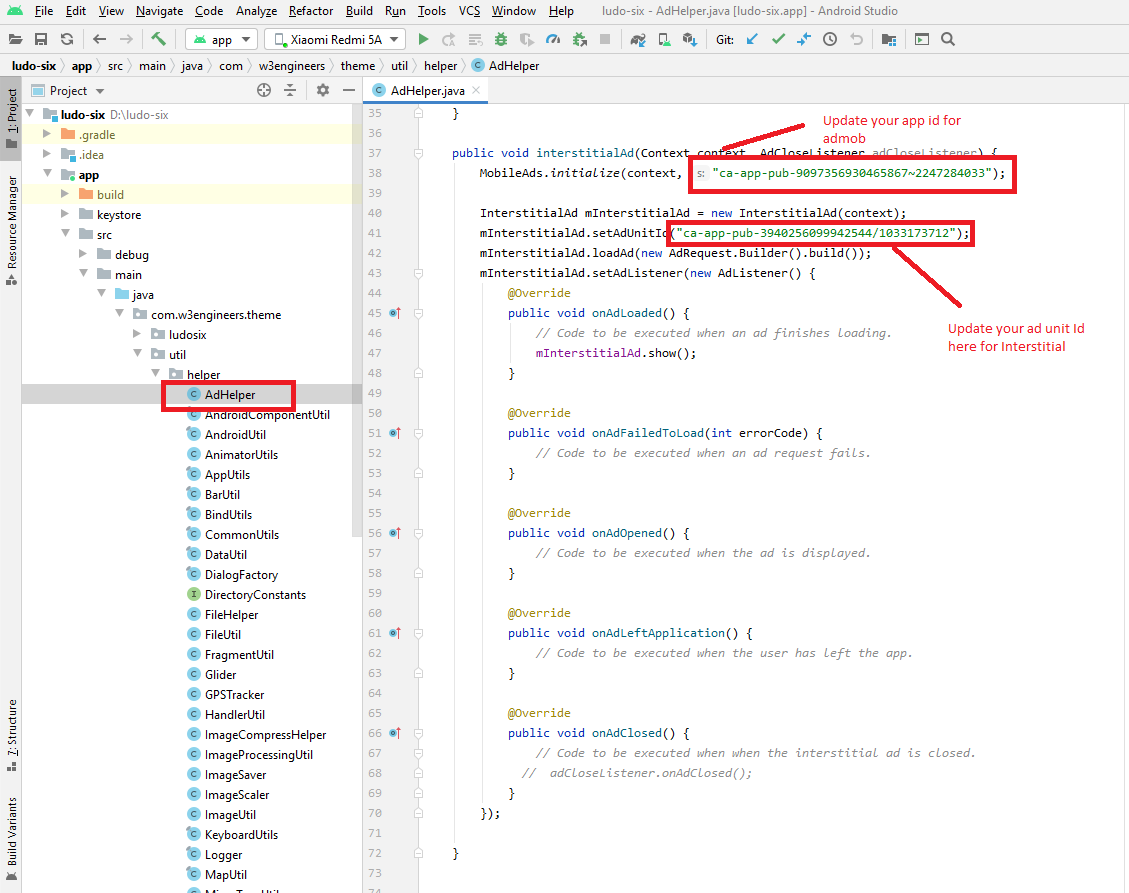
Then go to Go to "Ad helper" Class then change the app id and ad id as per the selected area.
6 - Facebook’s Ads Integration
Add the following dependency in app level build.gradle file:
implementation'com.facebook.android:audience-network-sdk:6.+'
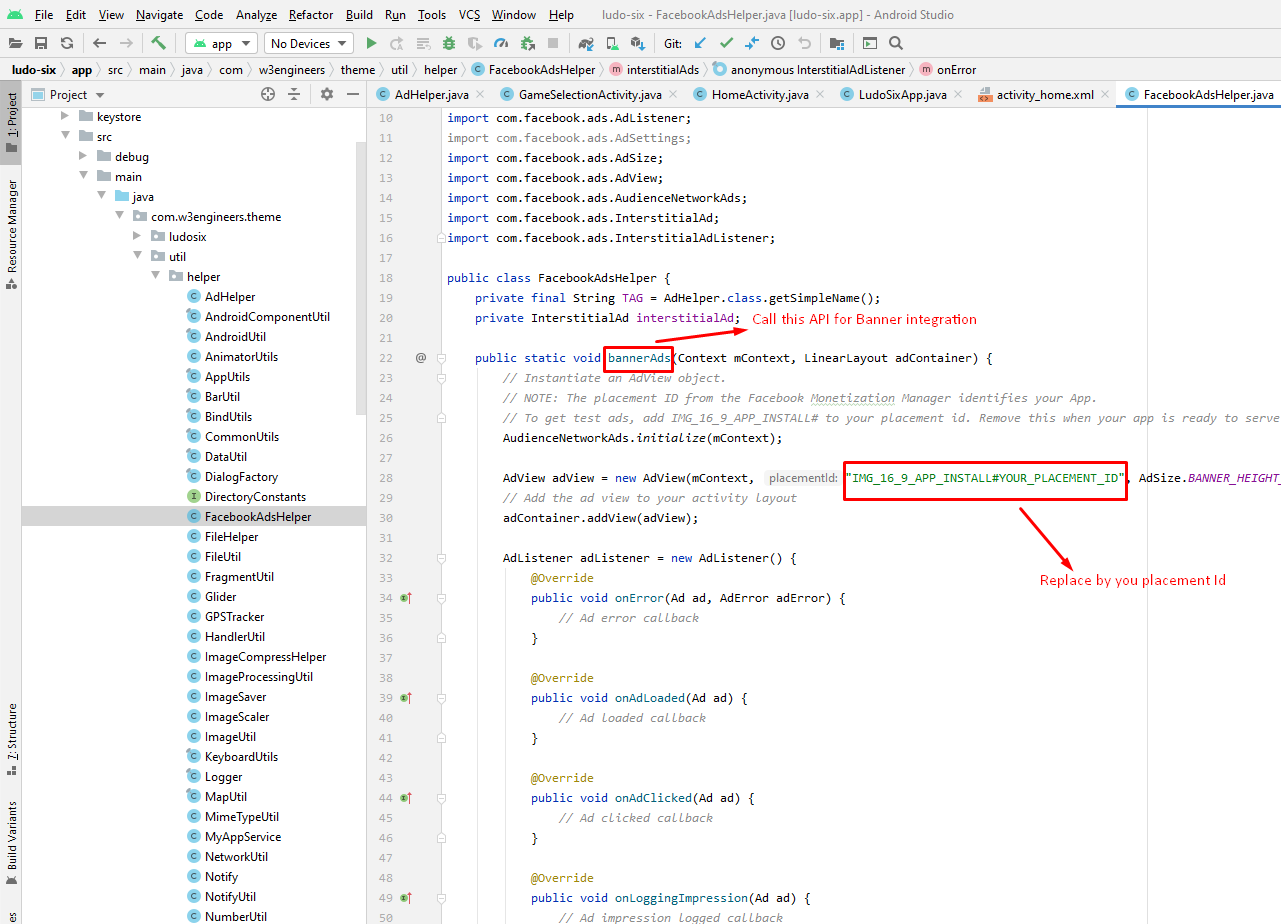
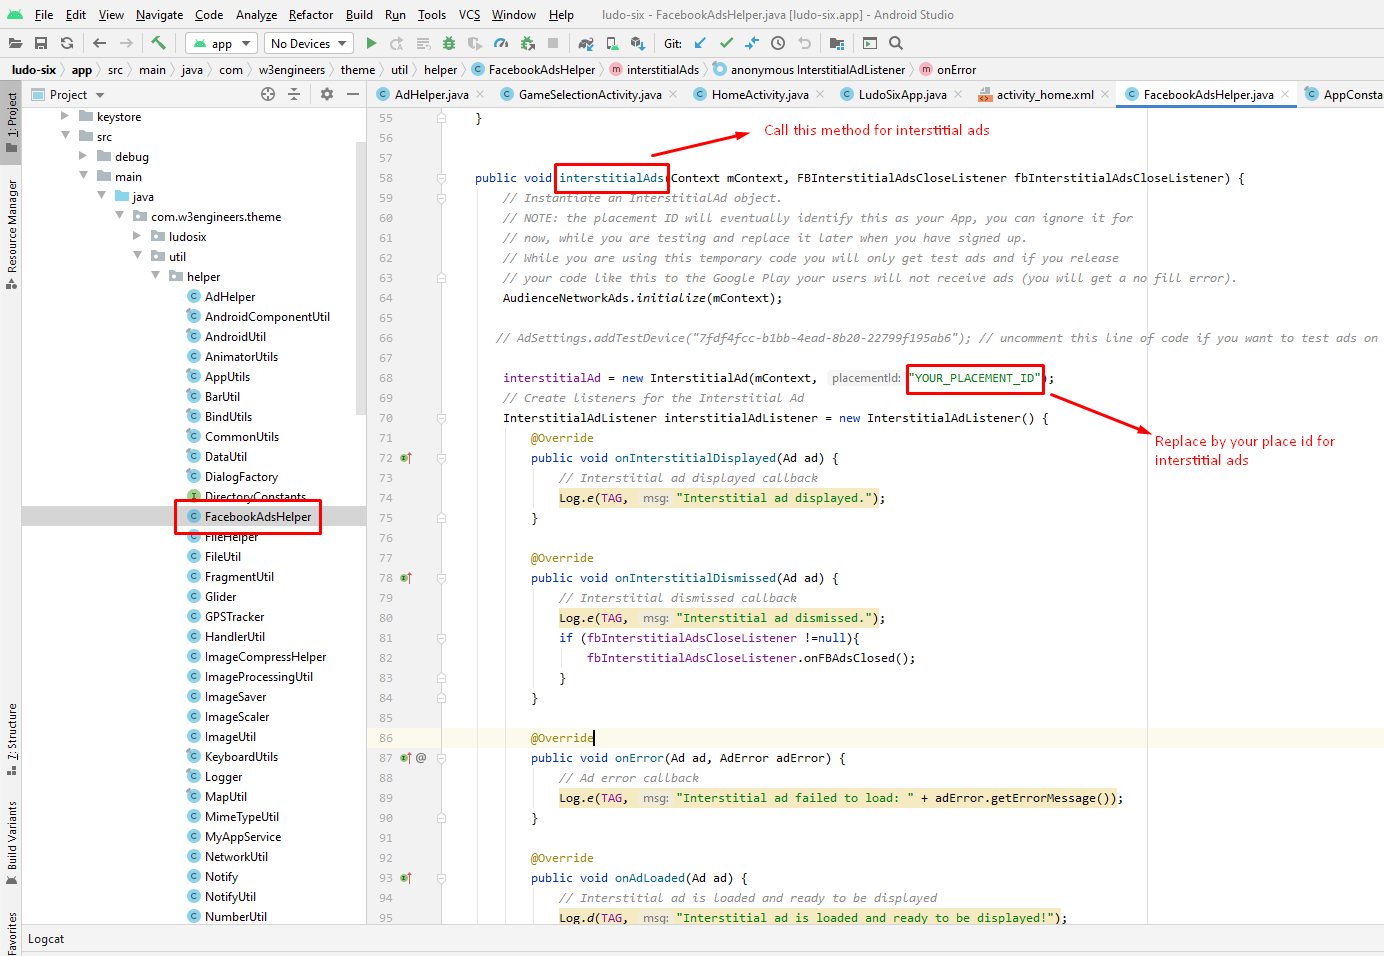
Open the FacebookAdsHelper class from fowling directory:
Com > w3engineers > theme >util> helper
Call the followings method where you want to show ads:
bannerAds():
This method is used to show the Banner ads.
Copy and paste the activity_home xml file into your source code.
interstitialAds():
This method is used to show the interstitialads.
Profile picture changing issue is fixed for Android 10:
Step 1:
Remove the following the dependency from app level build.gradle file:
implementation'com.theartofdev.edmodo:android-image-cropper:2.7.0'
Add the following the dependency in app level build.gradle file:
api'com.theartofdev.edmodo:android-image-cropper:2.8.+'
Step 2:
Add this line to your Proguardconfig file:
-keep class androidx.appcompat.widget.** { *; }
Step 3:
Update CropImageActivity into your AndroidManifest.xml
<activity
						android:name="com.theartofdev.edmodo.cropper.CropImageActivity"
						android:theme="@style/Base.Theme.AppCompat"
						android:screenOrientation="portrait" />
7 - Publishing the app in Playstore
Prepare your app
Change the package name and app name.
Generate sign apk.
Configure AdMob according to your account settings
Change the app logo.
Prepare resources
Prepare one logo with size 512px * 512 px
Take a minimum of 2 screenshots of your app
Generate feature graphics screen1024px * 512px
Reference link:
https://support.google.com/googleplay/android-developer/answer/1078870?hl=en
Submit your app on play store
Sign in to your play store account with your credential.
Create an app.
Go to “App Release” section.
Fillup application short and long description, upload a high-resolution logo, app screenshots and feature graphics that was prepared earlier.
Also filling the privacy policy link and other required information.
Click on save and if all required field submitted properly then you will find a green check mark on app release.
Now go to “App releases” section and go to manage production release.
Upload you signed apk and leave a short note in “What's new in this release” section.
Save this section.
Now finish “Content Rating” and “Store Listing” section with proper instruction and back to “App release” section again.
Finally, review your app and submit for publication.
Reference link:
https://www.youtube.com/watch?v=udPWeFUZzdo
App submission
After submission, you won’t find your application immidiately on playstore.
Play store team will review your app. And after review your application will be published on playstore.
Review time could max 48 hours.
Note
Here are some important tips for your application that will reduce the possibility of application rejection by play store.
Do not forget to change the app name and package name.
Do not forget to change the application logo.
Try not to download image or icons directly from Google. And try to use copyright free resources.
User your own AdMob credentials and link your application with AdMob account.