1 - Introduction
WallPark is built with native Java in Android Studio. It’s an android wallpaper application.
It offers more than 19 screens and all are fully designed & keeping in mind to fit for any
wallpaper types.
WallPark offers all required features, which can fulfill any modern application. It’s easy
to customize,
you can use it in any format of wallpaper like JPG, JPEG, PNG etc. You can customize any
screen as per your needs.
It follows all the standards to fulfill user’s requirements.
2 - Folder Structure
2.1Unzip the file.
2.2You see the following folders:
Wallpark (contain the android files)
wallpark-admin (admin panel files)
wallpark.sql (sql file)
3 - Requirments
Android Studio 3+
Android version 4.2+
Apche Server
PHP 7+
Mysql database
We have made important steps yellow for up and running the project.
4 - Installation
4.1PHP version 7+ required(So update your Xampp control panel or install new
one).
4.2Database Setup
4.2.1In order to setting up database , first you create a database “wallpark_db”.
4.2.2Then you can easily import the wallpark_db.sql file in your server.
4.2.3Link the database to admin panel
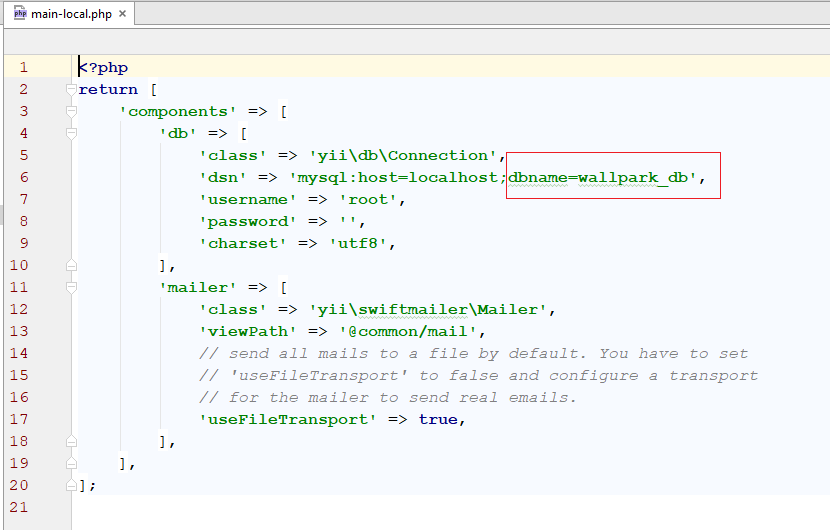
4.2.4For linking up, first you will find the file from this directory:
common\config\main-local.php.
4.2.5Insert the dbname (if it is empty), username, password.
4.3Installation on Locally
4.3.1Make sure that you have already installed Xampp control panel.
4.3.2Copy the wallpark-admin folder and paste it in your
Xampp's htdocs folder.
4.3.2Now run your Xampp Control Panel.
4.3.3Create a database. Database name will be "wallpark_db" or any other name
4.3.4Import the wallpark.sql file in your created database.(wallpark.sql file is
located in the Main_files.)
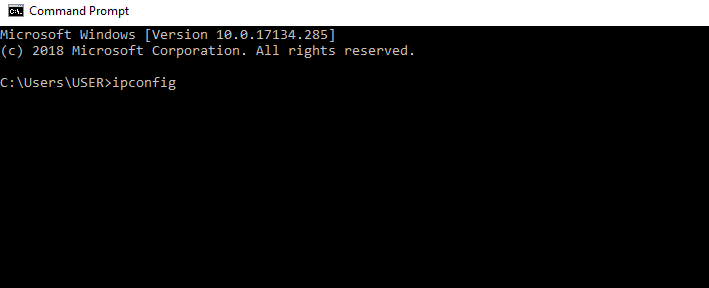
4.3.5Find your pc ip address.
4.3.6Open Command Promt and type => ipconfig
4.3.7Then find the IPv4 address (example: 192.168.2.88),copy the address
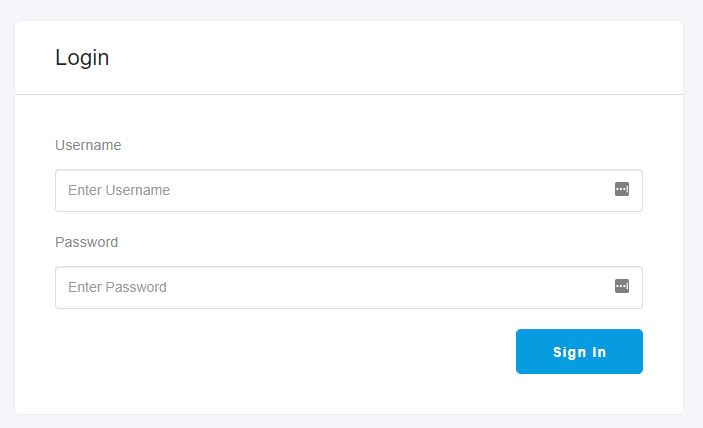
4.3.8Open your browser.In your browser url type:
http://your_ip_address/wallpark-admin
For example, my pc ip address is: 192.168.2.88
So the url will be: http://192.168.2.88/wallpark-admin
4.3.9If you see the admin login page, then admin-panel work successfully.
Username: admin
Password: 123456
4.4Installation on Server
4.4.1To install it on the live server, you should copy the project folder and paste it
to your live server folder.
4.4.2Please give the writeable 777 permission
to the following folders and the subfolders inside them:
backend\web\assets
backend\runtime
frontend\runtime\debug\mail
frontend\runtime
wallpark_images
4.4.5Login as Admin:
UserName: admin
Password: 123456
4.5Installation with terminal
4.5.1Installing apache
sudo apt update
sudo apt install apache2
sudo ufw allow in "Apache Full"
sudo apt install apache2
4.5.2Copy project to web root dir
sudo cp -R wallpark-admin /var/www/html/
4.5.3Installing MySQL
sudo apt install mysql-server
4.5.4Create Database(mysql)
create database wallpark_db;
create user db_user;
grant all on wallpark_db.* to 'db_user'@'%' identified by 'admin123';
4.5.5Import Database
mysql -h localhost -u root wallpark_db < wallpark_db.sql
4.5.6Install PHP 7.2
apt-get -y install php7.2 libapache2-mod-php7.2
sudo apt-get install php7.2-mysql
sudo apt-get install php7.2-gmagick
sudo apt-get -y install php7.2-gd php7.2-imagick
systemctl restart apache2
4.5.7Enabling mod_rewrite
sudo a2enmod rewrite
sudo systemctl restart apache2
sudo apt-get install php7.2-gmagick
systemctl restart apache2
4.5.8Edit host
If you want to change the server link. Edit this following file. If you don't want to change the link of the server,
you can skip this step.
sudo nano /etc/apache2/sites-available/000-default.conf
For more detail, Please follow the link below.
https://www.digitalocean.com/community/tutorials/how-to-set-up-apache-virtual-hosts-on-ubuntu-14-04-lts
4.5.8Restart server
sudo systemctl restart apache2
4.5.9Permission
Please give the writeable 777 permission
to the following folders and the subfolders inside them:
backend\web\assets
backend\runtime
frontend\runtime
wallpark_images
4.5.10Login as Admin:
UserName: admin
Password: 123456
5 - Connect the android app to the admin panel
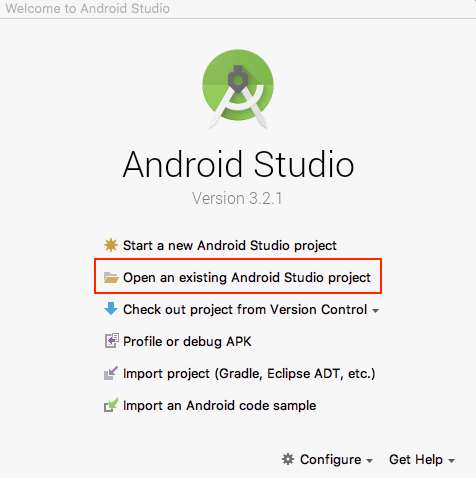
5.1Make sure that you have already installed Android Studio.
5.2Open Android Studio.
5.3Open existing Android Studio project by using one of below methods:
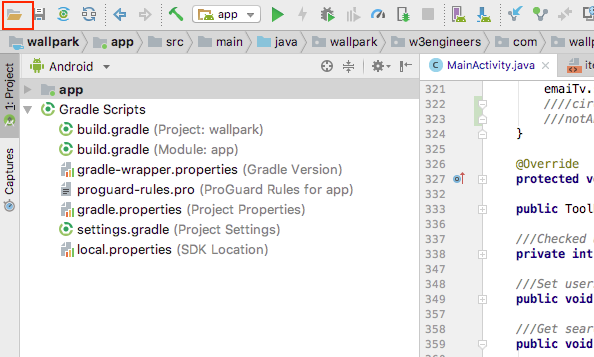
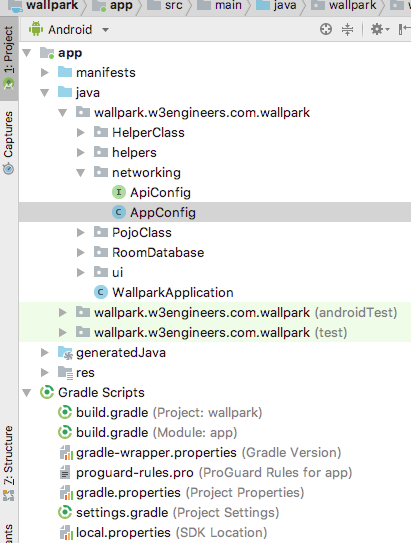
5.4Open the WallPark folder in android studio that contains android files.
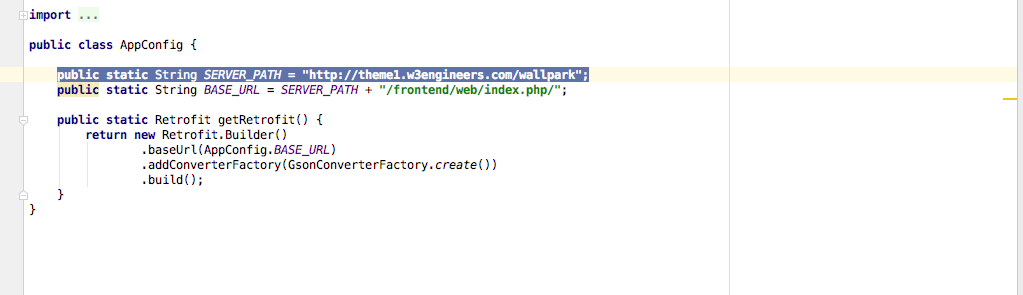
5.5Then open the AppConfig.java class which is located in the
networking package.
5.6Find the String of SERVER_PATH and edit the link as below:
public static String SERVER_PATH= "http://192.168.1.75/wallpark
5.7Run WallPark in your android studio. If everything okay
then you will see the wallpaper in your application.
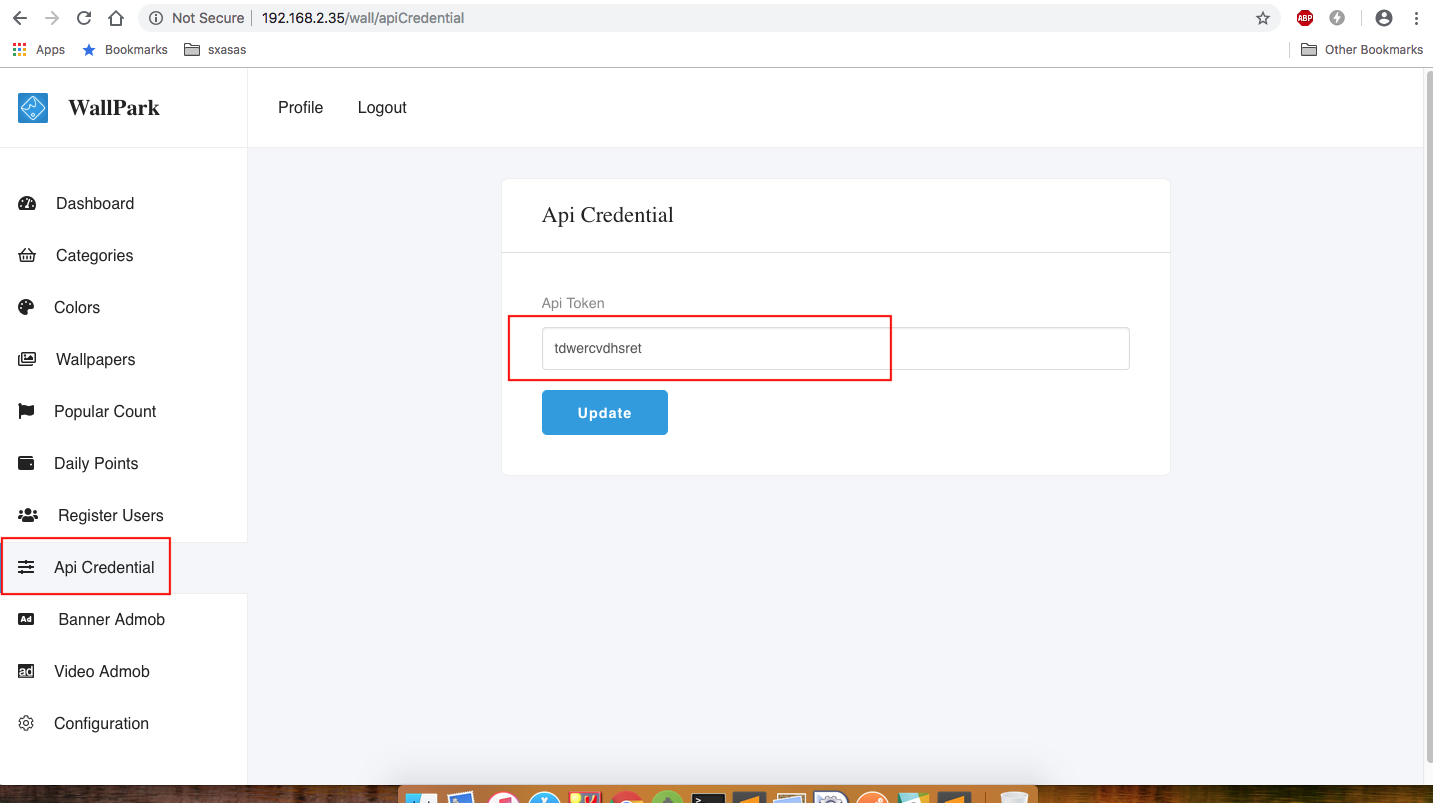
6 - Changing apitoken
6.1Go to your control panel and login with username and password.
6.2Go to Api Credential and copy Apitoken
6.3Go to HelperClass>StaticVaribleStoringClass and put Api
Token in “API_TOKEN”
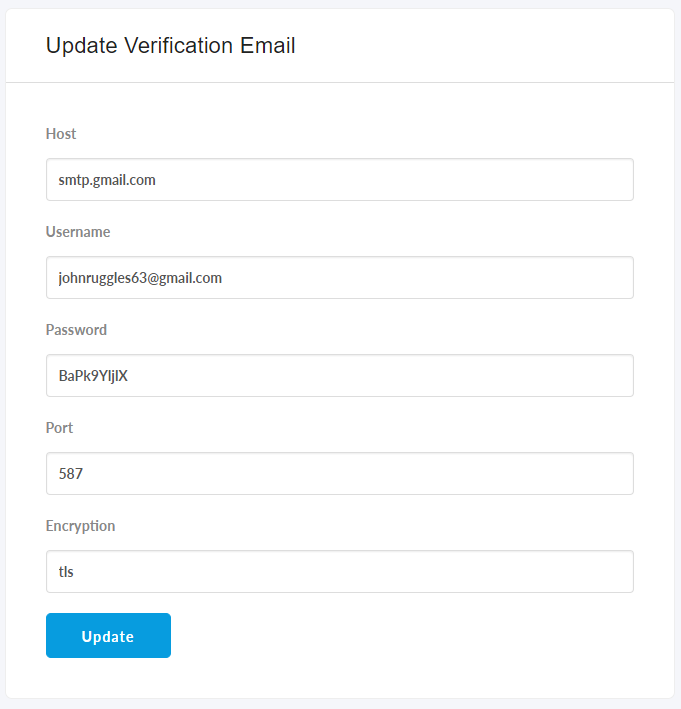
7 - SMTP Server Config
7.1To send the confirmation email and forgot password functionality
you have to configure your SMTP server. To configure the SMTP server,
click the SMTP Configuration menu from sidebar
and change the credentials of the SMTP server.
Host
Username
Password
Port
Encryption
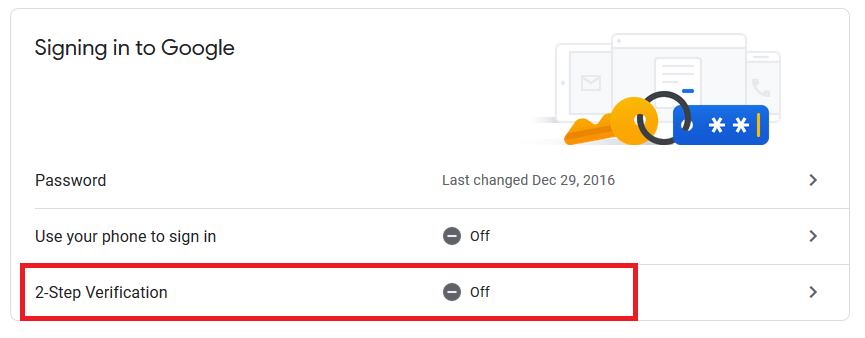
7.2Google SMTP Server Config
7.2.1Login to your Gmail account.
7.2.2Then visit the link:
https://myaccount.google.com/security
7.2.3In the security page, turn off the 2-step verification
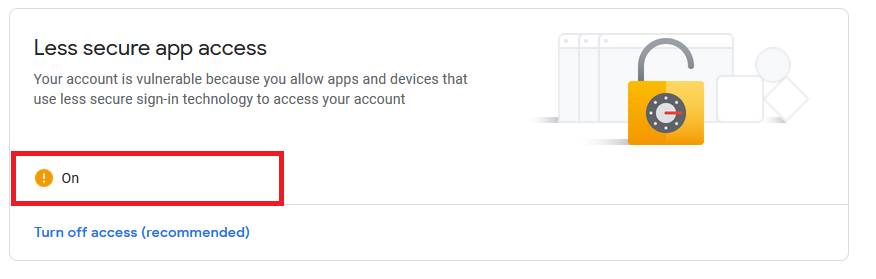
7.2.4Turn on the less secure app access
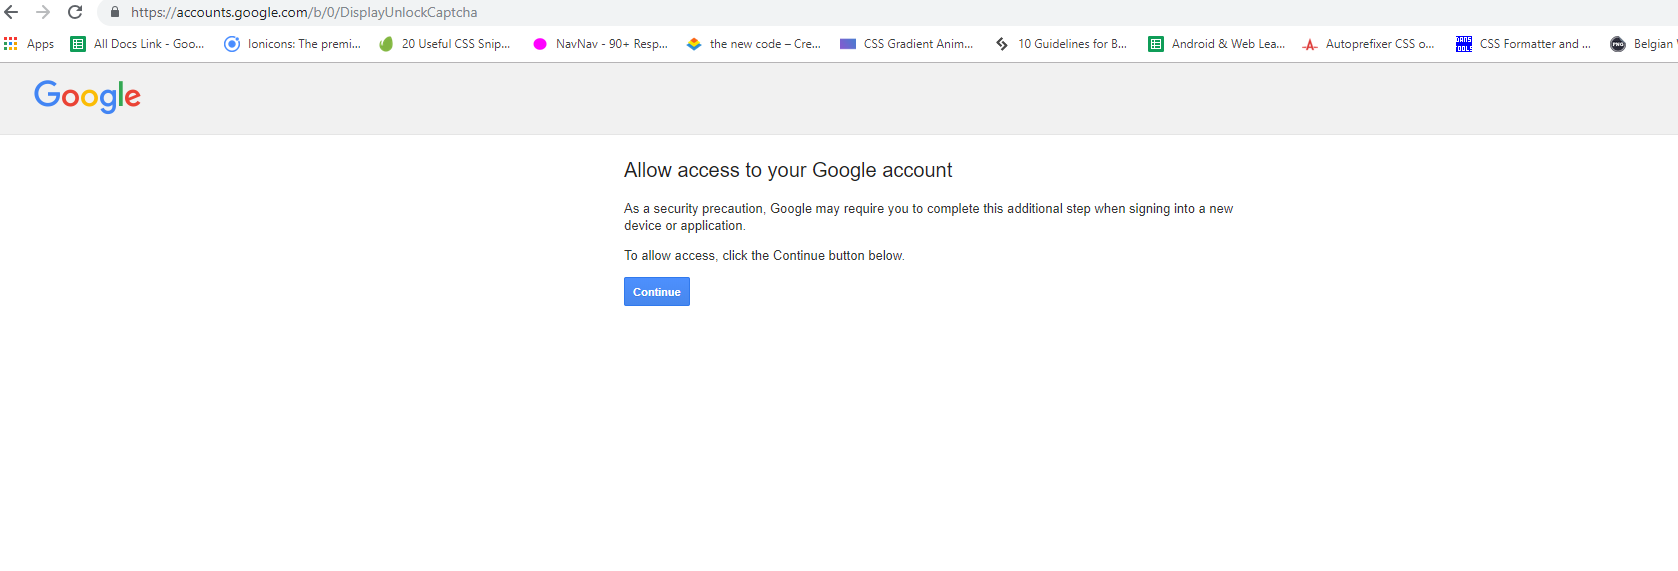
7.2.4Also visit the link:
https://accounts.google.com/b/0/DisplayUnlockCaptcha
and enable it.
8 - Customizing the App
8.1Rename Package
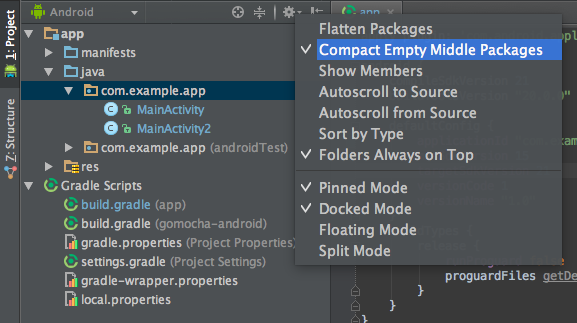
8.1.1In your Project pane, click on the little gear icon ( Gears icon )
8.1.2Uncheck / De-select the Compact Empty Middle Packages option
8.1.3Your package directory will now be broken up in individual directories
8.1.4Individually select each directory you want to rename, and:
Right-click it
Select Refactor
Click on Rename
In the Pop-up dialog, click on Rename Package
Enter the new name and hit Refactor
Click Do Refactor in the bottom
Allow a minute to let Android Studio update all changes
Note: When renaming COM in Android Studio, it might give a warning. In such case,
select Rename All.
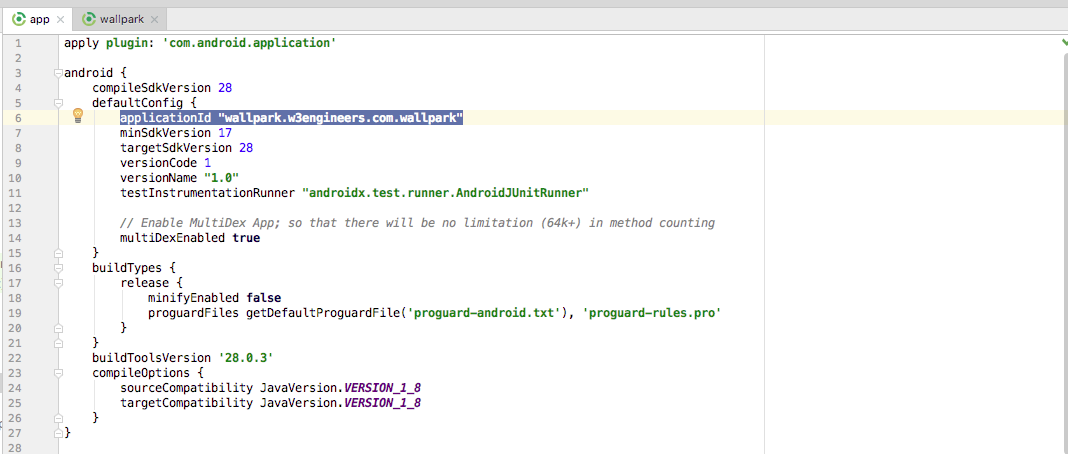
8.1.5Now open your Gradle Build File (build.gradle - Usually app or mobile).
Update the applicationId to your new Package Name and Sync Gradle,
if it hasn't already been updated automatically:
8.1.6You may need to change the package= attribute in your manifest.
8.1.7Clean and Rebuild.
8.1.8Done! Anyways, Android Studio needs to make this process a little
simpler.
8.2Change App Logo.
8.2.1Name your logo ic_launcher.png.
8.2.2Make your app logo for different size of screens.
(There are plenty of online tools that will help you to convert your logo for different
sizes of screen. My recommendation would be)
Android
Asset Studio.
8.2.3Replace those logos in the mipmap folder of your android studio
project.If you find any difficulties, please follow this
Youtube Video
8.3Changing the App Name
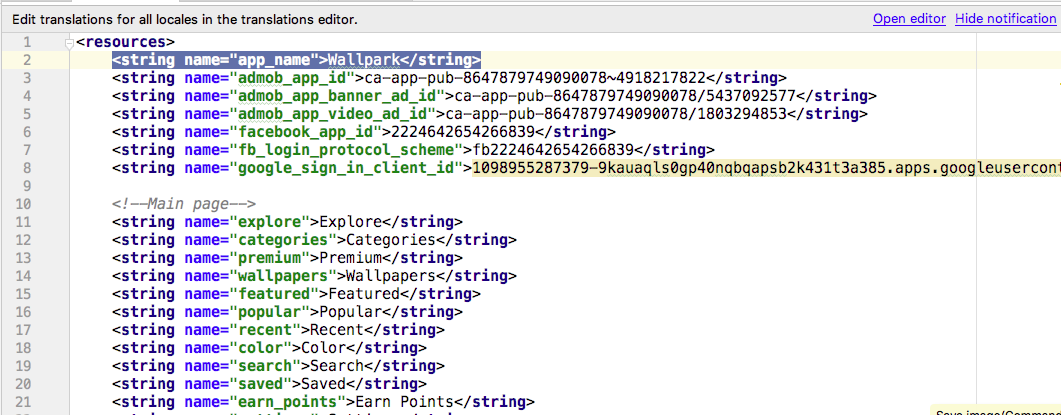
8.3.1For changing app name go to the values > strings.xml file
8.3.2And change the app_name.
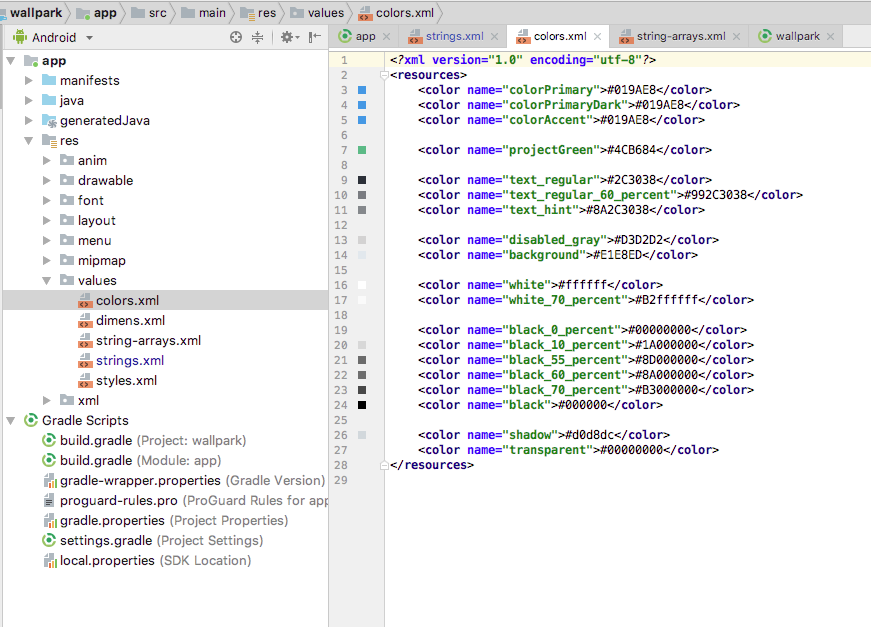
8.4Change App Color
8.4.1For changing app name go to the values > colors.xml file
8.4.2And change the colorPrimary,colorPrimaryDark, colorAccent.
Note : Supports only normal text size of the device.
9 - Login with Google
9.1Sign in with your Gmail
9.2 Go to this link
9.3 Click On “ Configure A Project “
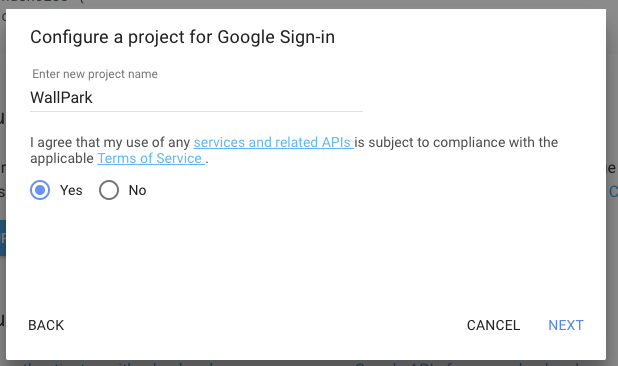
9.4 Enter a project name and click next
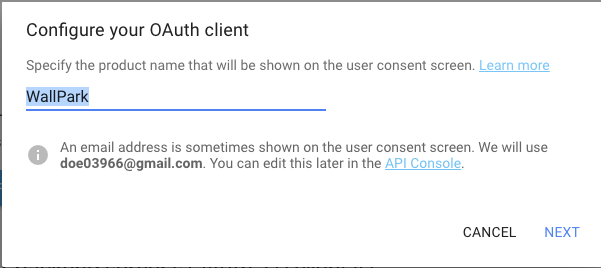
9.5Enter a product name and click next
9.6Select Android
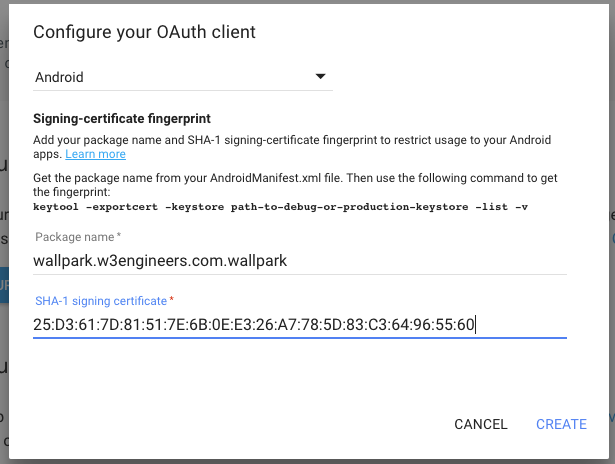
9.7Configure oath client id By giving Package name and SHA-1 signingcertificate
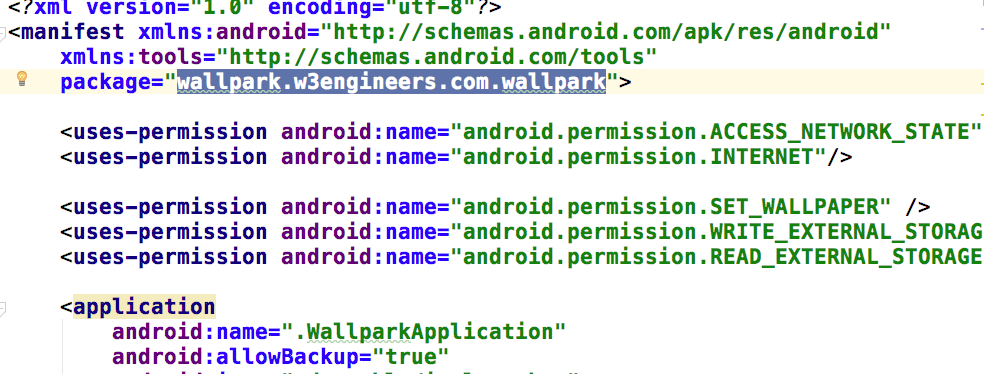
9.8To get the package name open the AndroidManifest.xml and copy the package
9.9Getting the signing certificate
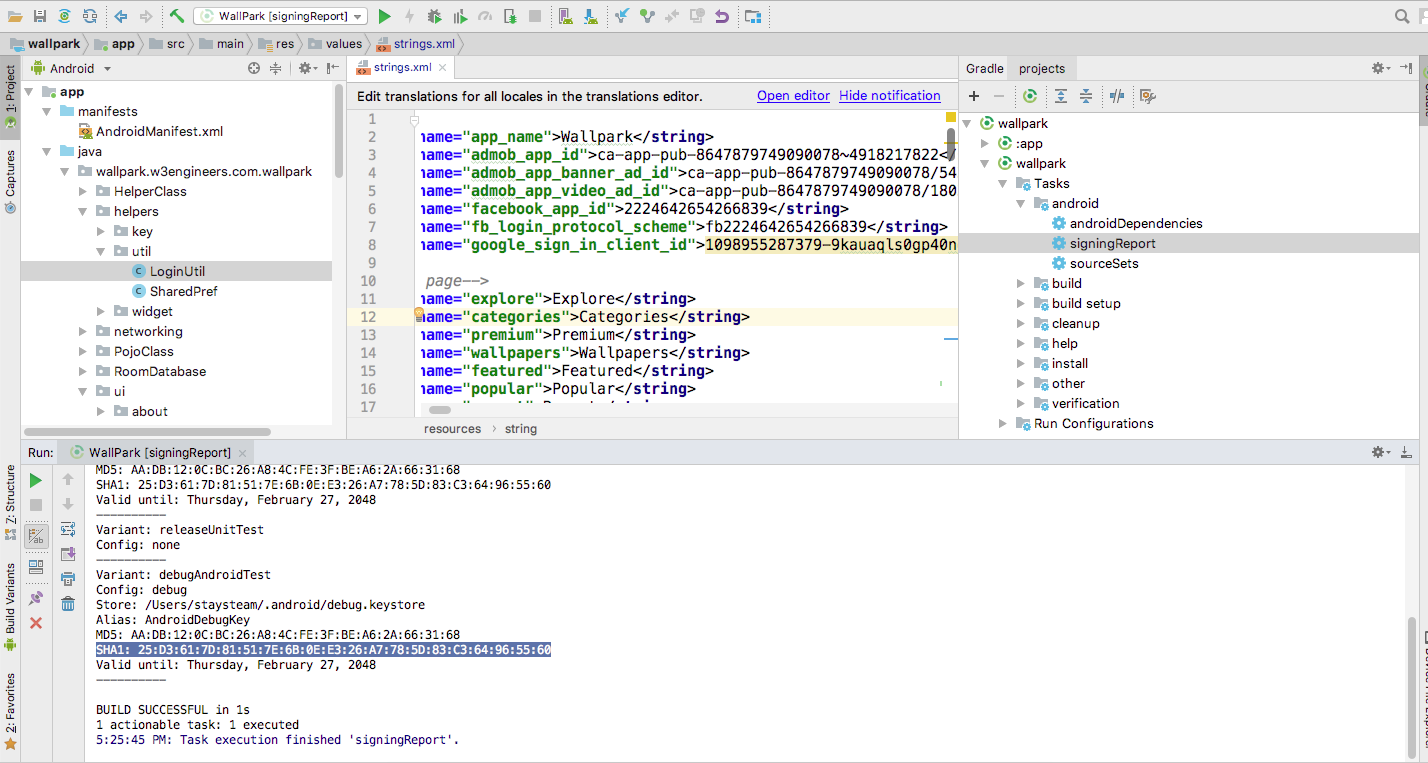
9.9.1Open Android Studio.
9.9.2Open your Project.
9.9.3Click on Gradle (From Right Side Panel, you will see Gradle Bar).
9.9.4Click on Refresh (Click on Refresh from Gradle Bar, you will seeList Gradle
scripts of your Project).
9.9.5Click on Your Project (Your Project Name form List (root)).
9.9.6Click on Tasks.
9.9.7Click on Android.
9.9.8Double Click on signingReport (You will get SHA1 and MD5 in
RunBar(Sometimes it will be in Gradle Console)).
9.9.9Select app module from module selection dropdown to run or debug your
application.
9.10Google Signin for release apk
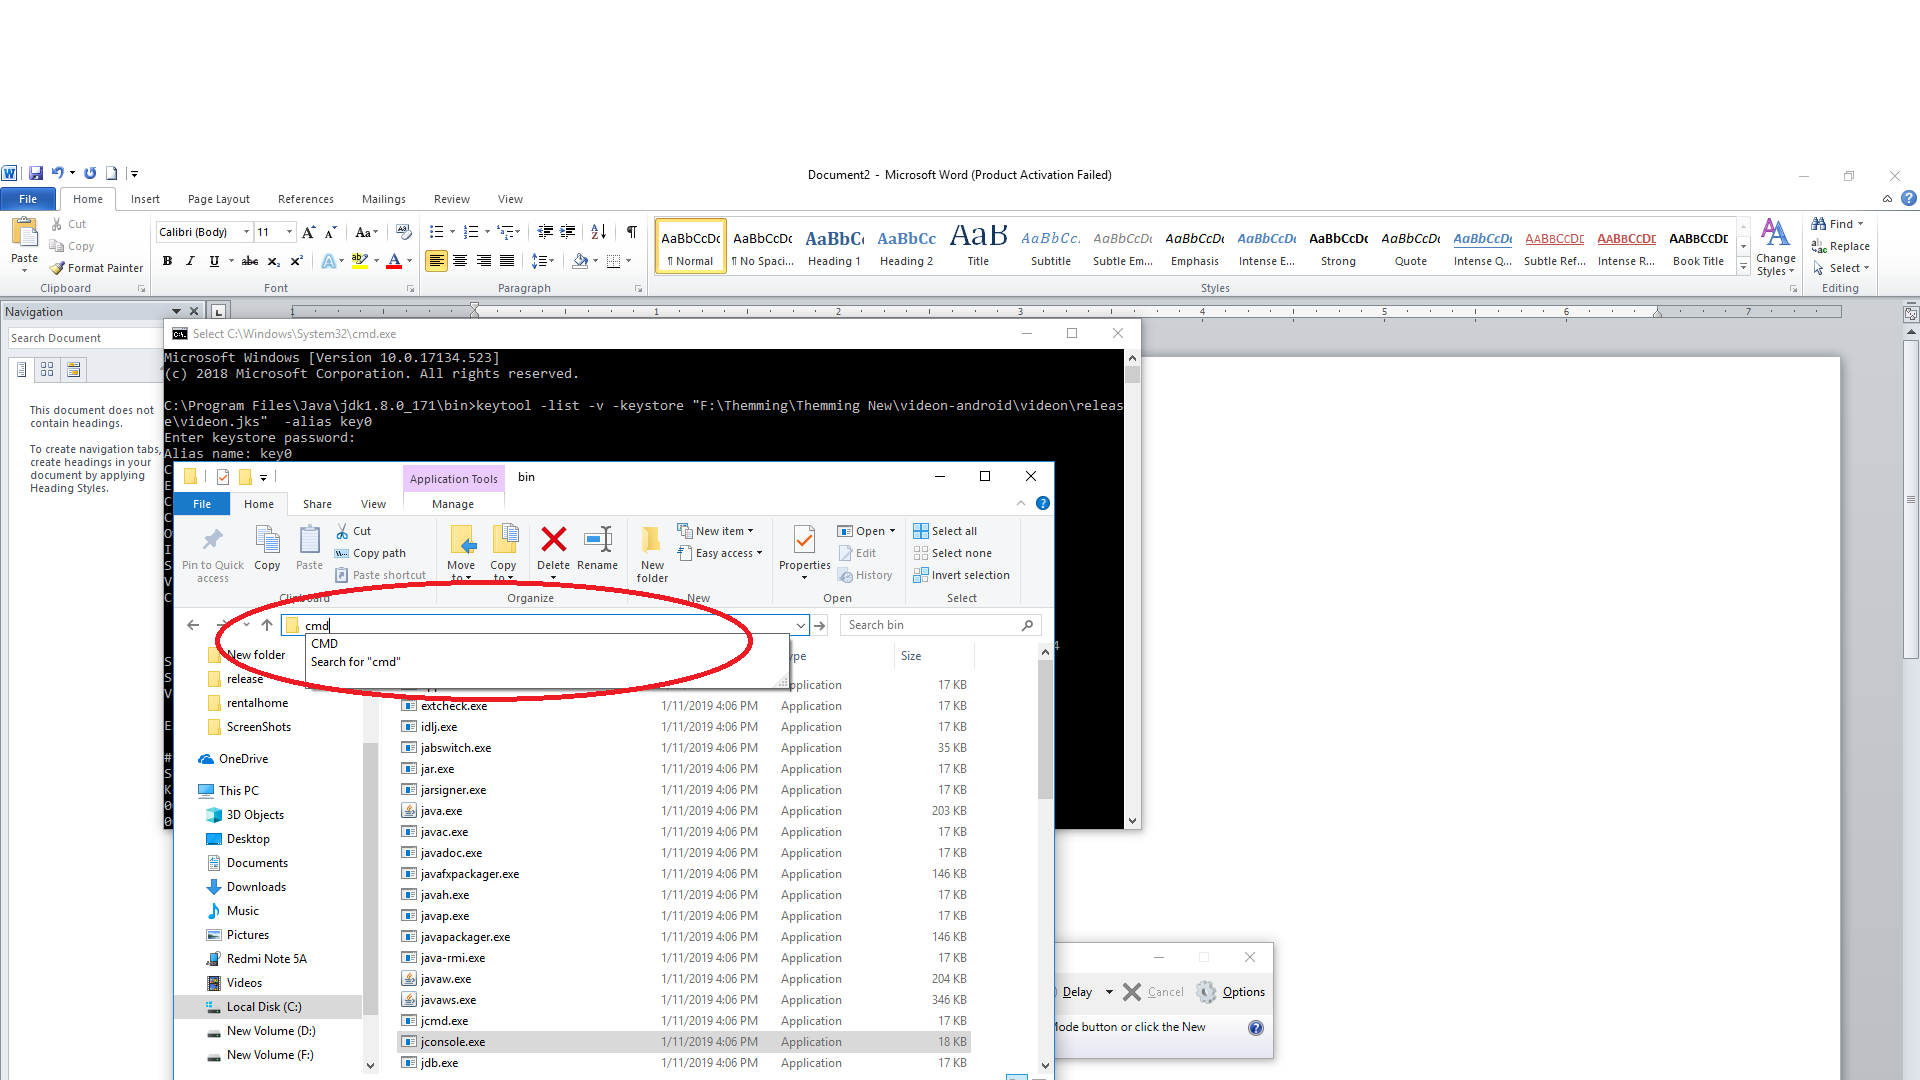
9.10.1Go to your jdk/jre forder and find bin directory. Enter into the bin directory and open cmmand promt/terminal here.
9.10.2Write command keytool -list -v -keystore "YOUR JKS FILE LOCATION" -alias YOUR ALIAS NAME and hit enter.In the next line input your key password and hit enter again. Now copy the SHA1 key as like image.
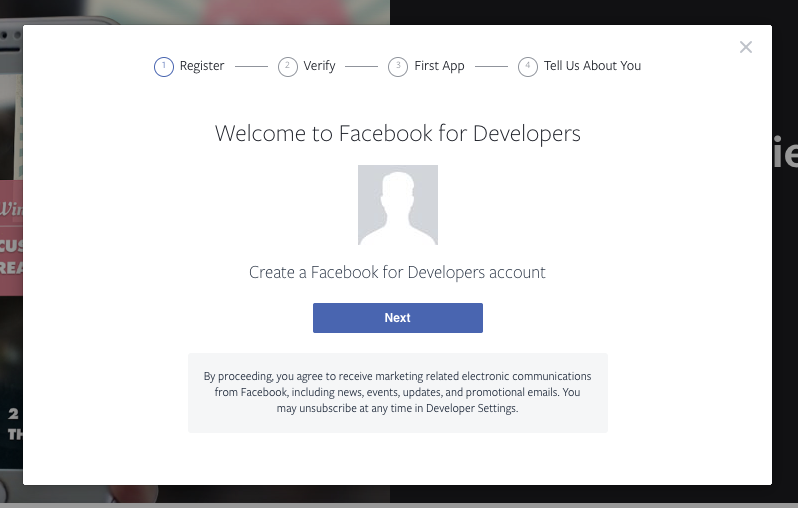
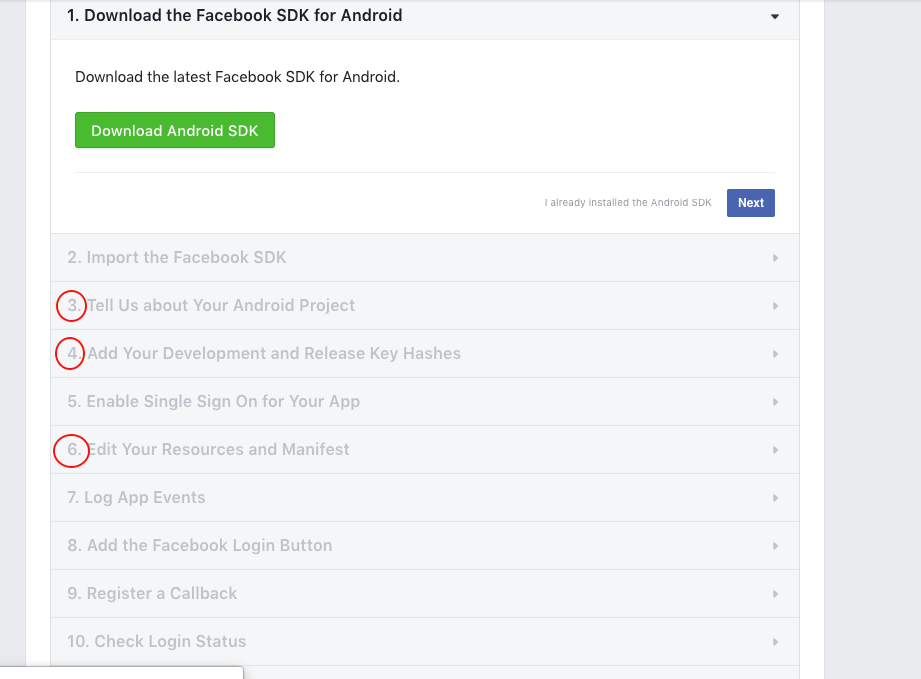
10 - Sign in with Facebook
10.1Login to your facebook account.
10.2Then Click this link.
10.3Click GET STARTED.
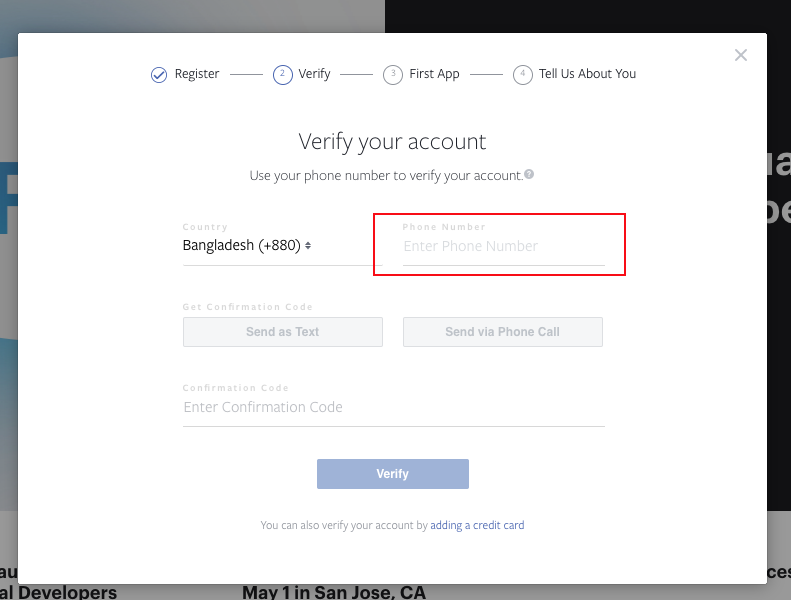
10.4Then you have to verify your account by Mobile number verification
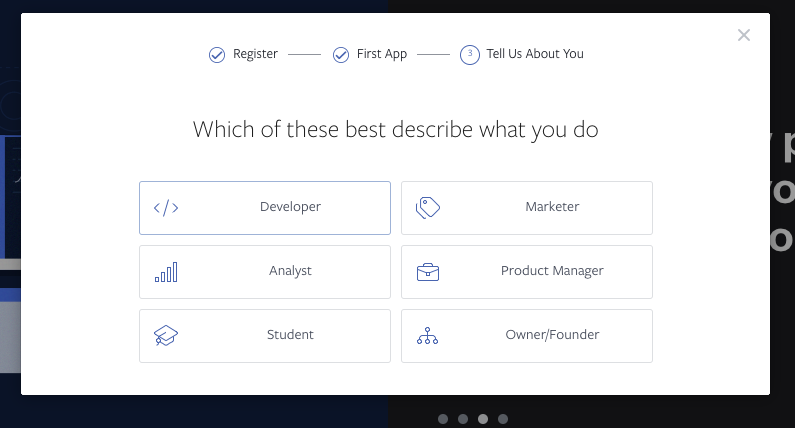
10.5After successfully verified you have to choose Developer option
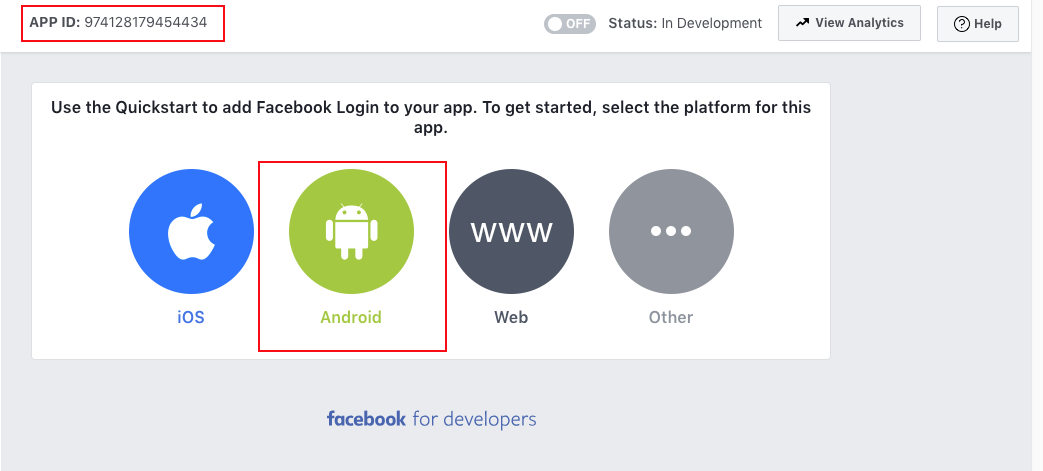
10.6Now select android.
10.7After select android you will get many option . But only 3rd, 4th
and 6th option will be used. In other option you should choose next or continue.
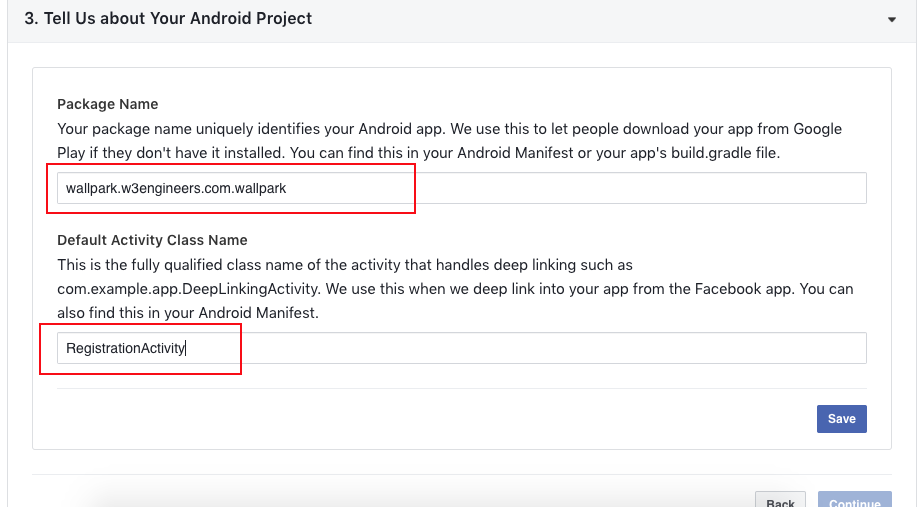
10.8In option 3 you have to put Package name and activity name .
You will get Activity name and package name from Android manifest.
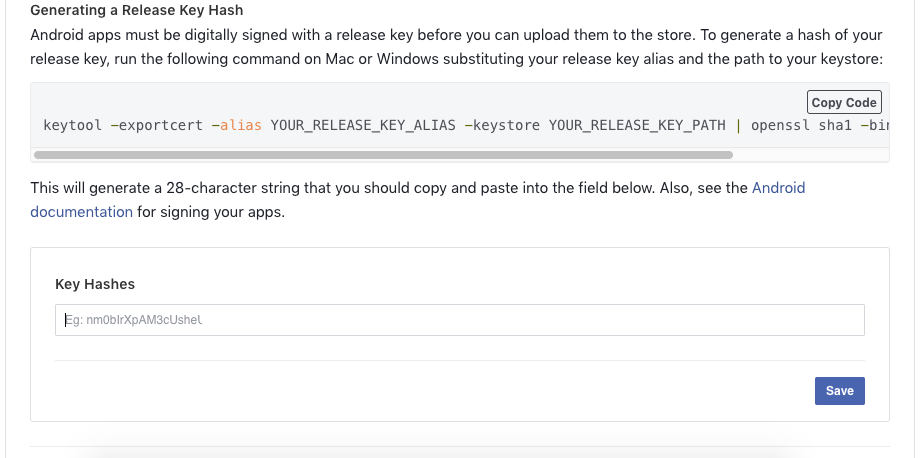
10.9In option 4 you need to generate hash key.
10.10Generate Hash Key
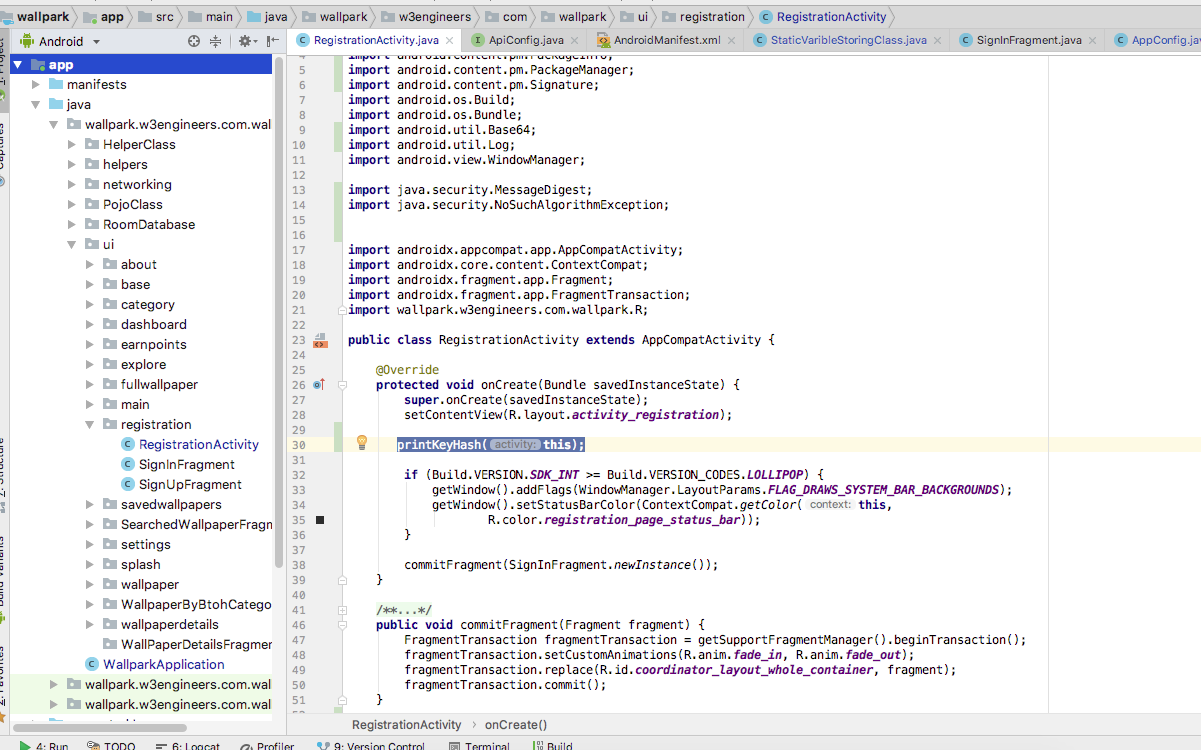
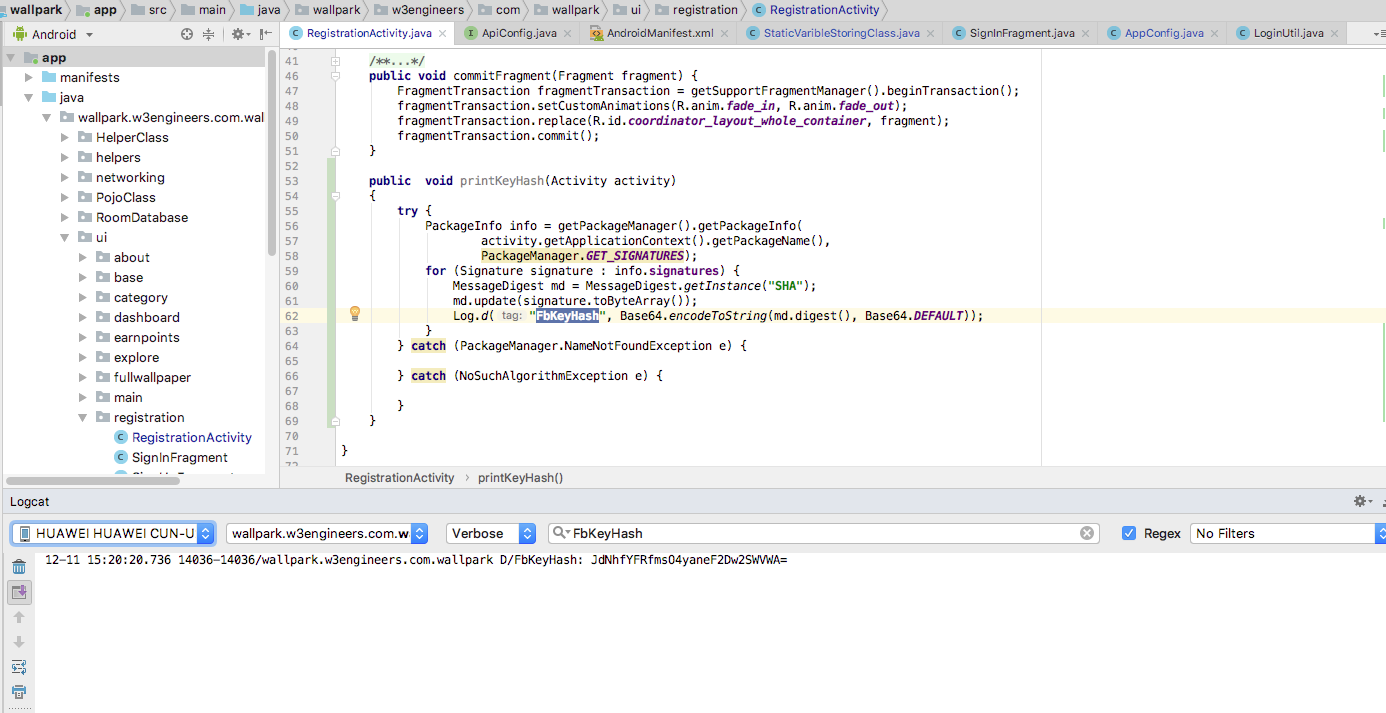
10.10.1To get the key hashes open the RegistrationActivity.java
10.10.2Go to line 30 and remove comment indicator and run the app
10.10.3Then browse to the login screen
10.10.4Go to android studio click Logcat from the bottom
10.10.5And paste FBKeyHash
10.10.6Select Debug from the drop downlist you will found a keyhash
10.10.7Copy the hash and paste it to the
Facebook app setting page
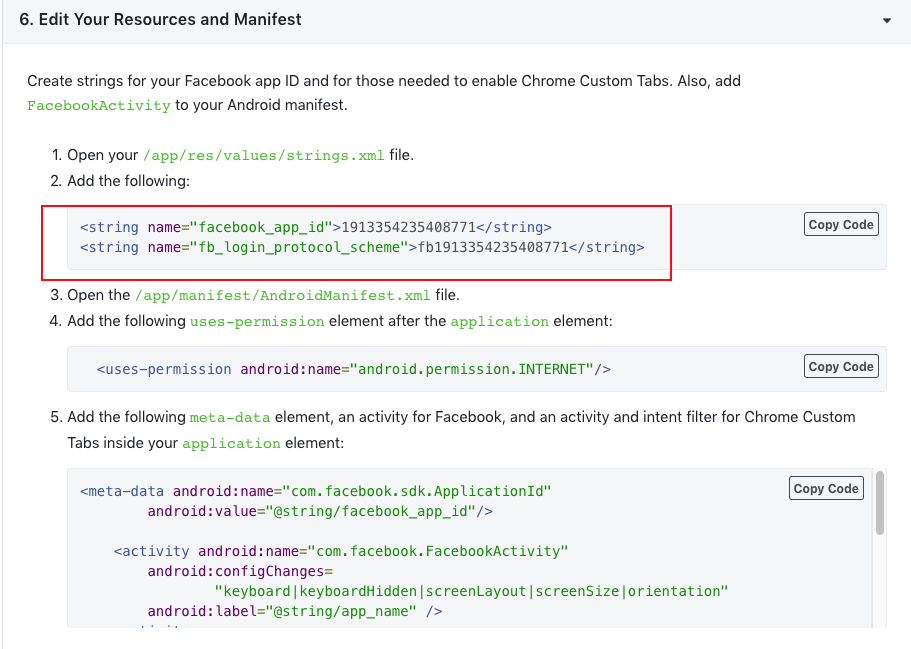
10.11In option six Copy marked string and paste it in android’s
res>values>strings.xml. If this value exist there just replace it.
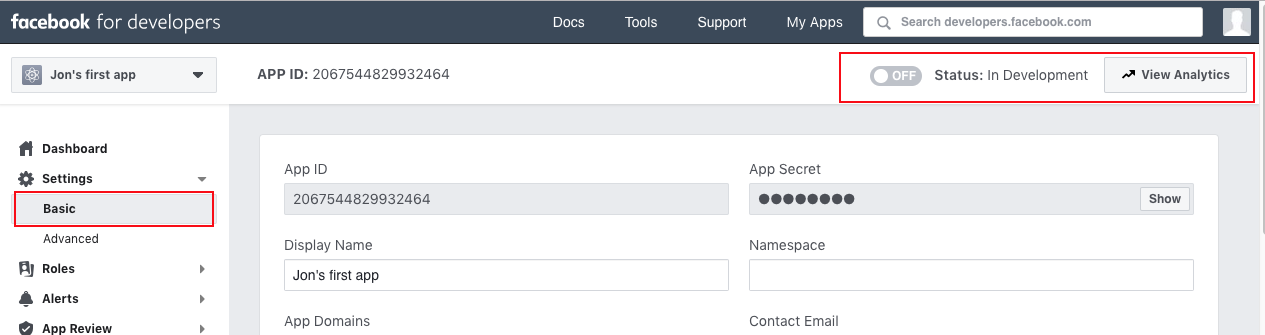
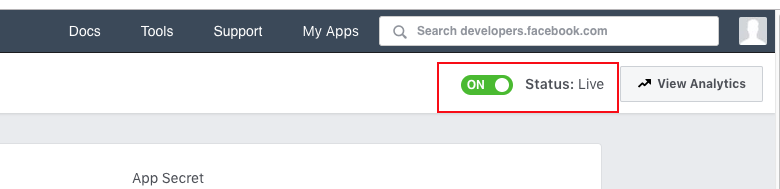
10.12After completing all Go to dashboard Basic setting . Here you can
see status is ‘ In development ’
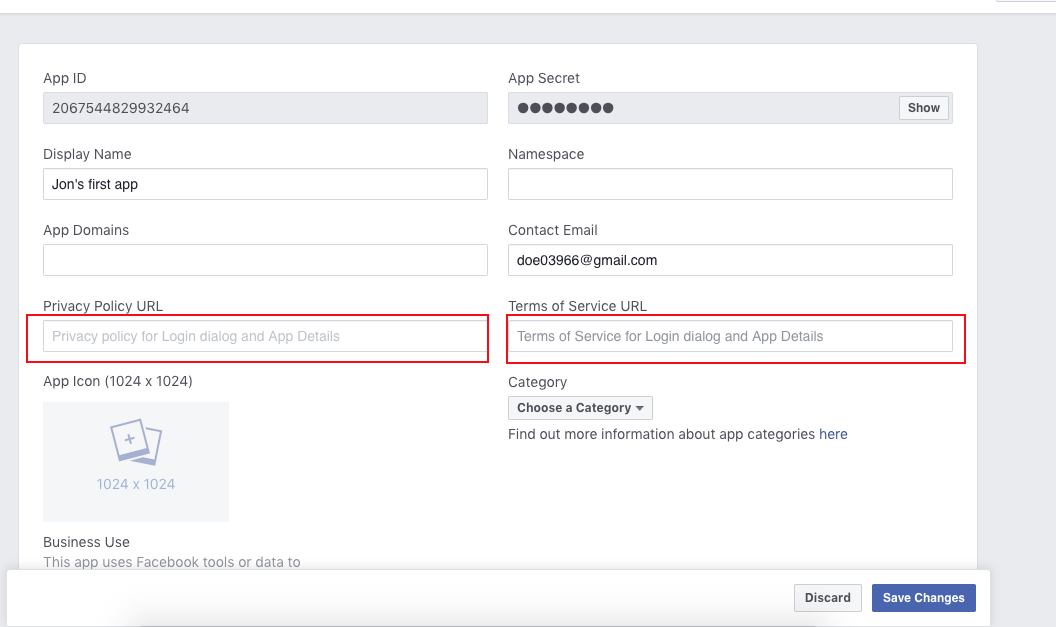
10.13To make it live you have to provide Privacy policy and Terms of
service. After providing this the status will change to live.
11 - Admob Configuration
Note : Real admob adds will be shown only after the publication into the google play store.
11.1Login with your Email id
11.2Go to this link
11.3From Apps option create App
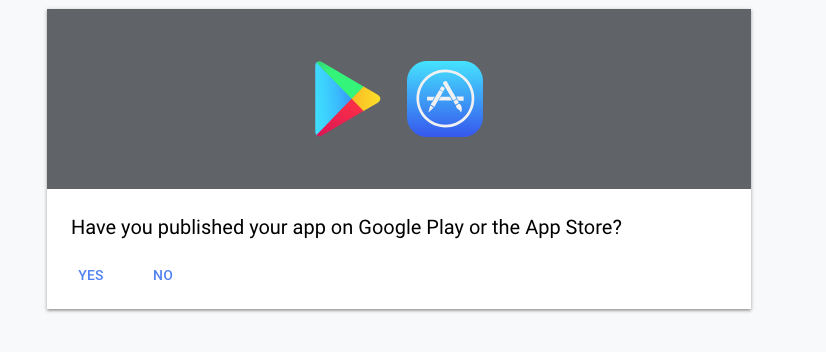
11.4If apps in play store then select yes otherwise no
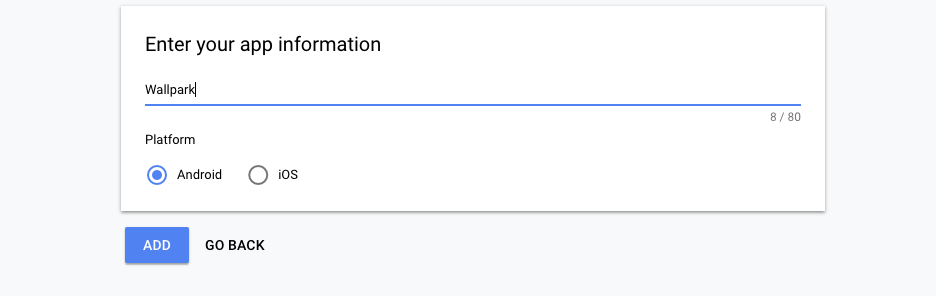
11.5Then provide app information and click add
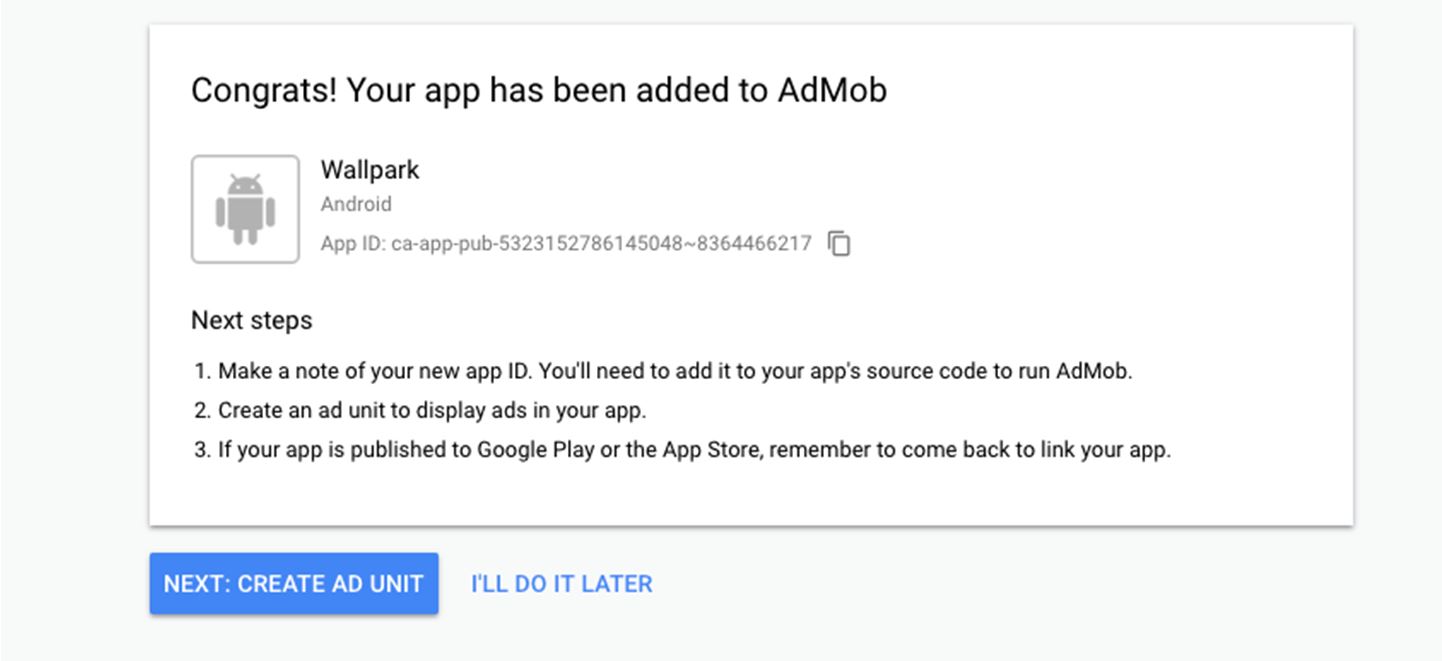
11.6Then you will get an App ID. Save it. You will need it later
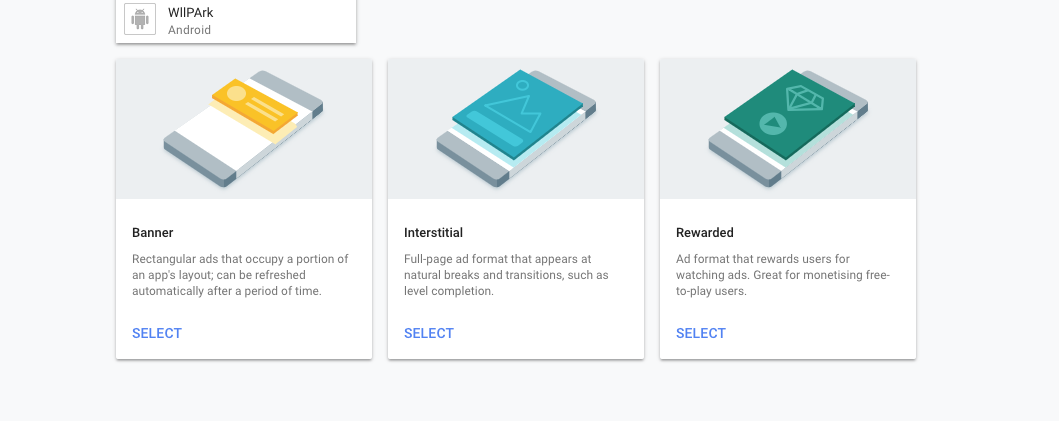
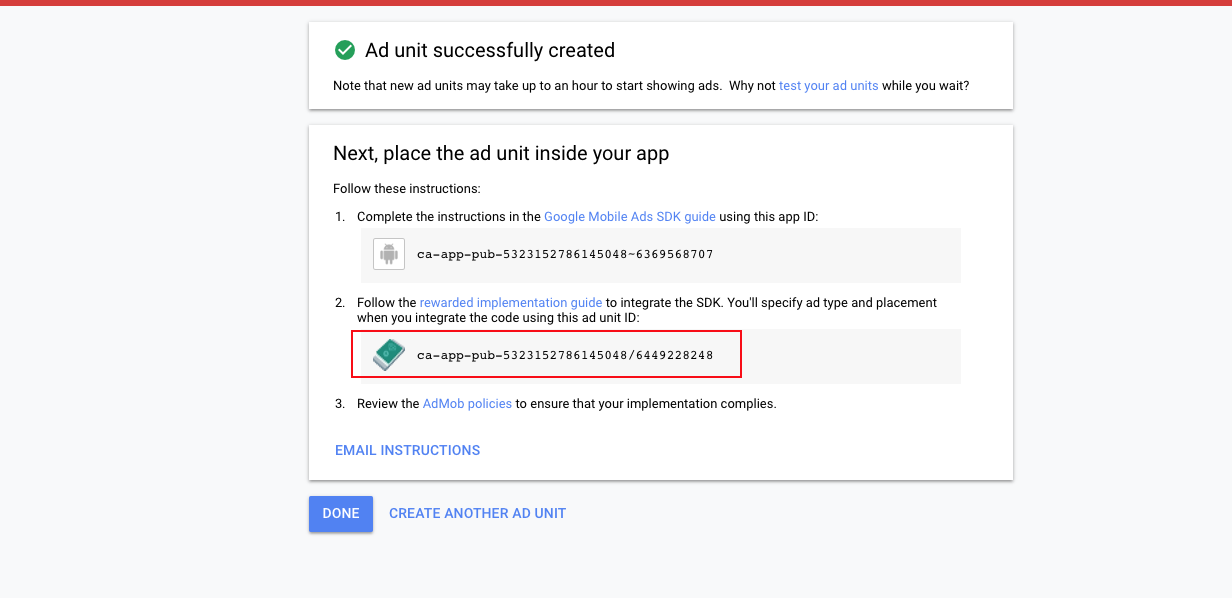
11.7Then click on ‘ CREATE AD UNIT ’ and you will find three type of
ads. Only Banner and Rewarded type video will be used
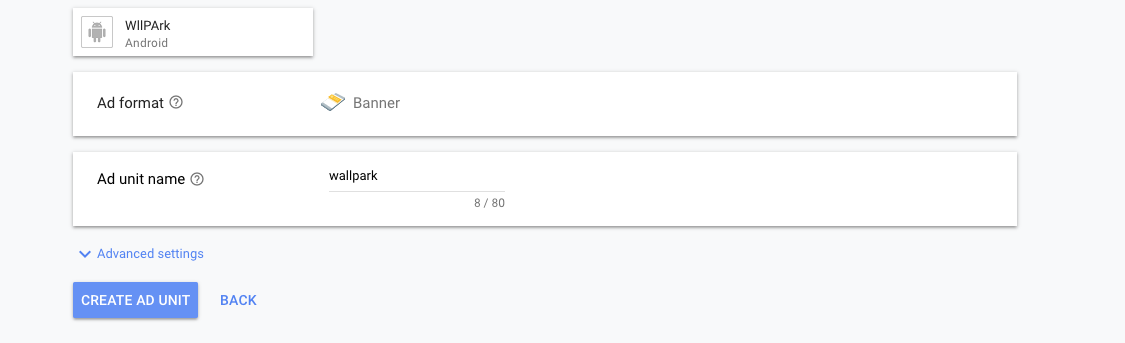
11.8Select banner. Provide ad unit name and click on ‘ CREATE AD UNIT ‘
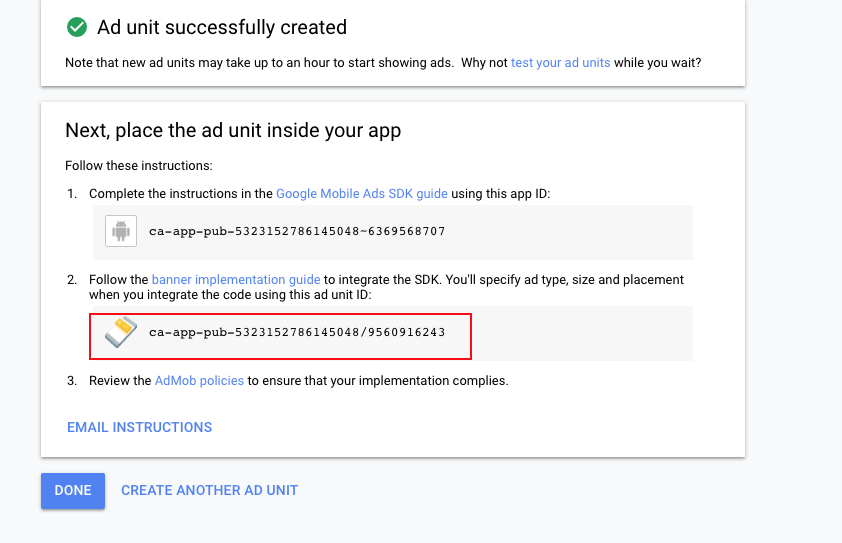
11.9Copy Banner ad unit id and save it.
You will need it later.
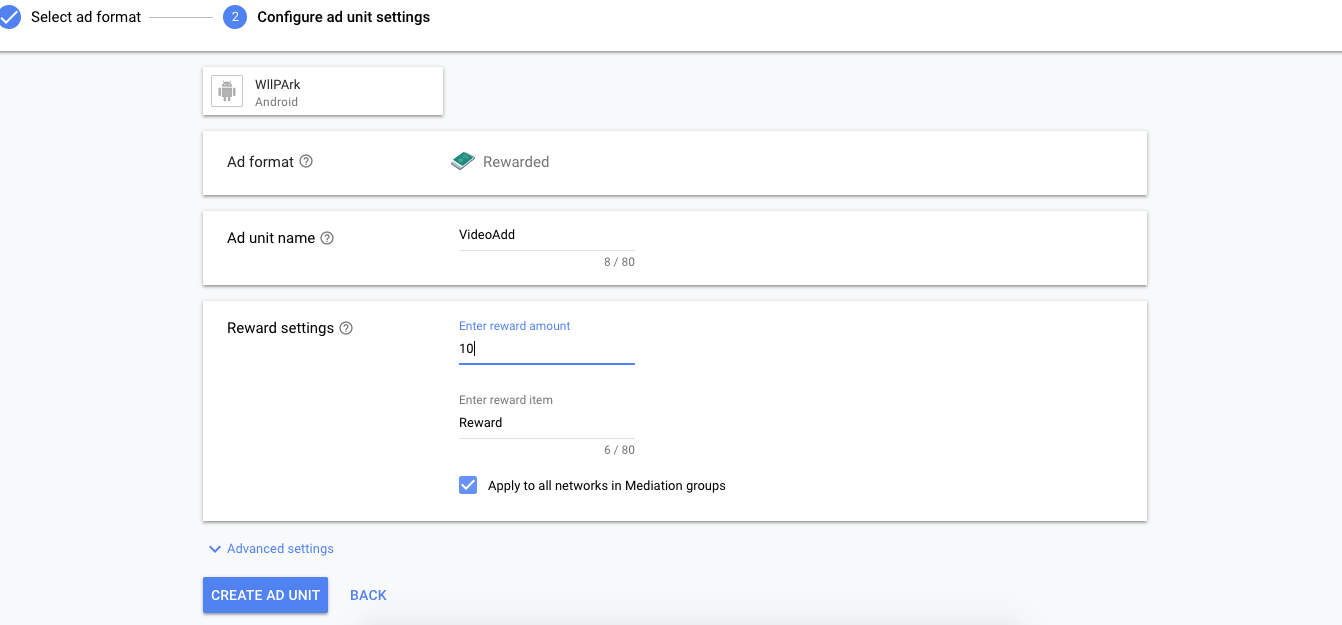
11.10Then again go back to ad type and select ‘ Rewarded ’ ad type. You
will find a page like this. Provide ad unit name and select ‘ CREATE AD UNIT ’
11.11Copy the Rewarded ad unit id
and save it . You will need it later.
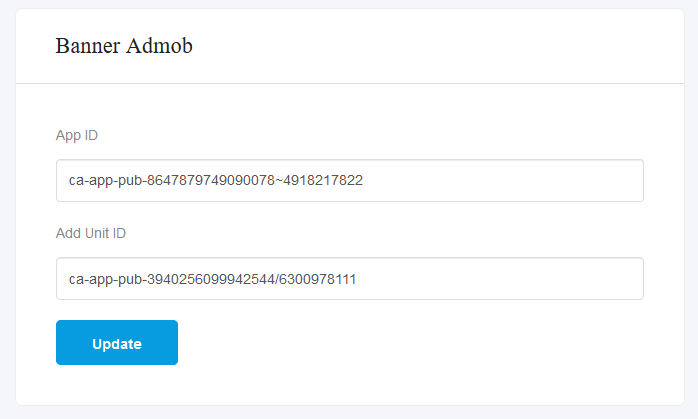
11.12Now get saved Admob App ID , Banner ad unit id.
Then go to Admin Panel. Put Admob App ID and Ad Unit ID
in the Banner Admob in the admin panel.
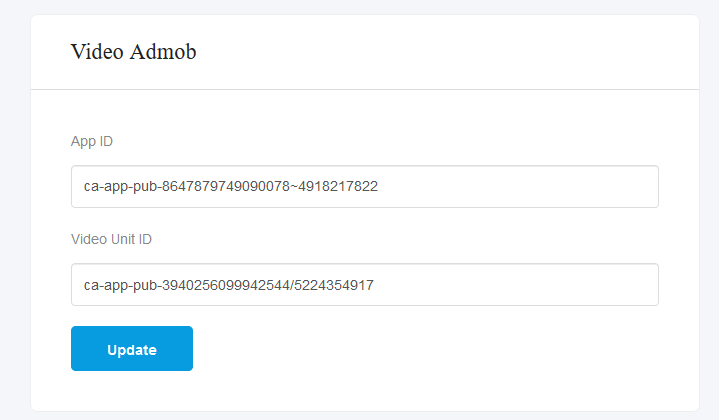
11.12Now get saved Admob App ID, Rewarded ad unit id.
Then go to Admin Panel. Put Admob App ID and Video Unit ID
in the Video Admob in the admin panel.
12 - Configure push notification
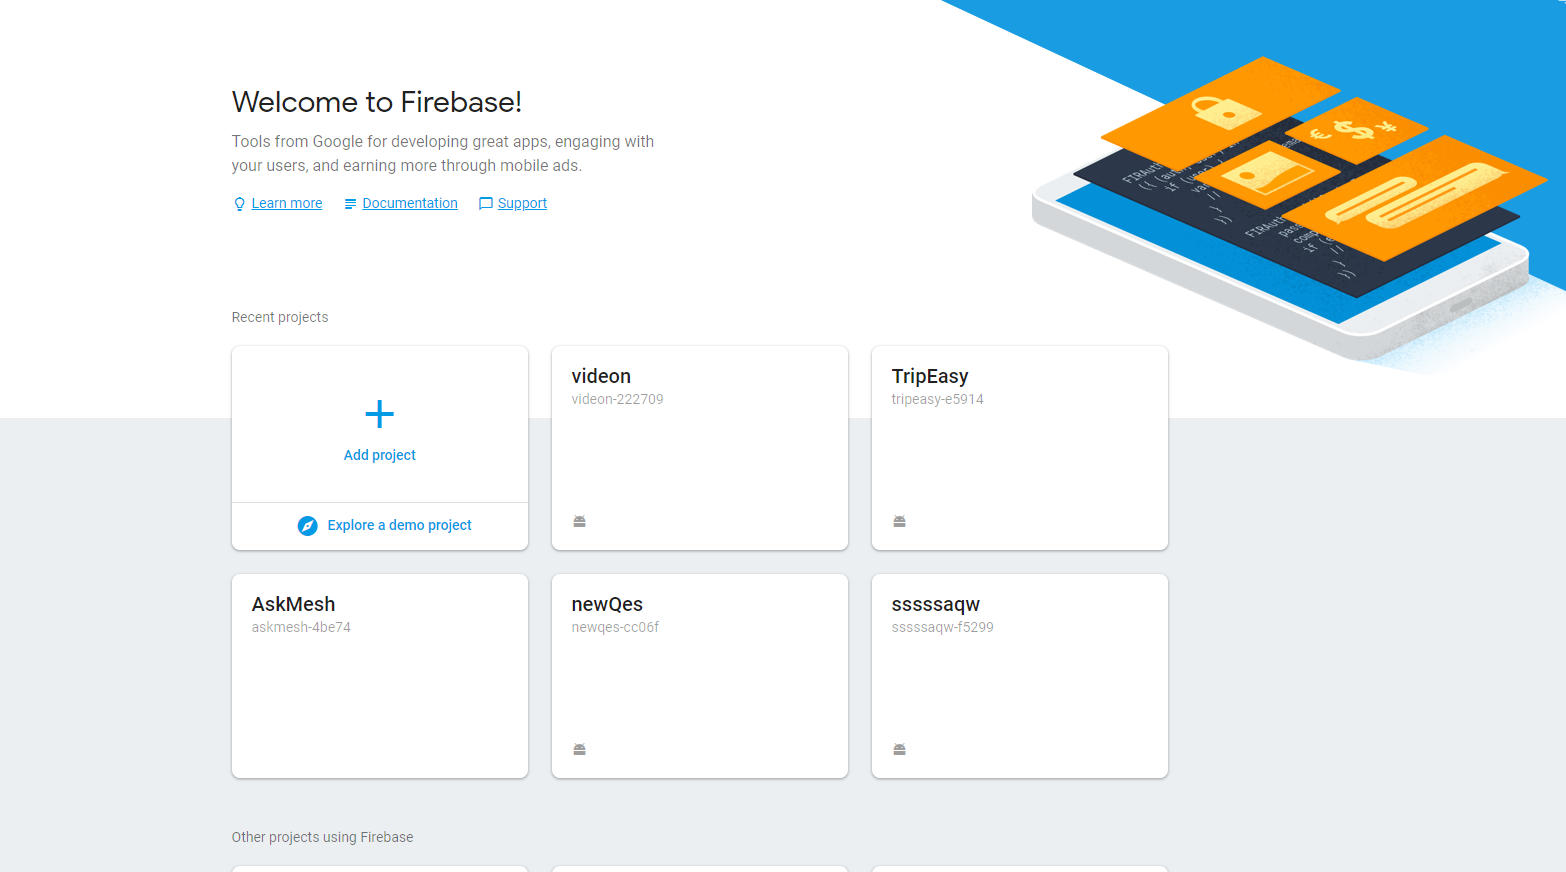
12.1Sign in with your Gmail
12.2Go to console.firebase.google.com
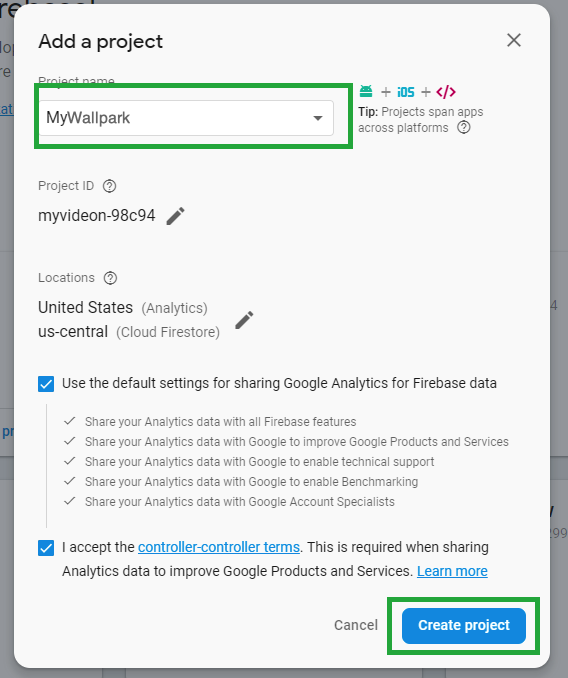
12.3Click On Add project
12.4Provide a project name and hit on “Create Project”
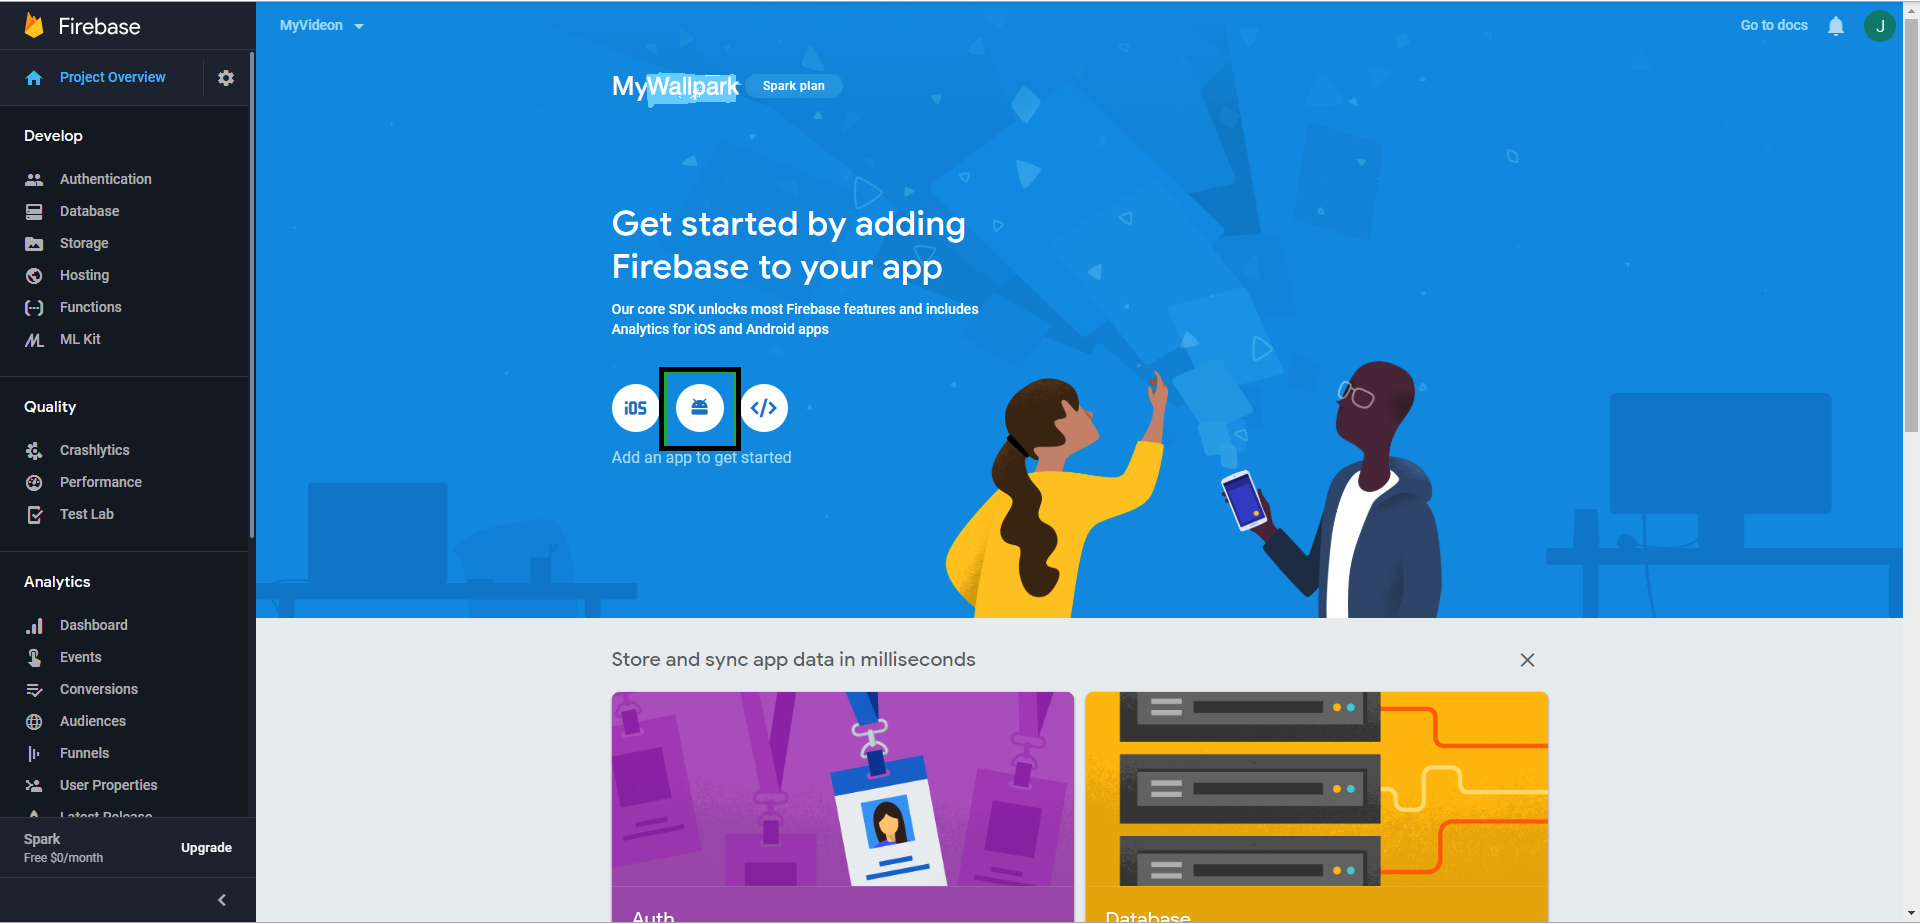
12.5Now click on Android Icon to configure project for android.
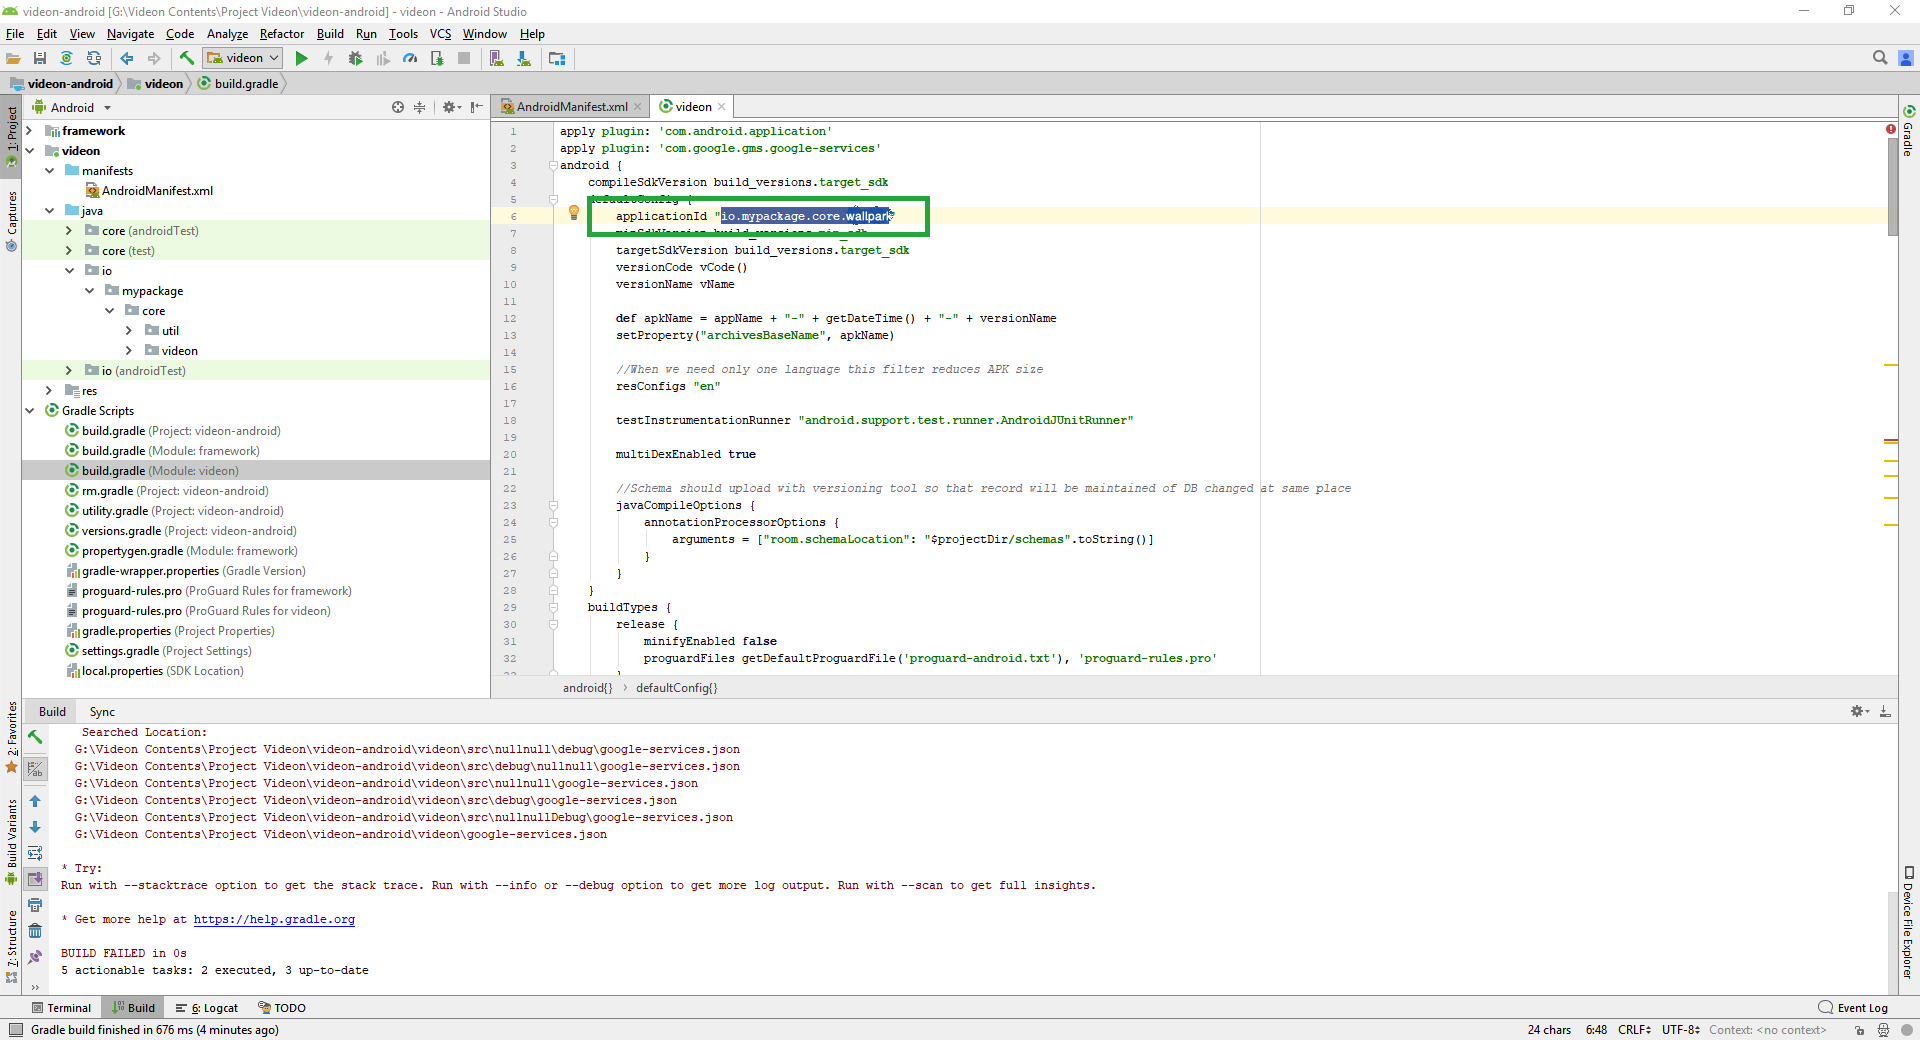
8.6Open Android Manifest and copy package name.
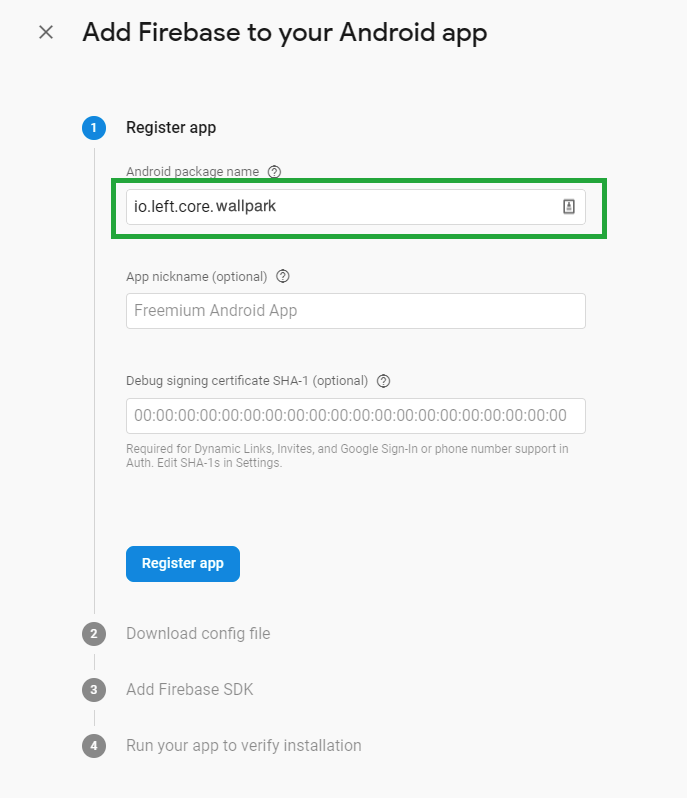
12.7Past the package name in Register App field.
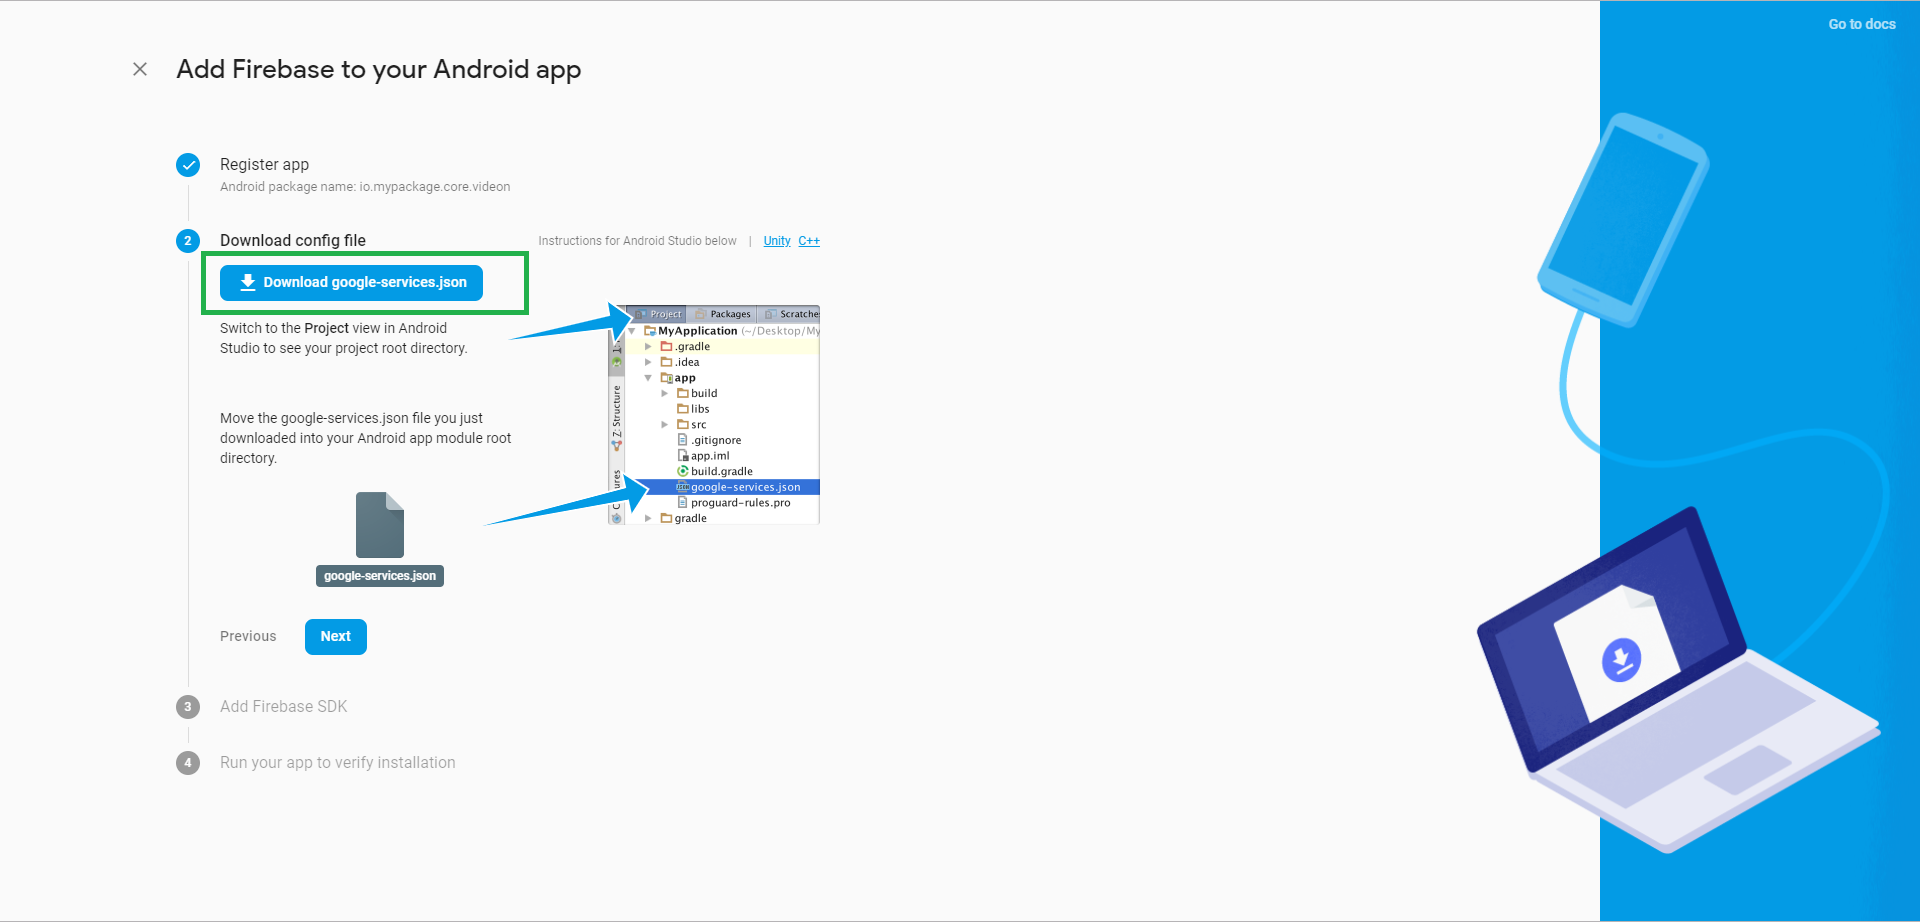
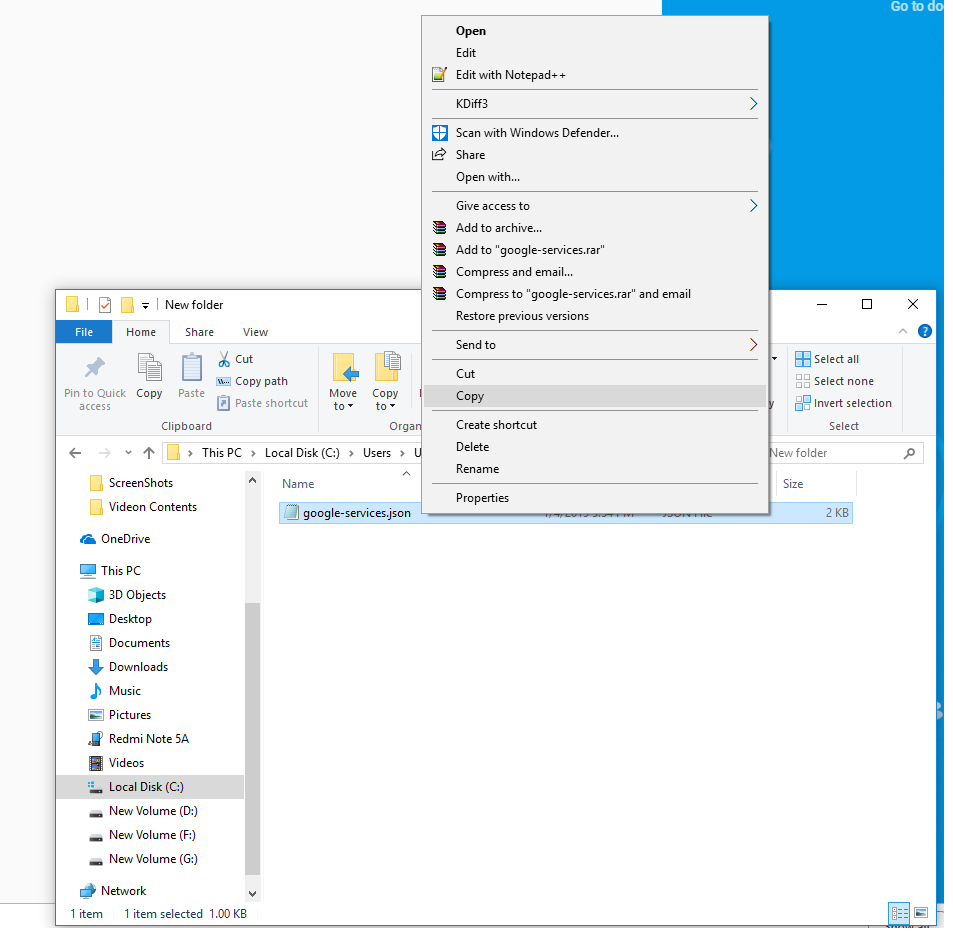
12.8Download the googleservice.json file.
12.9Copy googleservice.json file.
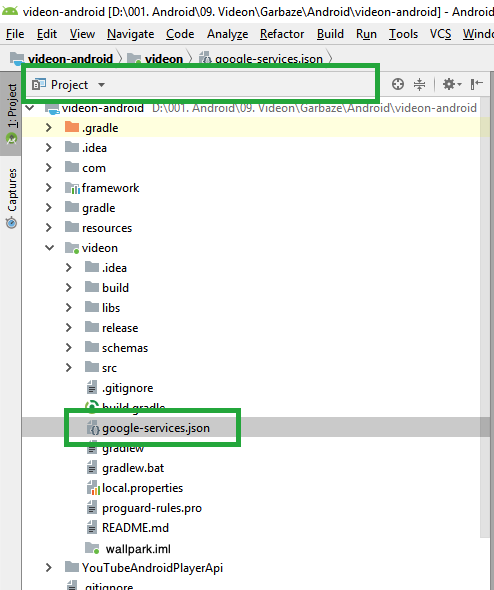
12.10Go to your project.
12.11Select project.
12.12Browse wallpark and replace the googleservice.json file.
12.13Now sync your project again.
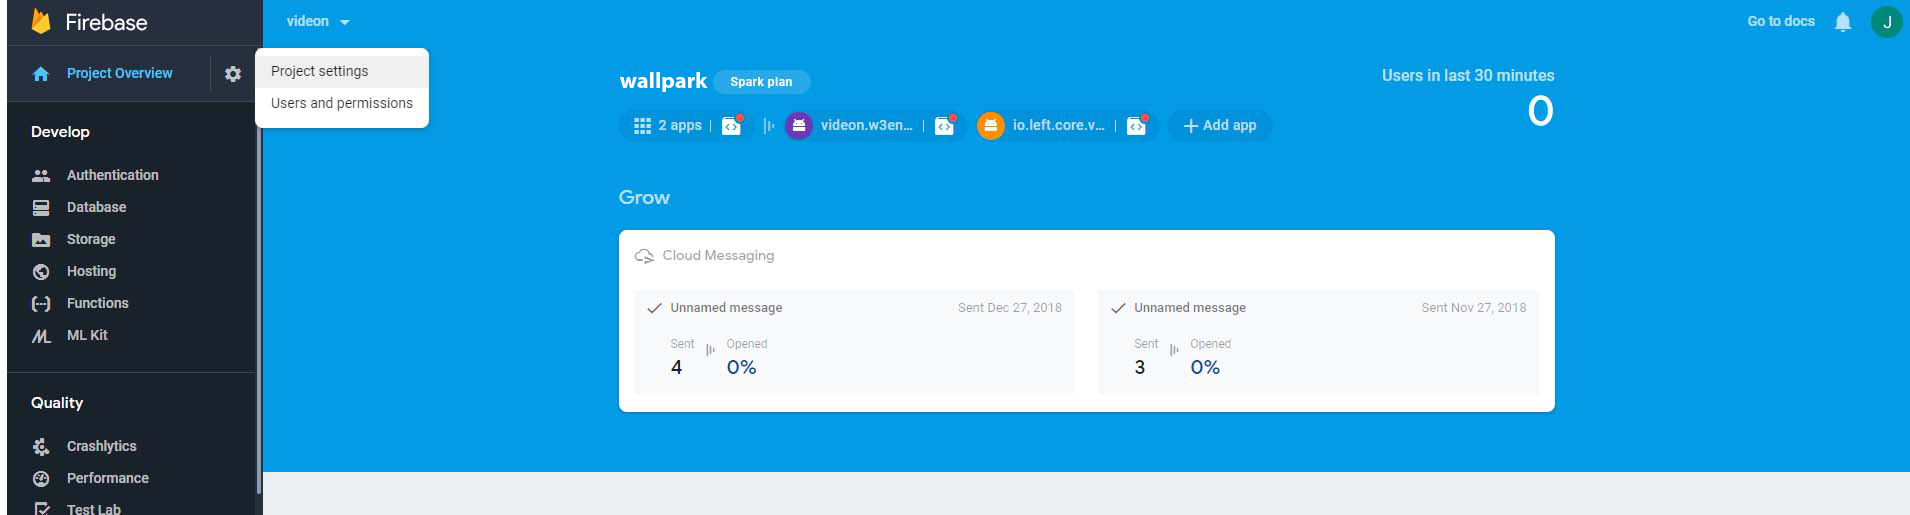
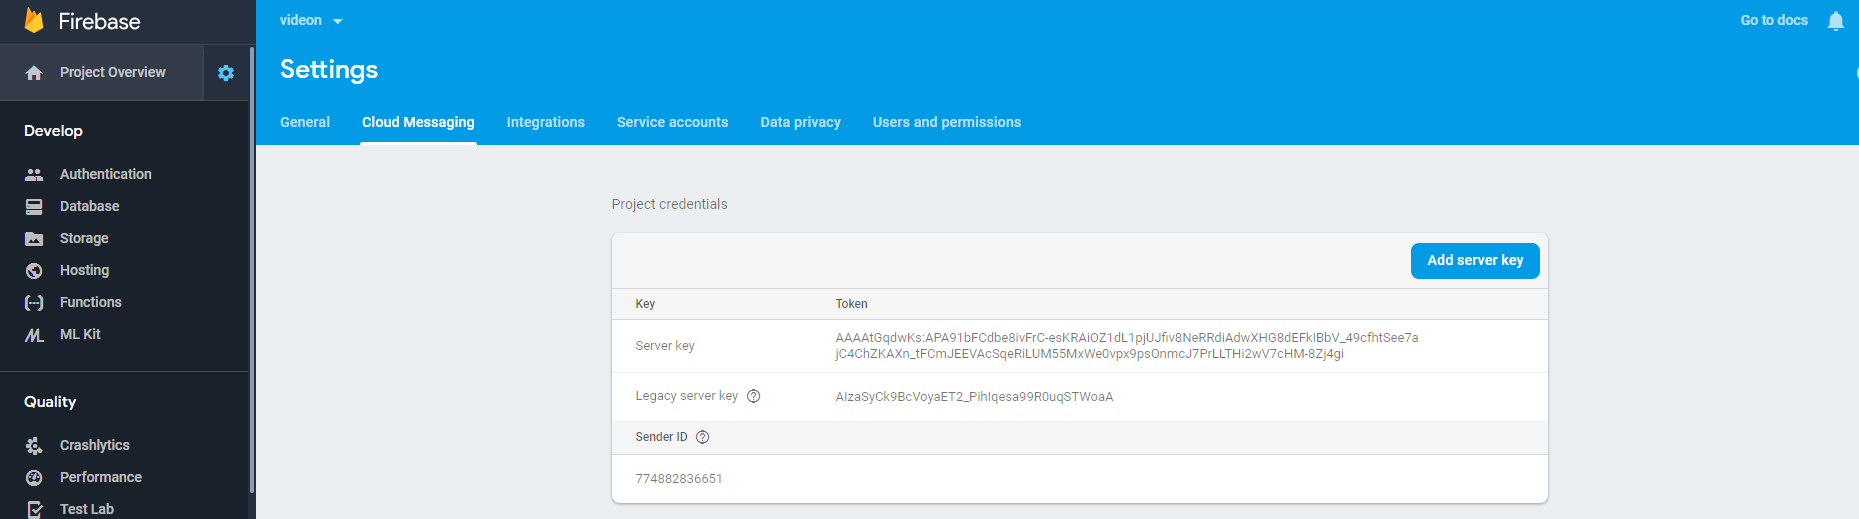
12.14Admin Panel
Click Setting icon on project setting
Click Cloud Messaging and copy the server key and paste it in the auth key field in the admin panel.
14 - Configuration of Admin Panel
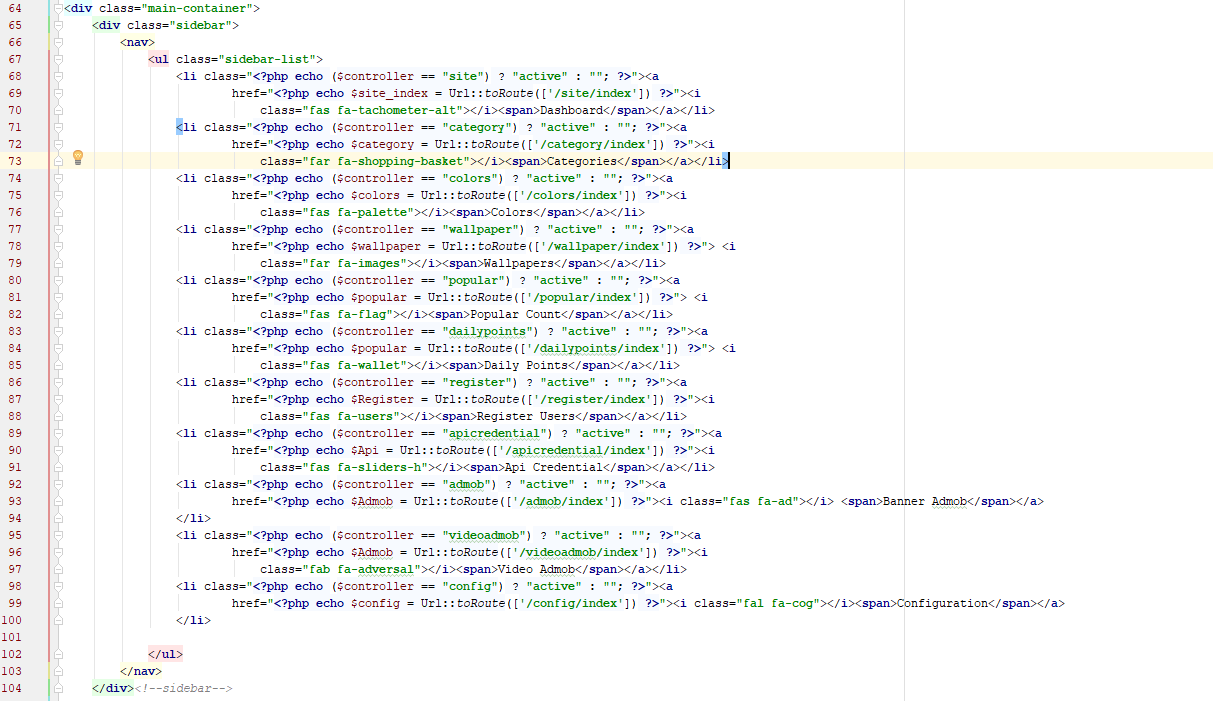
14.1Sidebar Customization
14.1.1For customizing the sidebar navigation item, you will find the file from this location
backend\views\layout\main.php
14.1.2Edit this navigation item name as your choice.
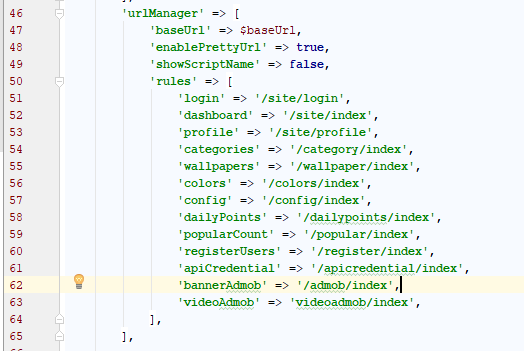
14.2Changing the url link
14.2.1For changing the url link, you will find the file from this location
14.3 Edit the url manager just like the below diagram or your choice.
14.3Changing maximum file size
14.3.1For changing the maximum file size of the server, first you must chnage the
post_max_size and
upload_max_filesize of the server and then restart the server.
For details please visit the following link
Click Here
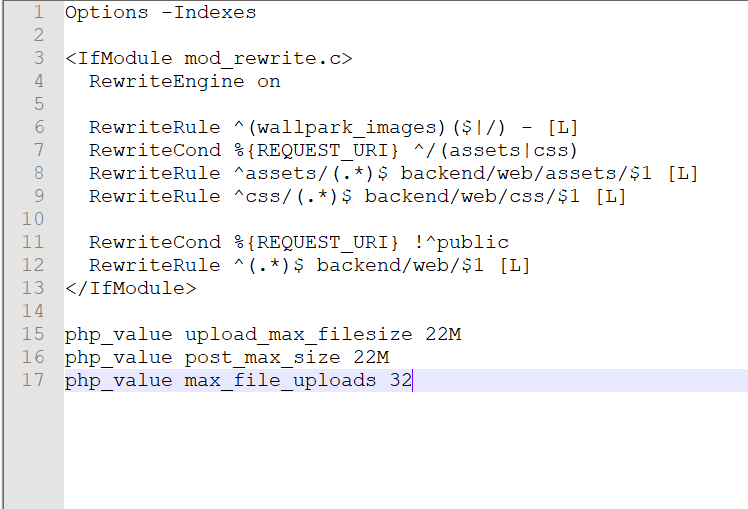
14.3.2In the root of our project there is a .htaccess file.
14.3.3You can change this file to configure the upload file size and file count for multiple upload of the server .
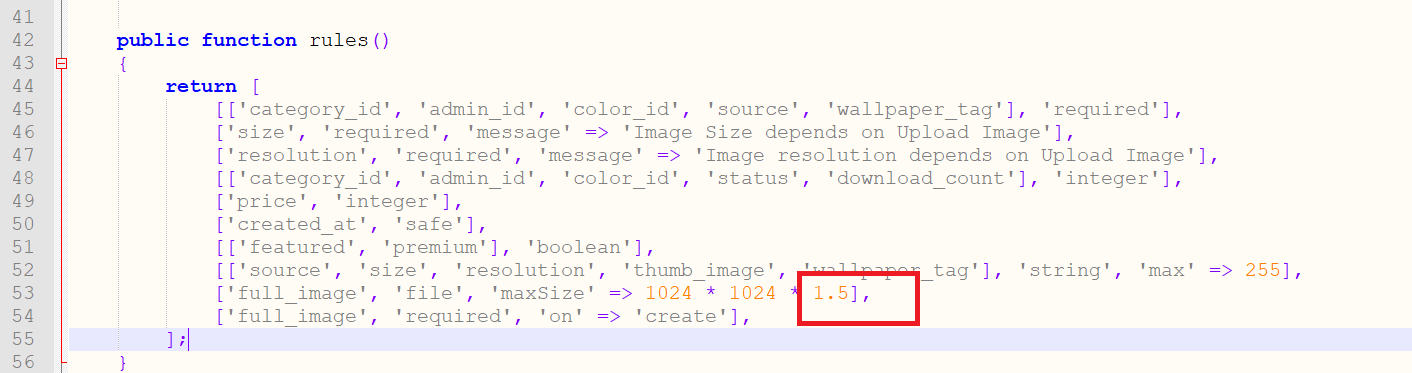
14.3.4To change the max file size of the wallpapers
Go to backend\models folder
Open Wallpaper.php files
Go to line 53
Change the last value of ['full_image', 'file', 'maxSize' => 1024 * 1024 * 1.5]
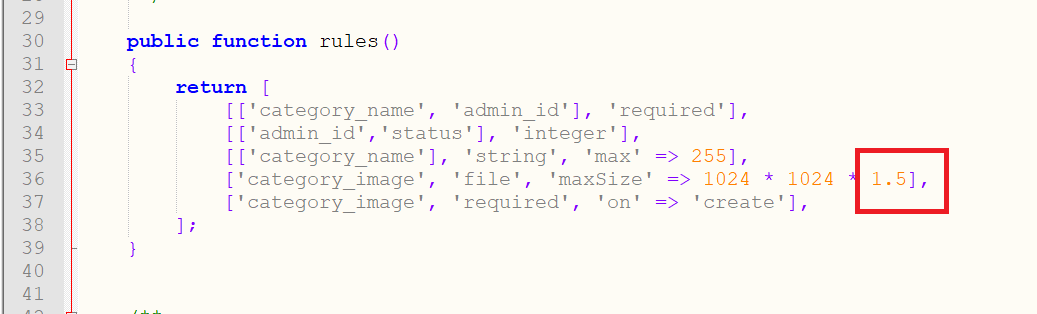
14.3.5To change the max file size of the category
Go to backend\models folder
Open Category.php files
Go to line 36
Change the last value of ['category_image', 'file', 'maxSize' => 1024 * 1024 * 1.5]
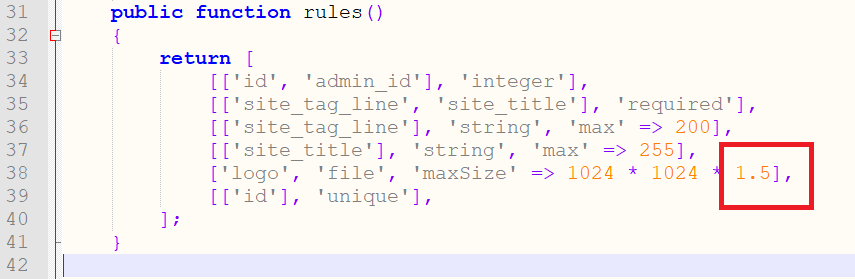
14.3.6To change the max file size of the config
Go to backend\models folder
Open Config.php files
Go to line 38
Change the last value of ['logo', 'file', 'maxSize' => 1024 * 1024 * 1.5],
14.4Changing file count for uploading multiple wallpapers
14.4.1For changing file count for uploading multiple wallpapers of the server, first you must chnage the
max_file_uploads of the server and then restart the server.
Go to backend\models folder
Open Uploadimages.php files
Go to line 26
Change the last value of maxFiles in [['files'], 'file','maxFiles' => 10, 'extensions' => 'jpg, gif, png', 'skipOnEmpty' => false],
15 - Functionality of Admin Panel
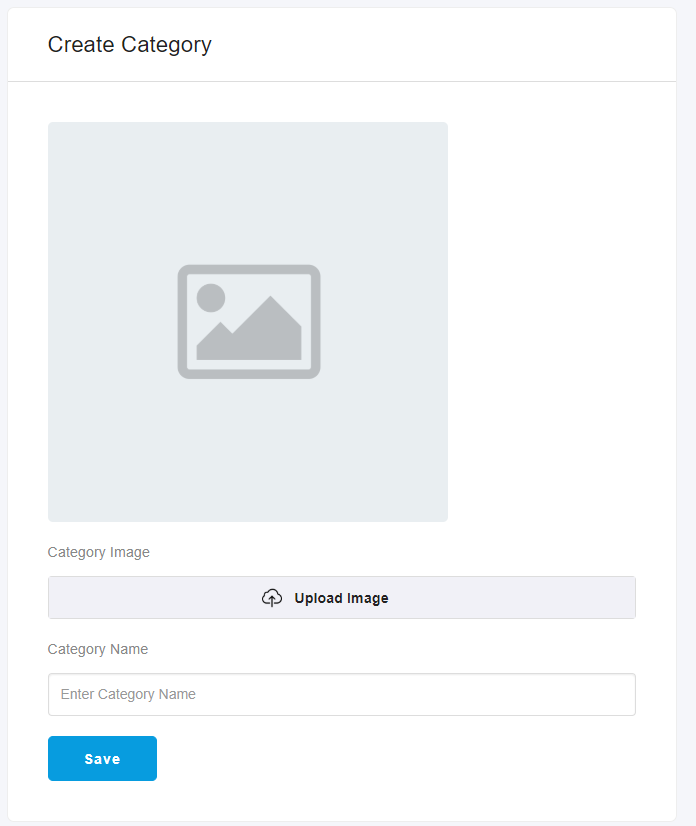
15.1Category
15.1.1Admin can add different types of category.
15.1.2Admin must be uploaded the category image and set the category name.
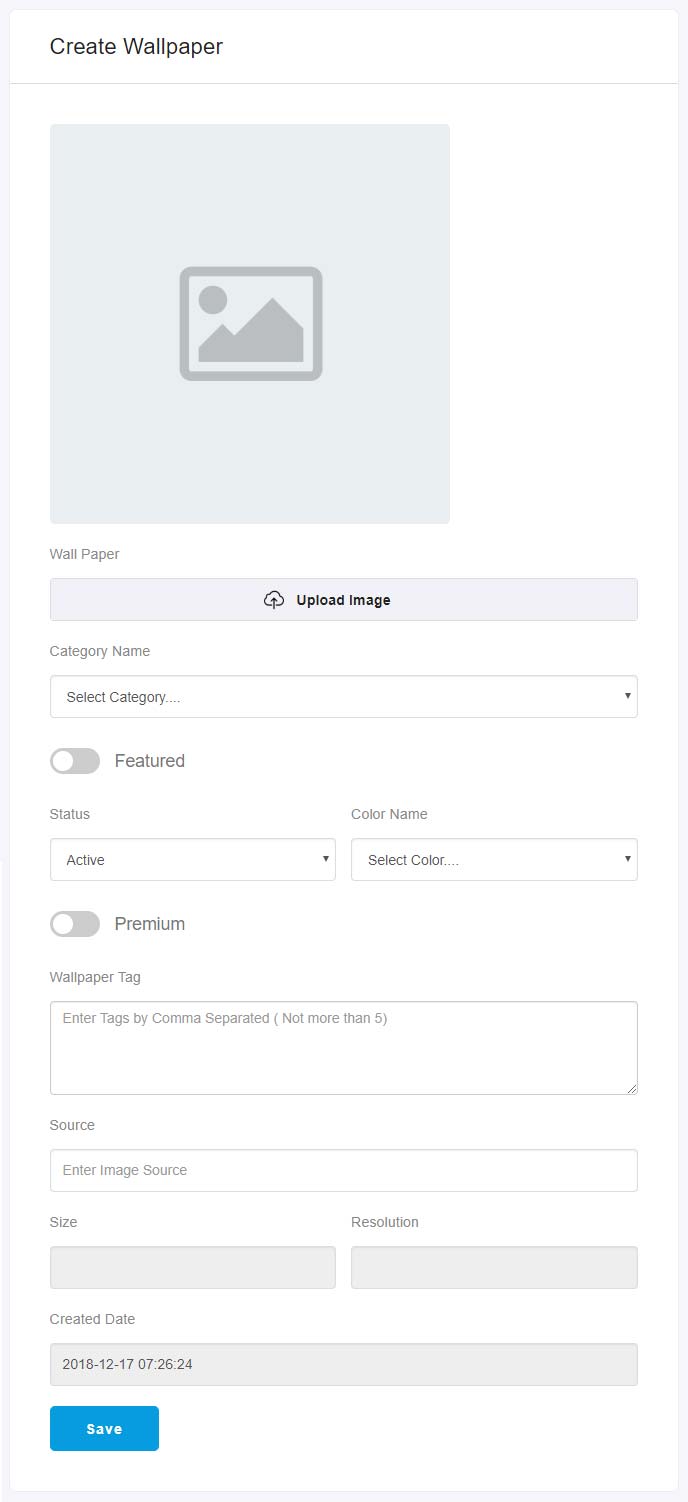
15.2Wallpaper
15.2.1Admin can upload different types of wallpapers.
15.2.2Admin must upload the wallpaper then it’s size and resolution are automatically inserted to the form.
15.2.3Then select the category, color.
15.2.4Select featured or not
15.2.5Set the status active, (if it is inactive ,then it will not display to the android app)
15.2.6Set premium or not (if premium then set the price of it)
15.2.7Add different types of tags (not more than 5) for search the wallpapers
15.2.8Set the source of wallpaper.
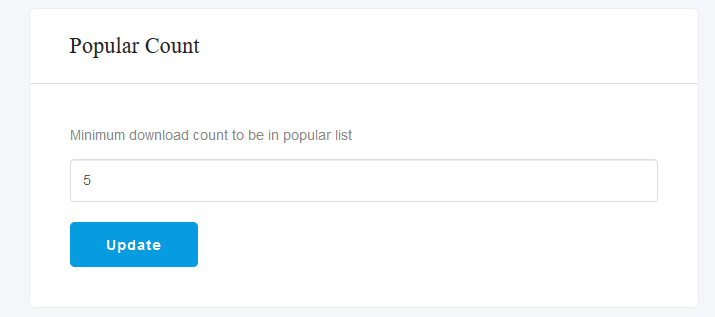
15.3Popular Count
15.3.1From the admin panel, you can set the popular count value.
15.3.2Popular Images: List of images that their download count must be
greater than or equal to popular count value.
15.4Daily Points
15.4.1Admin can set daily points value. When user’s request to get the daily point,
this value will be sent to the user.
15.5Banner Admob
15.5.1Admin can set the App IdApp Id and Add unit Id
from the admin panel for displaying the add in the android app.
15.6Video Admob
15.6.1 Admin can set the App Id and
Video unit Id from the admin panel for displaying the video add in the android app.
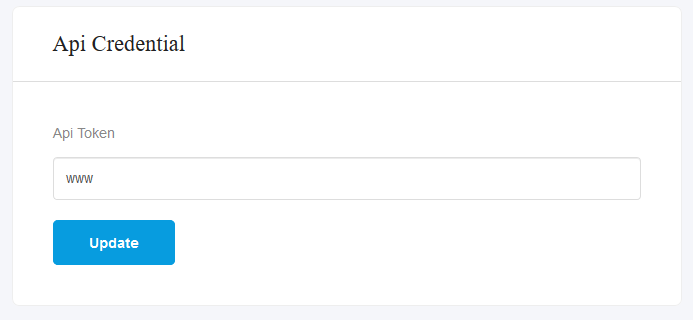
15.7Api Credential
15.7.1Admin can add the api credential from the admin panel.
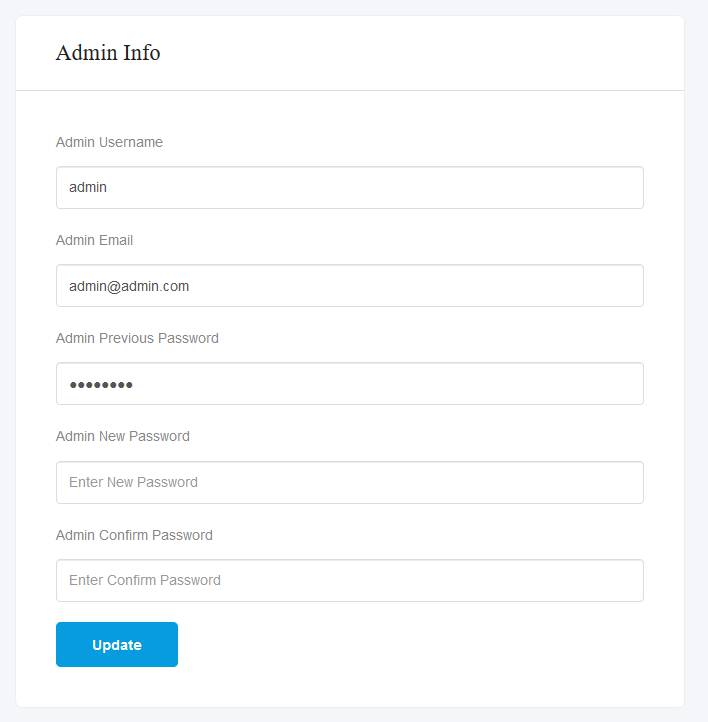
15.8Profile
15.8.1Admin can update the username, email and password from the profile section.
14.9Configuration
15.9.1Admin can easily update the site logo, title and tag title from the admin panel.