Bootic
An iOS eCommerce app with admin panel
by: W3 Engineers Ltd.
Email: info@w3engineers.com
At first thank you for purchasing this template. If you have any question or any problem
regarding
this template, feel free to Contact
us via
info@w3engineers.com.
1 - Introduction
Bootic is built with native Swift in XCode. It’s an iOS e-commerce app with admin panel.
It offers more than 17 pages and all are fully designed & keeping in mind to fit for any product types.
Bootic offers all required features, that can fulfil any modern application. It’s easy to customize,
You can use it as any type of stores like Fashion, Electronics, Grocery and Restaurant. You can customize any page as per your needs.
It follows all the standards to fulfil customer’s requirements.
2 - Folder Structure
2.1Unzip the file.
2.2You see the following folders:
Bootic_IOS
Bootic_Admin (admin panel files)
db.sql (sql file)
Server_Configuration_setup_process.mp4 (Video Tutorial)
3 - Requirements
XCode 10.0 or later(If you face any compiling error in XCode 10.0, Please try on XCode 11.0.)
iOS version 11.0 or later
PHP 7+
mysql database
We have made important steps yellow for up and running the project.
4 - Installation
4.1PHP version 7+ required(So update your Xampp control panel or install new
one).
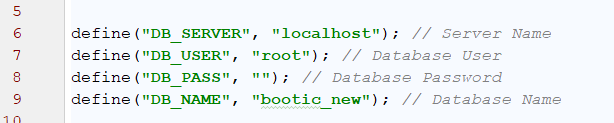
4.2Database Setup
In order to setting up database , first you create a database “db_name”.
Then you can easily import the db.sql file in your server.
Link the database to admin panel
For linking up, first you will find the file from this directory:
Insert the db_name (if it is empty),
username, password.
4.3Installation on Locally
Make sure that you have already installed Xampp control panel.
Copy the admin-panel folder and paste it in your
Xampp's htdocs folder.
Now run your Xampp Control Panel.
Create a database. Database name will be
"db_name" or any other name
Import the db.sql file in your created database.(db.sql file is
located in the Main_files.)
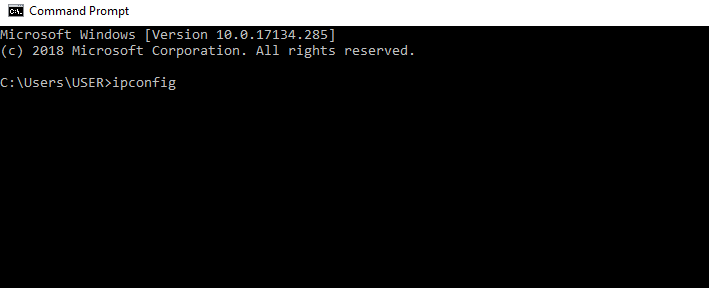
Find your pc ip address.
Open Command Prompt and type => ipconfig
Then find the IPv4 address (example: 192.168.2.88),copy the address
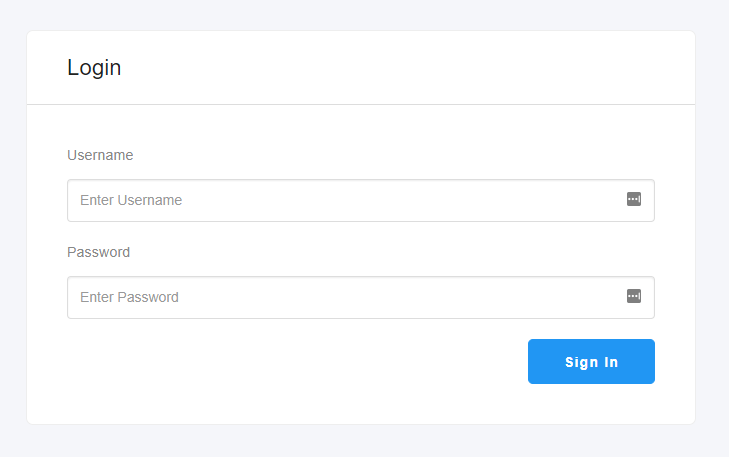
Open your browser.In your browser url type:
http://your_ip_address/bootic-admin
For example, my pc ip address is: 192.168.2.88
So the url will be: http://192.168.2.88/bootic-admin
If you see the admin login page, then admin-panel work successfully.
Username: admin
Password: 123456
4.4Installation on Server
To install it on the live server, First import the databse to the server.
Then copy the project folder and paste
it to your live server folder.
Please give the writeable 777 permission
to the following folders and the subfolders inside them:
public\uploads
public\uploads\thumb
Login as Admin:
UserName: admin
Password: 123456
5 - Installation of IOS
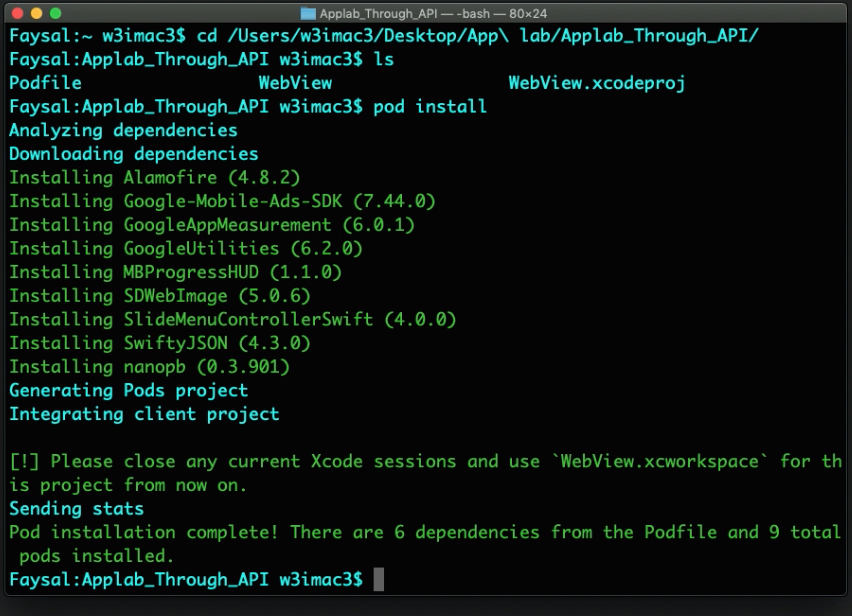
Then update your gem file with command
sudo gem install -n /usr/local/bin cocoapods
Then give your project path in
terminal cd /your project path
Run pod install command in terminal
Another new file will create named
Bootic.xcworkspace
Double click Bootic.xcworkspace to open
Project will open in XCode and you can
see two projects are their and expand both
Bootic contains full projects source code
and Pods contains library files
Open
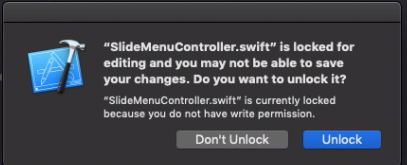
Bootic>Backup>CustomSlideMenuController.swift file. Select full source code and copy.
Then open
Pods>Pods>SlideMenuControllerSwift>SlideMenuController.swift file and select full code and paste here.
You can see a unlock popup will appear and select unlock.
Then remove the comment starting tag (/*)
from the beginning line and from the ending tag (*/) from the last line.
Cofigure through API
If you have a website to update information dynamically
then you don't need to add config file to project.
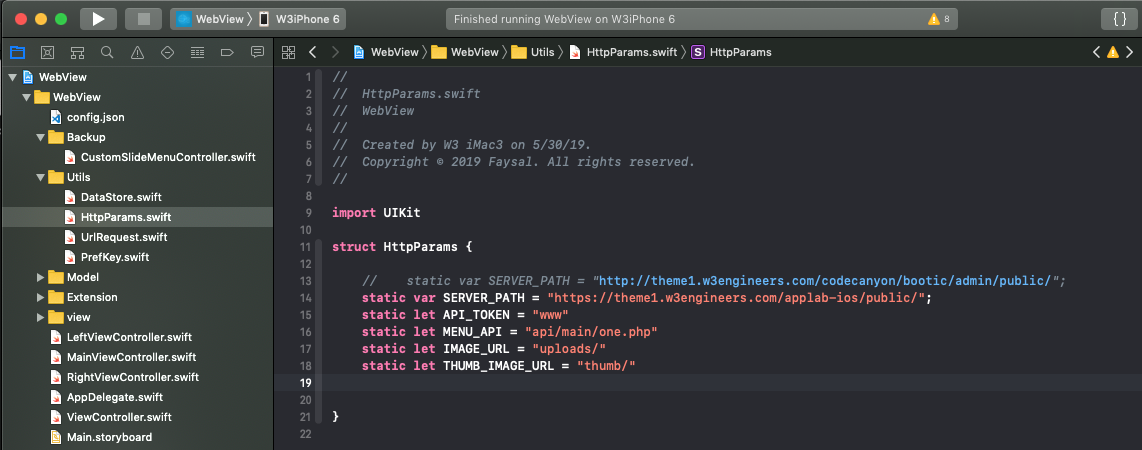
Open XCode project and open
Utils/Constants.swift file
You need to update
MAIN_URL and API_TOKEN
Select any simulator and Run the project
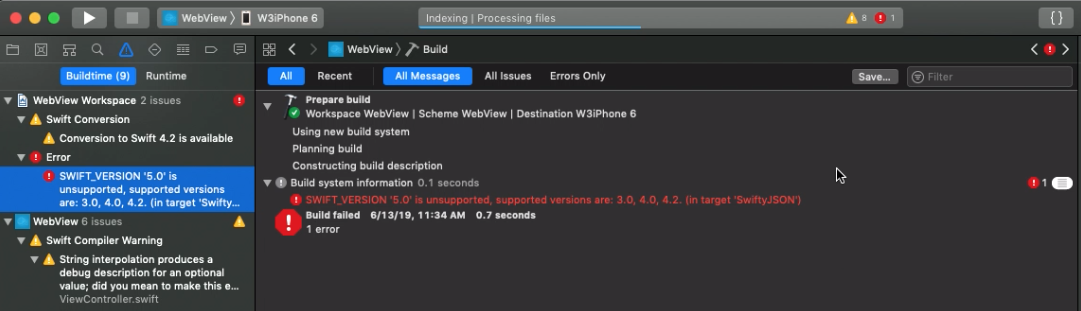
NB:During build if you face this issue
"SWIFT_VERSION '5.0' is unsupported, supported
versions are: 3.0, 4.0, 4.2. (in target 'SwiftyJSON')""
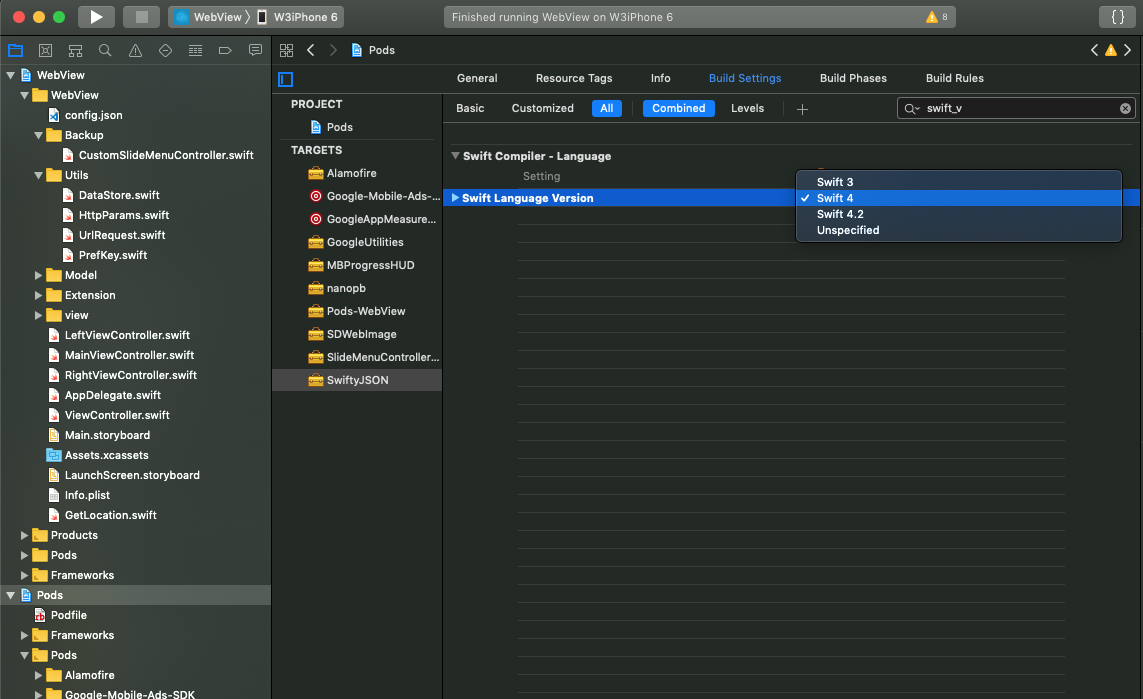
Then select Pods project and you can see all the
library you have used. Select SwftyJSON project and go build settings tab. In top
search box type swift_version and change the Swift Language Version Swift 4. Run Again.
6 - Customizing the App
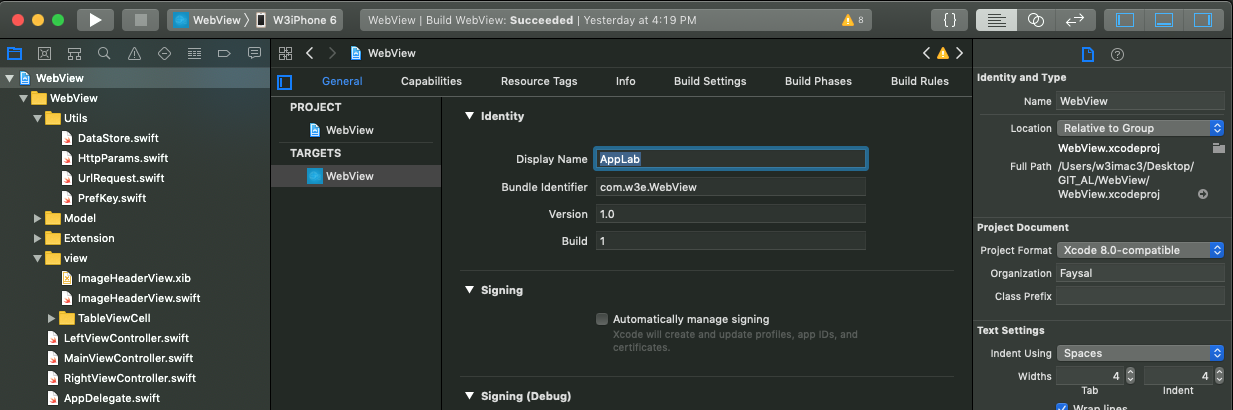
6.1Change app name and bundle identifier
Click project file from left and then choose General tab.
It will open settings for this project
Update Display Name for App Name and Bundle Identifier
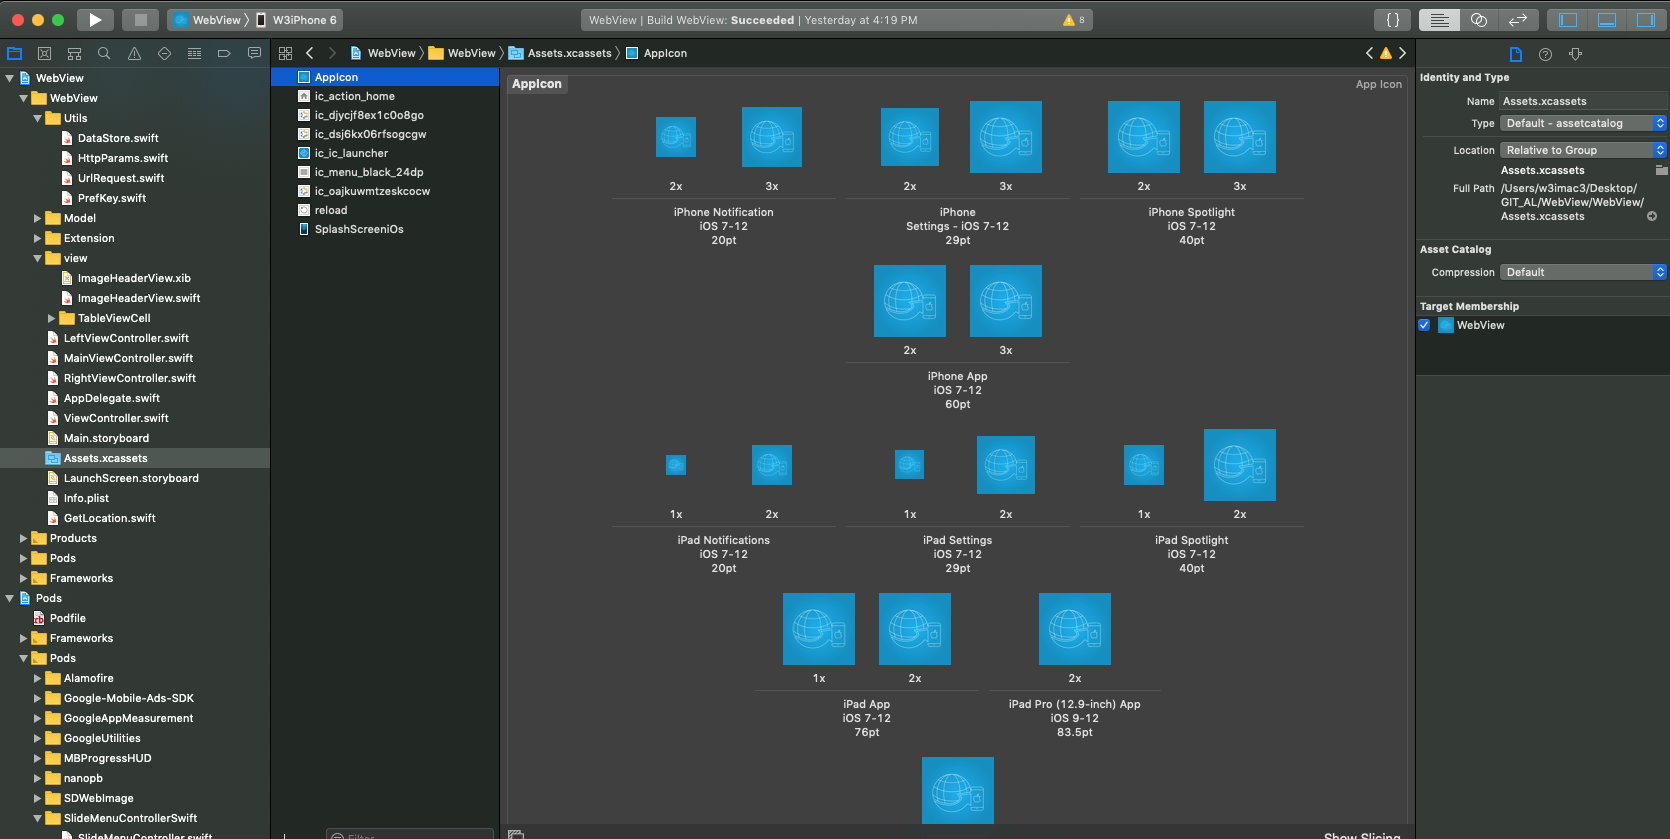
6.2Change App Logo
Open Assets.xcassets file and choose AppIcon on top.
Provide your app logo. This needs different size of image for
different device support. Try to update app fields.
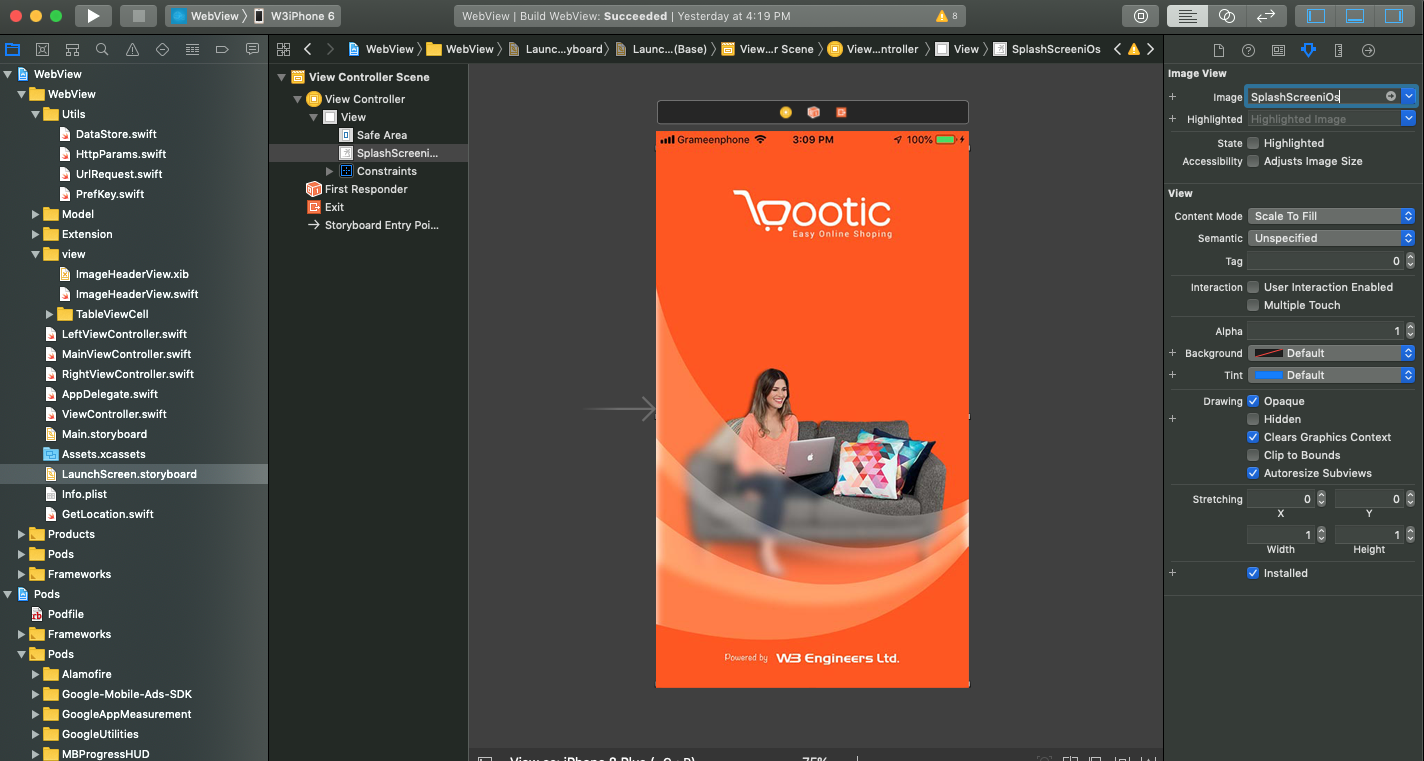
6.3Change Spalsh screen
Open LaunchScreen.storyboard file. This only used an full
screen image for now. You can simply redesign or change image from right side image option.
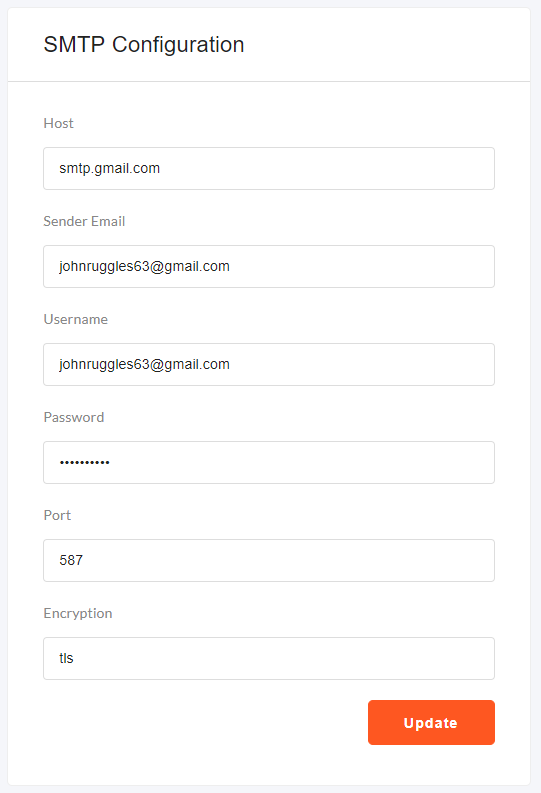
7 - SMTP Server Config
7.1To send the confirmation email and forgot password functionality
you have to configure your SMTP server. To configure the SMTP server,
click the SMTP Configuration menu from sidebar
and change the credentials of the SMTP server.
Host
Sender Email
Username
Password
Port
Encryption
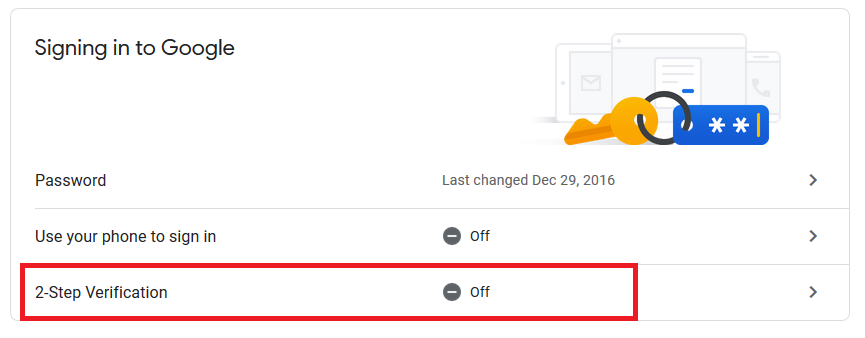
7.2Google SMTP Server Config
7.2.1Login to your Gmail account.
7.2.2Then visit the link:
https://myaccount.google.com/security
7.2.3In the security page, turn off the 2-step verification
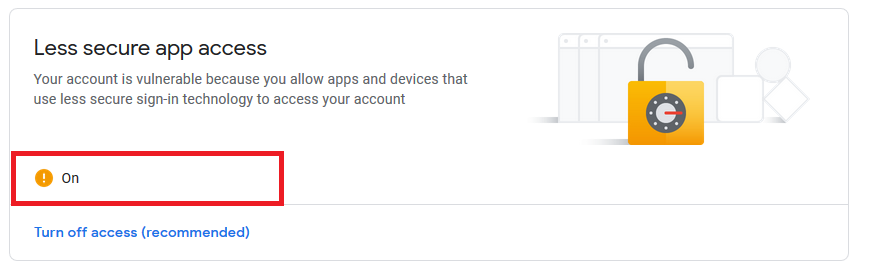
7.2.4Turn on the less secure app access
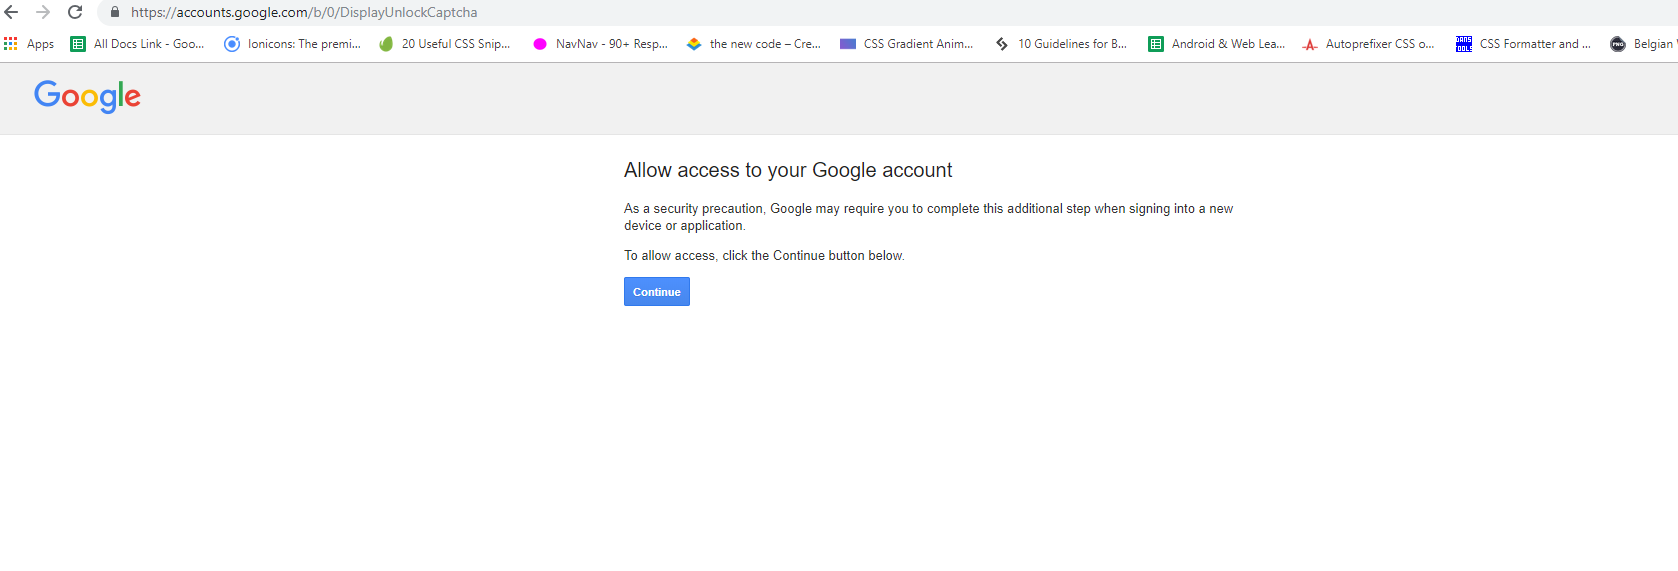
7.2.4Also visit the link:
https://accounts.google.com/b/0/DisplayUnlockCaptcha
and enable it.
8 - Admob Configuration
8.1Login with your Email id
8.2Go to this link
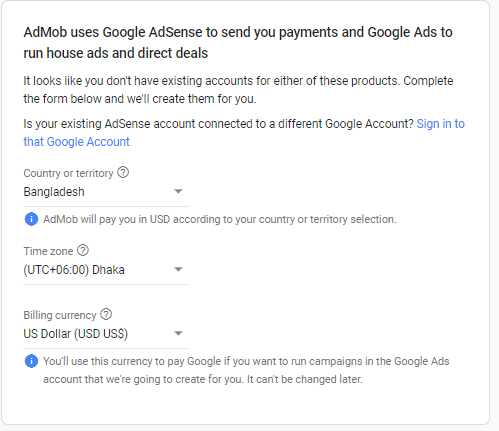
8.3If its your first app tghen you have to select your country,
timezone and currency
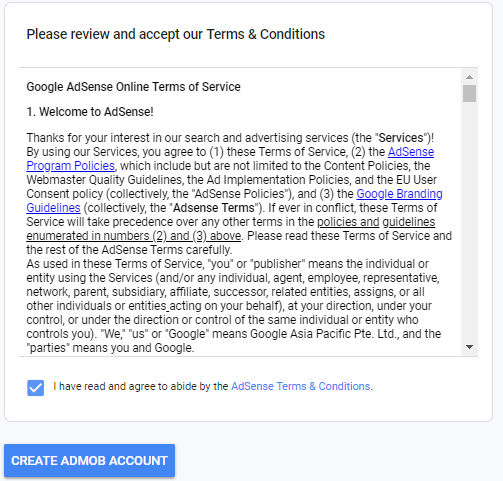
8.4Then you have to agree of the terms and condition and
Create Admob Account
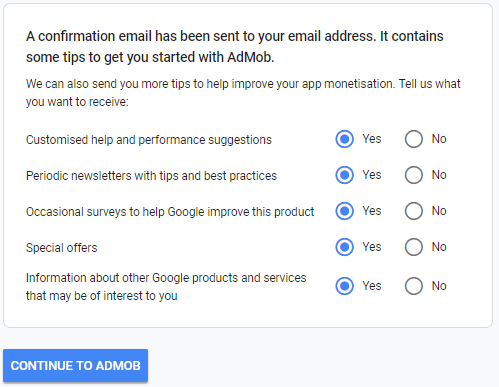
8.5Then you click Continue to Admob
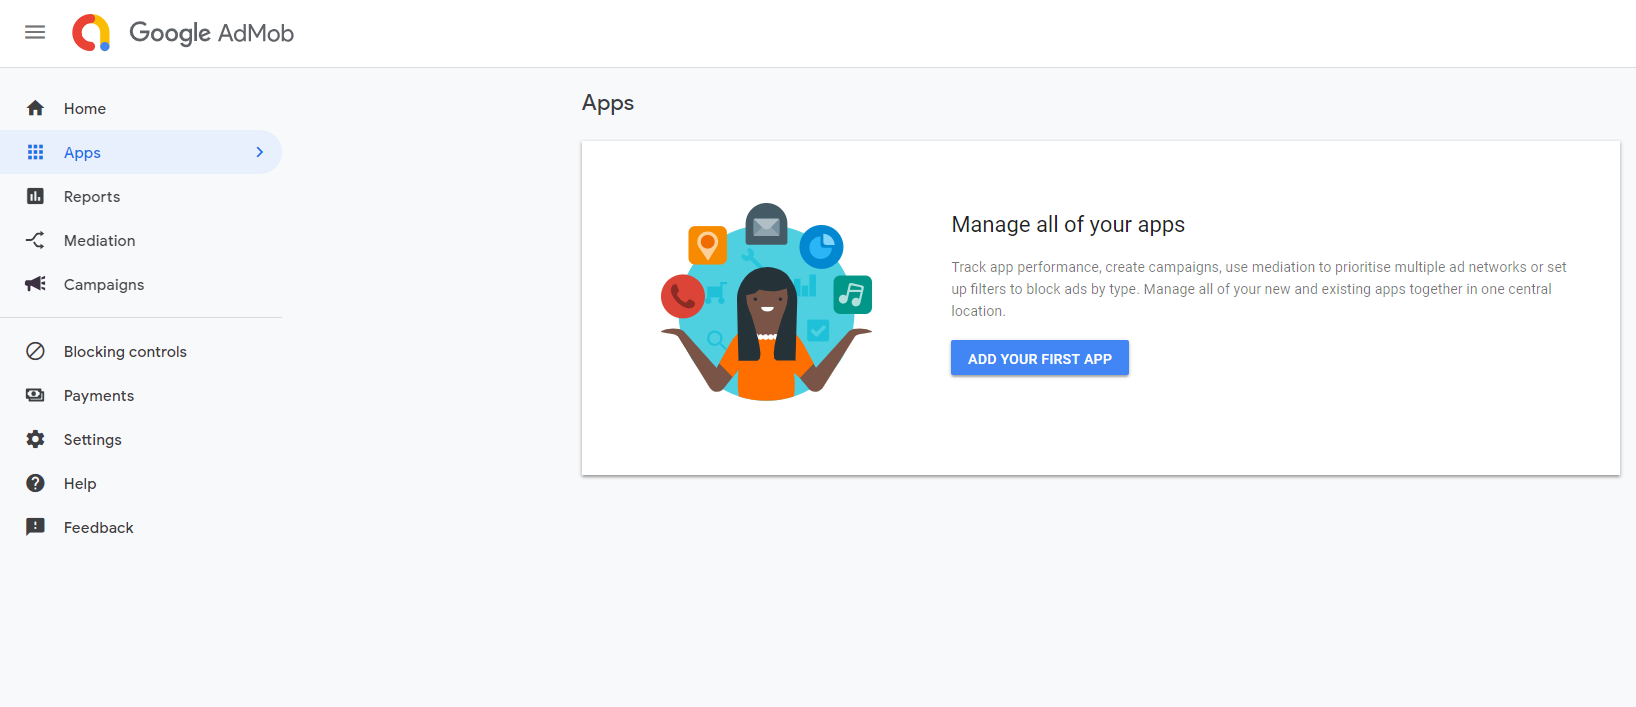
8.6Then you click App and Create your first app
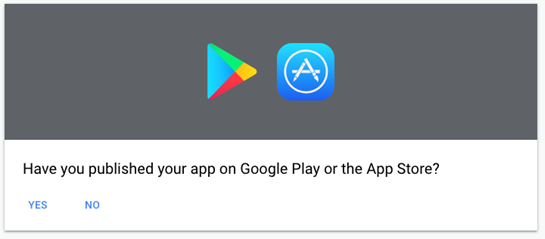
8.7If apps in play store then select yes otherwise no
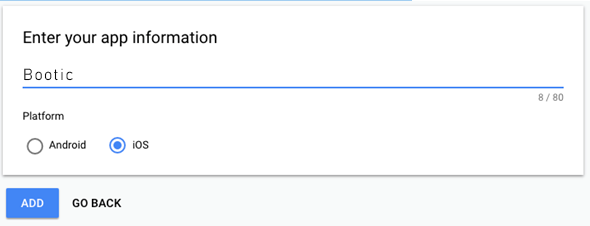
8.8Then provide app information and click add
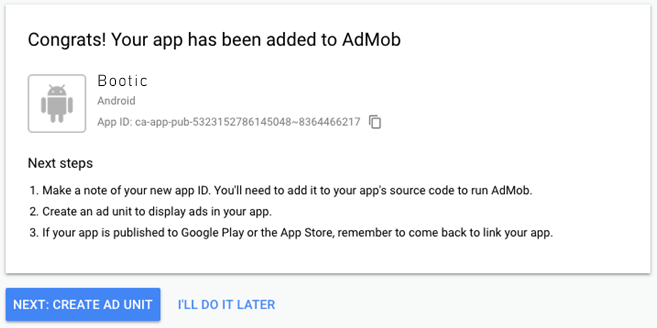
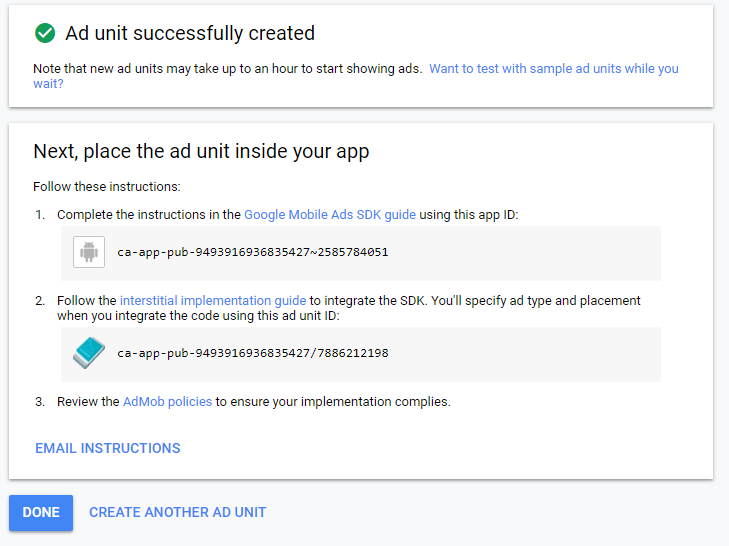
8.9Then you will get an App ID. Save it. You will need it later
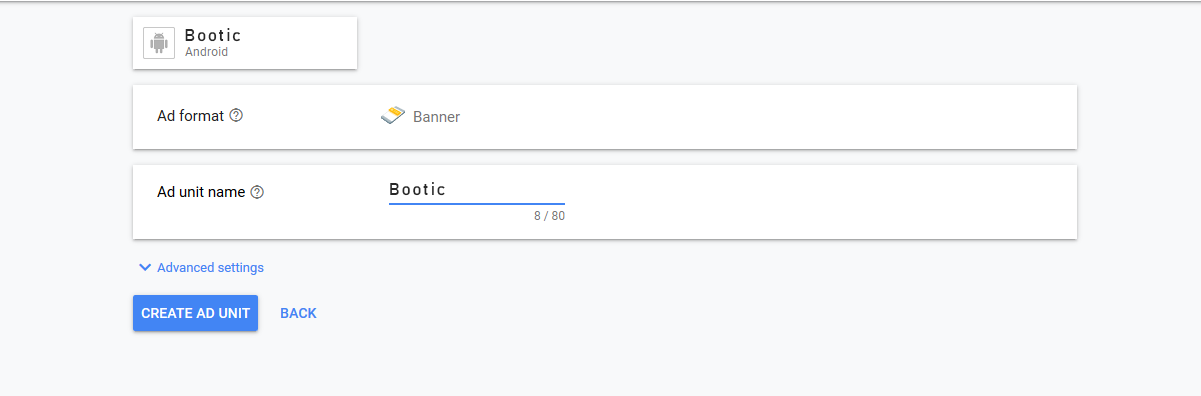
8.10Then click on ‘ CREATE AD UNIT ’ and you will find three type of
ads.
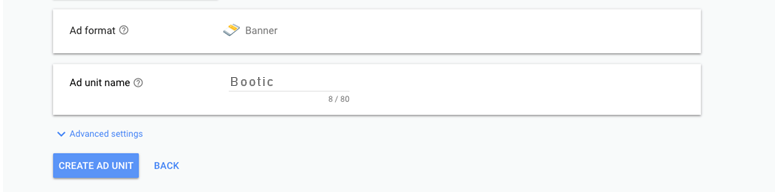
8.11Select banner. Provide ad unit name and click on ‘ CREATE AD UNIT ‘
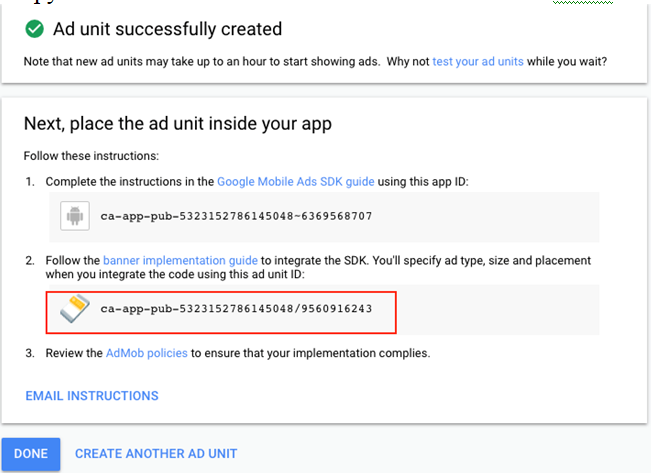
8.12Copy Banner ad unit id
and save it. You will need it later
8.13Then again go back and click ‘ ADD AD UNIT ’
8.14Select ‘ Interstitial ’ ad type.
8.15You will find a page like this. Provide ad unit name and select
‘ CREATE AD UNIT ’
8.16Copy ad unit id and save it . You will need it later .
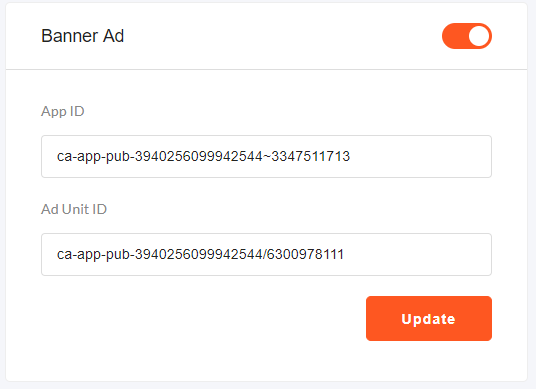
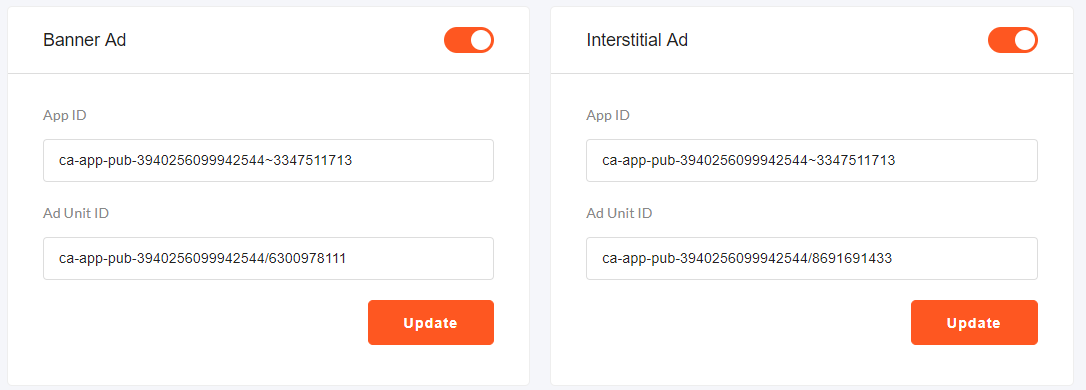
8.17Now get saved Admob App ID, Banner Ad Unit ID.
Then go to Admin Panel click Admob from sidebar. Put App ID and Ad Unit ID
in the Banner Ad in the admin panel.
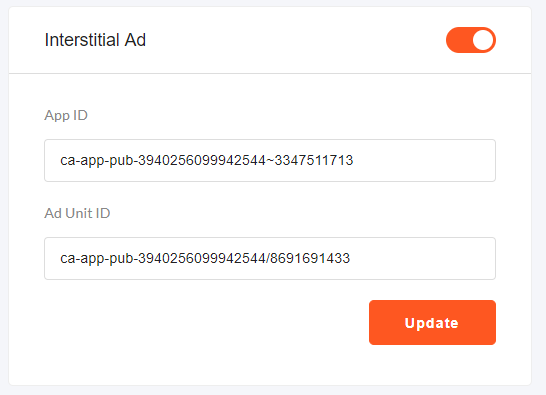
8.18Now get saved Admob App ID, Interstitial Ad Unit ID.
Then go to Admin Panel. Click Admob form sidebar. Put App ID and Ad Unit ID
in the Interstitial Ad in the admin panel.
8.19You can hide admob from the ap by clicking the on/off toggle button form the header.
9 - Publishing the app in Appstore
This one is very good and detailed updated instruction
https://codewithchris.com/submit-your-app-to-the-app-store/
If you prefere text only then you can use this one:
https://medium.com/macoclock/how-to-submit-ios-app-to-app-store-c1e801ff817b
Admin Panel
10 - Folder Structure of Admin Panel
10.1Inside the project folder, you will see the following directories that are important
to setup and customizing the admin panel.
10.2public directory: All the public files like outlook, uploaded images/videos, apis are inside this directory.
public\api : List of all apis.
public\common\php : Common files like header, footer, sidebar.
public\common\other : Custom Styte and Script file.
backend\plugin-frameworks: All the external style and javascript files.
backend\uploads: All the uploaded images.
10.3private directory: All the private files like models, controllers files are inside this directory.
private\controllers : All the controller files.
private\models : All the models.
private\vendor : External php scripts like phpmailer.
private\init.php : All the settings like database credential, uploaded folder name, item count for pagination.
Please make sure you have change the database credential in the
private/init.php file.
Please make sure you have set the writable 777 permission to the
public/uploads and public/uploads/thumb folder
11 - Functionality of Admin Panel
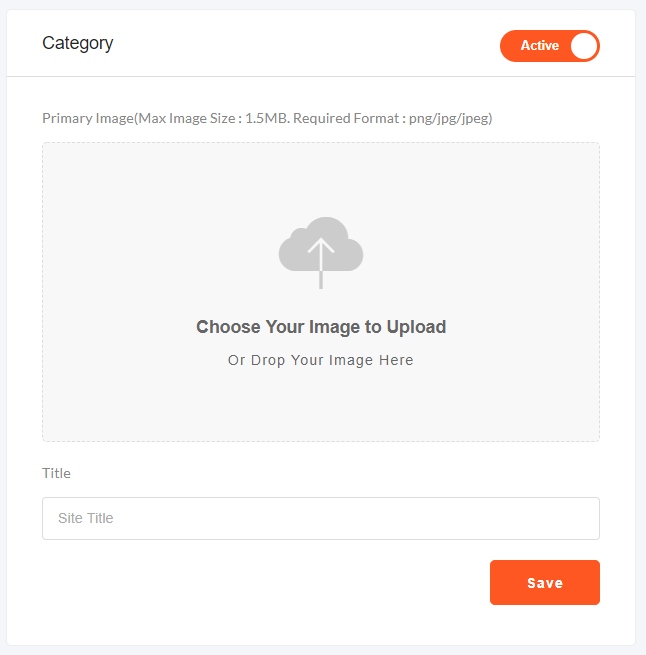
11.1Categories
Admin is able to add/update/delete categories form the admin panel.
To add category admin have to add an image and a set a title for the category.
11.2Attributes
Admin is able to add/delete/update product attributes.
To add attributes, admin have to set the title of the attribute and set the attribute value of the
attribute. Admin have to add comma separated attribute values in the attribute form.
Admin is able to change the attribute values form attribute page without loading the apge.
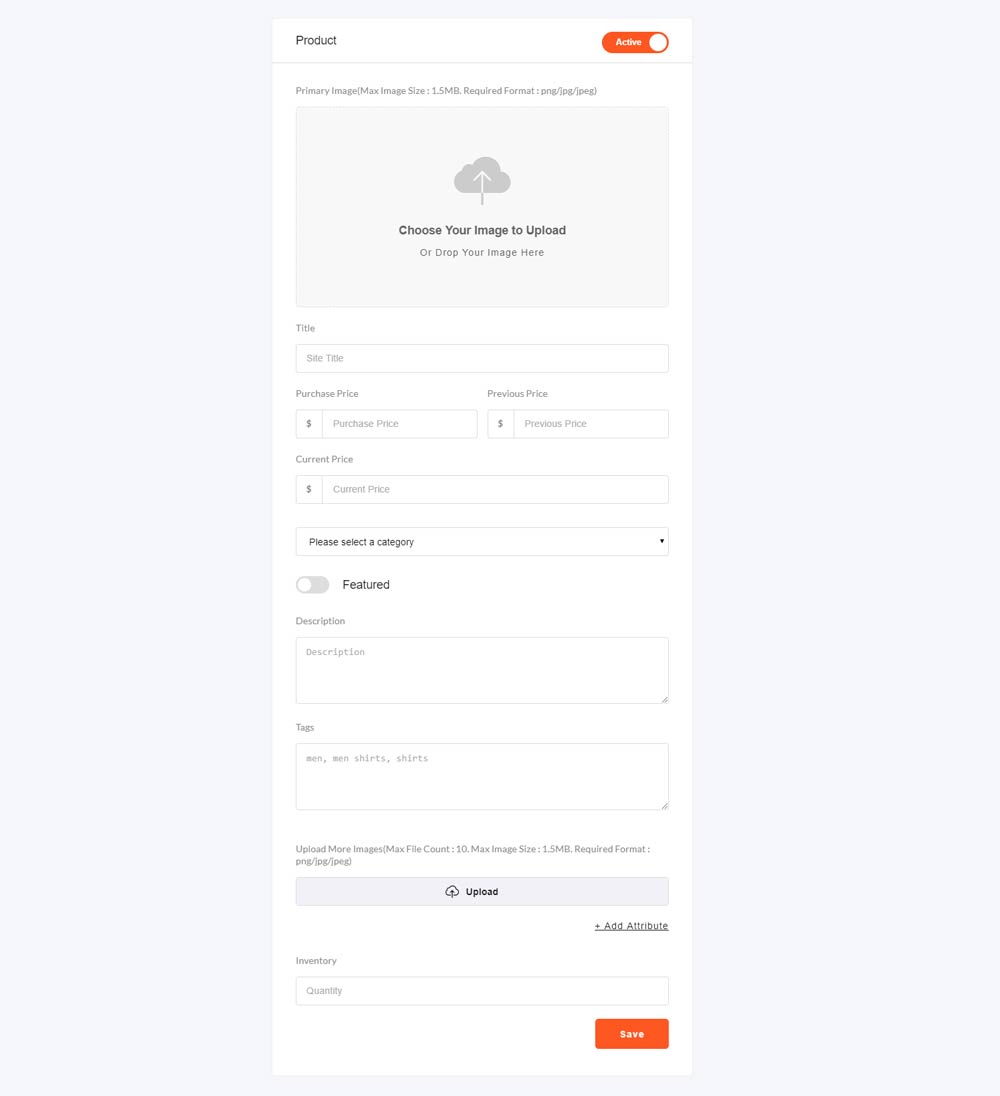
11.3Product
Admin is able to add/delete/update products.
To add a product admin has to upload a primary image. Put the purchase price, previous price(if have any)
and sellig price. Admin have to select the category, featured(Yes/No). Admi n have to put product description,
tags. Admin is able to upload multiple product images. And lastly admin have to set the inventory of the product.
From the Add Attribute button admin is able to add attributes and the quantity of the
product.
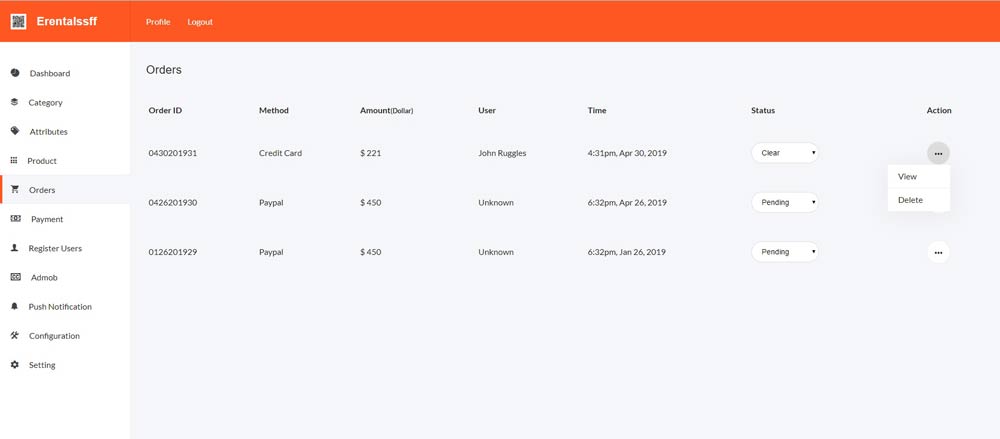
11.4Orders
Admin is able to view all the orders.
Admin can change the order status(Pending/Clear). Also admin is able to see the order details. Admin is
able to generate invoice in pdf format.
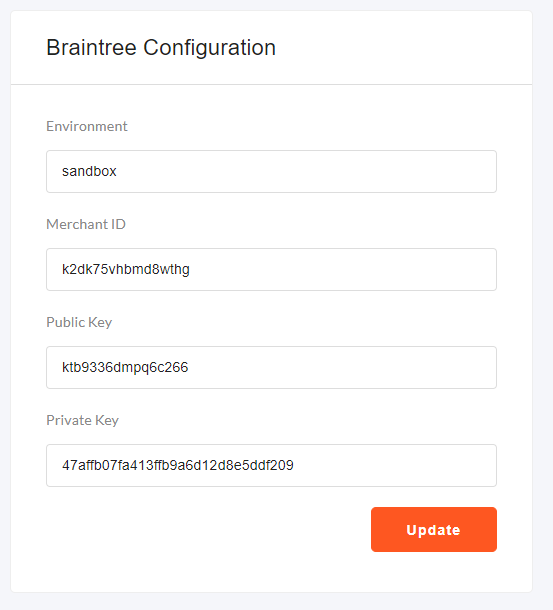
11.5Payment
We have integrated braintree payment method.
Admin has to put braintree credentials(Environment, Merchant ID, Public Key, Private Key) to the admin panel.
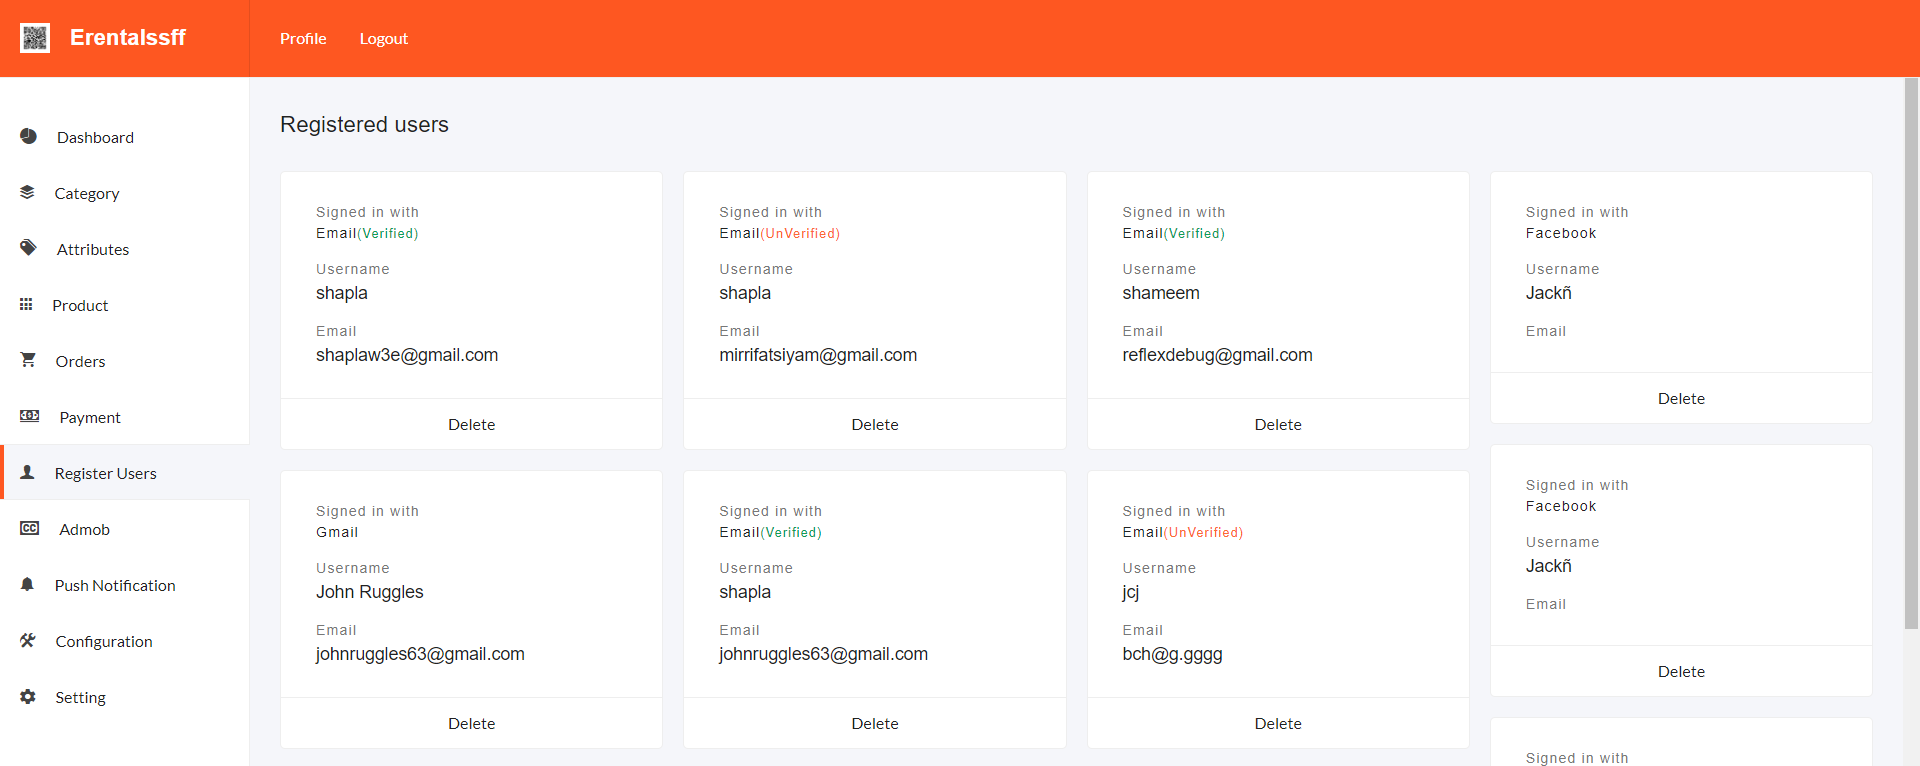
11.6Registered users
Admin is able to view/delete all the
registered users form Registered users menu.
11.7Google Admob
Admin can configure admob credentials from admin panel.
Also admin can on/off admin from the on/off button in the admob page.
11.8Push Notification
Admin can send push notification from the admin panel.
First, Admin have to put the AuthKey in the AuthKey field. Then create a notification
by inserting title and description. To send the notification admin have to send the notify button.
Note : Please follow the steps we described in
11 - Configure firebase for push Notification to configure push notification
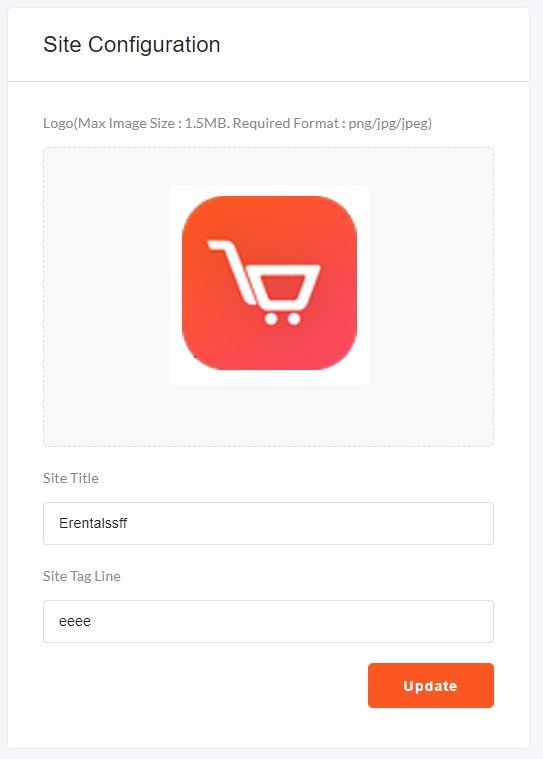
11.9Configuration
In the configuration page, admin will be able to change the icon, site title
and site tag line in the Site Configuration form.
Also, admin will be able to configure the smtp server
credentials for the user registration process from the app.
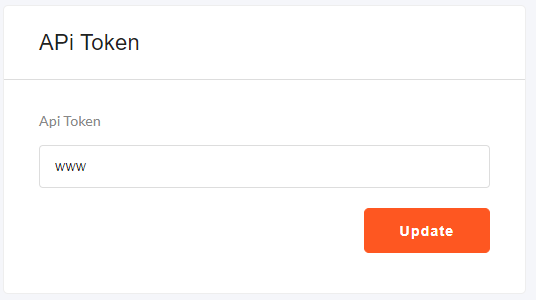
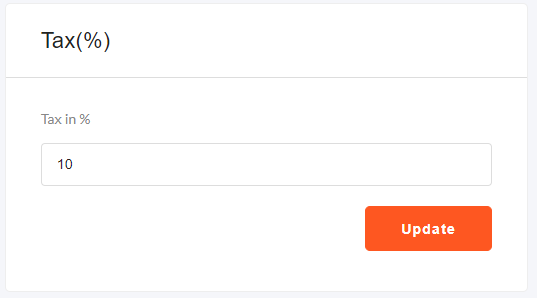
11.10Setting
From the setting page, Admin will be able to change the api key,
which used in the app.
Also, Admin will be able to change
the currency name and currency font
Also, Admin will be able to change
the TAX.